This guide will outline the instructions to Disable the Omnissa Horizon (formerly VMware Horizon) Session Bar. These instructions can be used to disable the Horizon Session Bar (also known as the Horizon Client Menu Bar or Shade Bar) for full screen Horizon VDI sessions.
Horizon Client Menu Bar (Shade)
The Horizon Client Menu Bar, or “Shade”, is the Session bar at the top of full screen VMware Horizon VDI Sessions.
This Menu Bar provides information on the connection, ability to send key sequences, connect USB devices, restart a VDI guest VM and more.
In same cases, users or administrators may want to disable the Shade.
Disable the Horizon Client Menu Bar (Shade)
There are multiple ways that you can disable the shade including using GPOs as well as the registry on client systems. Please note that if you are setting up clients in Kiosk mode, the shade will be automatically disabled and these instructions aren’t required.
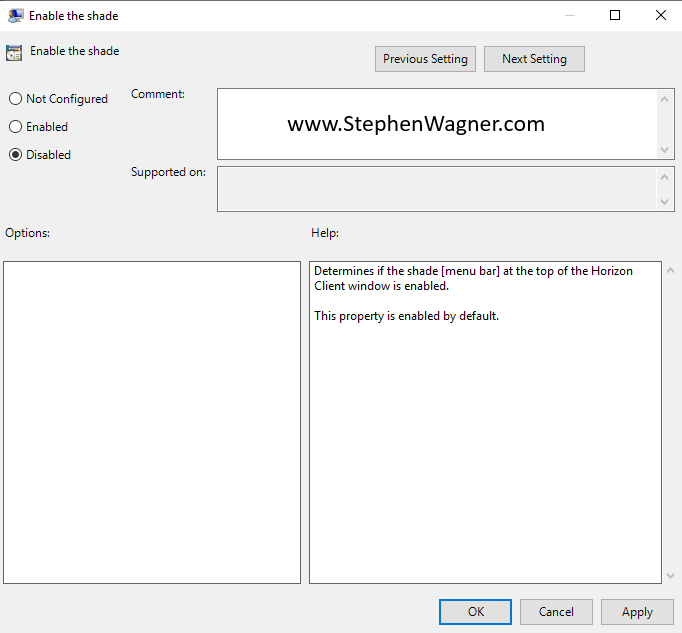
Disable Horizon Shade using GPO
To disable the Shade with GPOs, create a Group Policy Object (or edit the local group policy on the client system), and navigate to the following location:
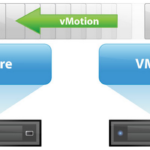
Normally, any VMs that are NVIDIA vGPU enabled have to be manually migrated with manual vMotion if a host is placed in to maintenance mode, to evacuate the host. While we may have grown accustomed to this, there is a better way, with vGPU Enabled VM DRS Evacuation during Maintenance mode!
A new feature that was introduced with vSphere 7.0 U3f, was the ability to configure and allow automatic vMotion of VMs with vGPUs, meaning that DRS can now migrate your VDI and AI/ML vGPU enabled workloads when hosts are placed in to maintenance mode. This also allows you to streamline remediation with vLCM when updating vGPU enabled hosts running vGPU enabled VMs.
Additionally, as of vSphere 8.0 U2, DRS can now estimate the STUN times required for vMotion of vGPU enabled VMs, and control whether automatic DRS vMotion’s are allowed. This STUN time limit can be set buy an administrator.
Enable automatic vMotion evacuation of vGPU enabled VMs
To enable the automatic vMotion of vGPU enabled VMs on your vSphere Cluster:
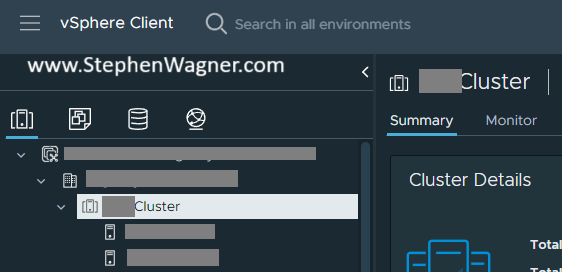
Navigate to your vSphere Cluster.
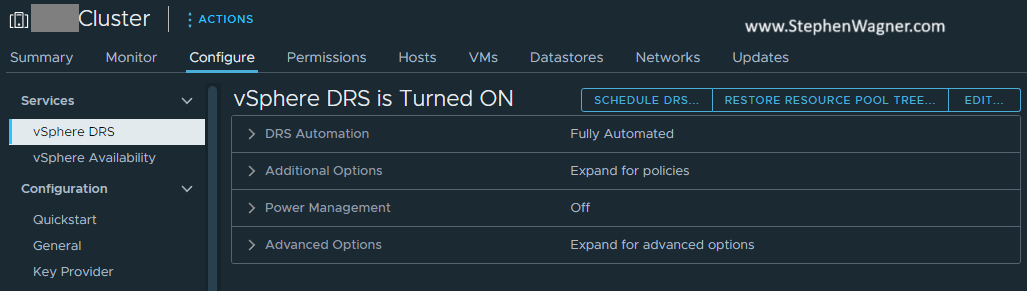
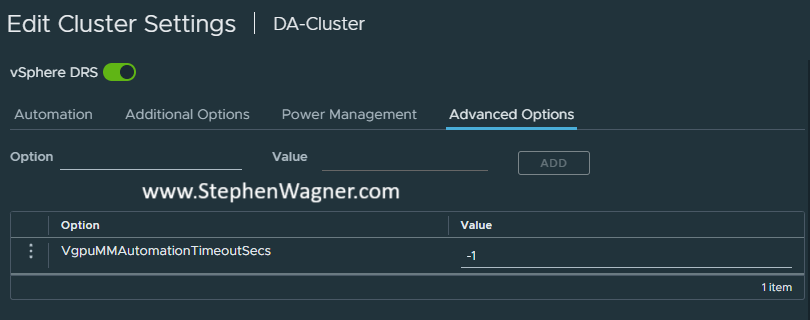
Click on the “Configure” Tab, and then select “vSphere DRS”, and click “Edit”.
Navigate to the “Advanced Options” tab.
Add “VgpuMMAutomationTimeoutSecs” and set to “-1”.
After performing the above, when you place a host with vGPU enabled Virtual Machines in to Maintenance Mode, vSphere DRS will evacuate and migrate the VMs to other hosts in the cluster that have the required hardware.
If you attempt to place a host in to Maintenance Mode without enabling automatic vMotion of vGPU enabled VMs, it will fail with the error: “DRS failed to generate a vMotion recommendation for a virtual machine on a host entering Maintenance Mode“.
Enable and Configure vGPU STUN Time Estimate and Limits
If you are running vSphere 8U2 or higher, you can enable vGPU STUN time estimation and limits for DRS on the vGPU enabled cluster. Similar to the instructions above, we can add and configure two variables to the vSphere DRS cluster “Advanced Options”.
To enable STUN time estimation, add PassthroughDrsAutomation and set to “1”.
To override the default vMotion STUN time limit of 100 seconds, add VmDevicesStunTimeTolerated and set it to your preferred maximum number of seconds. Alternatively, you can set this limit Per VM by navigating to the VM in vSphere and adding this variable under the “VM Options” “Advanced Settings” section.
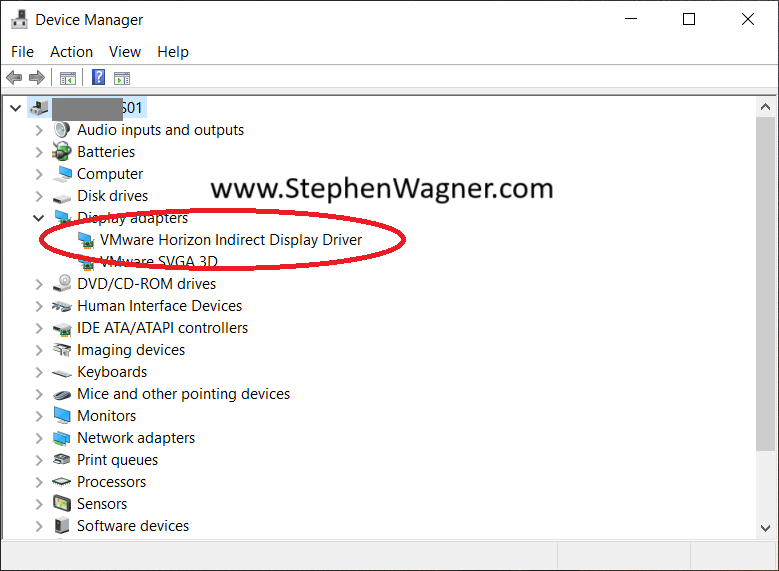
You may experience GPU issues with the VMware Horizon Indirect Display Driver in your environment when using 3rd party applications which incorrectly utilize the incorrect display adapter. This results with the inability to use and/or run GPU accelerated workloads including VDI, AI, and ML.
This issue effects NVIDIA vGPU (both vGPU and vDGA passthrough), AMD MxGPU, and Intel Data Center GPU Flex GPUs using SR-IOV, in any deployment where the VMware Indirect Display Driver is installed.
When this issue occurs, the application will incorrectly query the capabilities of the VMware Indirect Display Adapter instead of the GPU that is presented to the VM, resulting in a scenario where the application isn’t aware of the capabilities of the GPU you are utilizing, failing to utilize the GPU, and hardware acceleration, such as hardware encoding (NVENC) and hardware decoding.
What is the VMware Horizon Indirect Display Driver
The VMware Horizon Indirect Display Driver, also known as the VMware Indirect Display Driver, is a “virtual” display driver that isn’t bound to a specific hypervisor, and works with many deployments because of the lack of that limitation.
GPU Issues with the VMware Horizon Indirect Display Driver Enabled
This driver is installed with the VMware Horizon agent, and can work in conjunction with hardware acceleration, including GPUs (such as NVIDIA vGPU, AMD MxGPU, and Intel Data Center GPUs using SR-IOV).
Under normal circumstances, the VMware Horizon Indirect Display Driver is prioritized as a fallback driver for remoting protocols, except in environments where no hypervisor or GPU display drivers are available (like Horizon Cloud on Azure) in which case it would become the priority.
The Problem
Applications designed to use a GPU, may not be able to correctly identify which display adapter to use on the VM. While you may have a GPU, vGPU, or 3D acceleration in your environment, the application may be unaware of the device and/or its capabilities.
This is caused by the application either not correctly using the preferred primary display adapter (GPU and/or vGPU), or not being designed to handle multiple display adapters (and drivers).
Example Scenario:
When using CyberLink PowerDirector 360 in a VMware Horizon environment with an NVIDIA vGPU, the application will query the VM’s Windows instance for hardware acceleration capabilities, specifically hardware encoding, hardware decoding, and use of APIs like NVIDIA’s NVENC encoder. In this scenario, while the VM does have an NVIDIA vGPU workstation profile attached with a valid NVIDIA RTX Virtual Workstation (vWS) license, the application is only aware of the VMware Indirect Display Driver and it’s capabilities. This results in all hardware accelerated encoding and decoding capabilities to be disabled.
Example Symptoms
3D Acceleration not detected by application
CUDA Cores not available for application
OpenCL not available
DirectX and Direct3D usage unavailable
In all scenarios, the VM will appear to have 3D acceleration, however one or multiple applications won’t have access.
The Solution
Thanks to the design of the VMware Indirect Display Driver, it should be prioritized in a fashion that it’s used only when other display drivers aren’t available (including NVIDIA vGPU), or system resources aren’t available; however, some 3rd party application may not be able to reference the prioritization, or support multi-GPU (multi display driver), resulting in the incorrect display adapter being used.
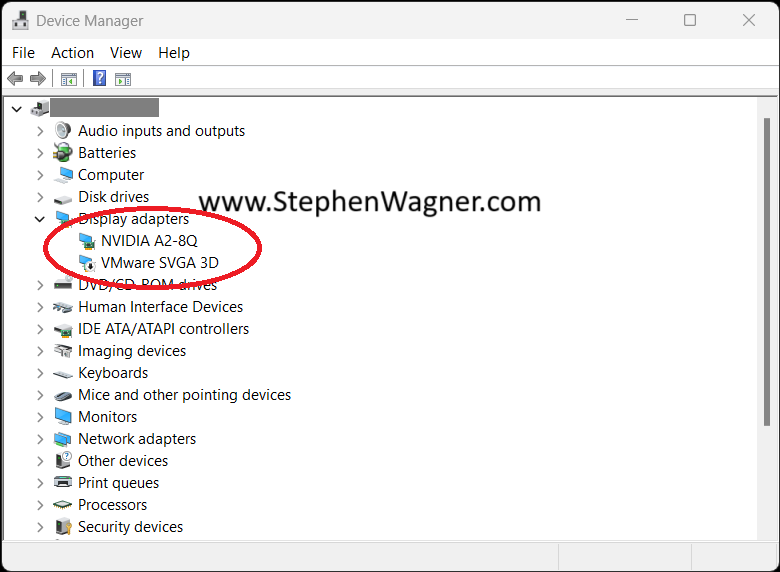
As a workaround, you can remove the VMware Indirect Display Driver from the Windows instance running in the VM.
NVIDIA vGPU with VMware Horizon Indirect Display Driver Removed
Please note that simply disabling the “VMware Horizon Indirect Display Driver” will not suffice. A full removal (Right Click, “Uninstall Device”) is required to workaround this issue. Additionally, upgrading or re-installing the VMware Horizon Agent will re-install the VMware Indirect Display Driver.
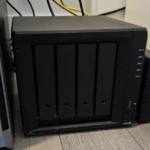
Today we’re going to cover a powerful little NAS being used with VMware; the Synology DS923+ VMware vSphere Use case and Configuration.
This little (but powerful) NAS is perfect for your VMware vSphere homelab and numerous other scenarios and uses. Let’s go over this specific use case, and how to best configure it with your VMware environment so you can fully take advantage of it.
Keep in mind that this post reviews only one of many potential uses, specifically with VMware vSphere (and ESXi). I’m hoping with time to review some other uses for this NAS.
Synology DS923+ VMware vSphere Use Case
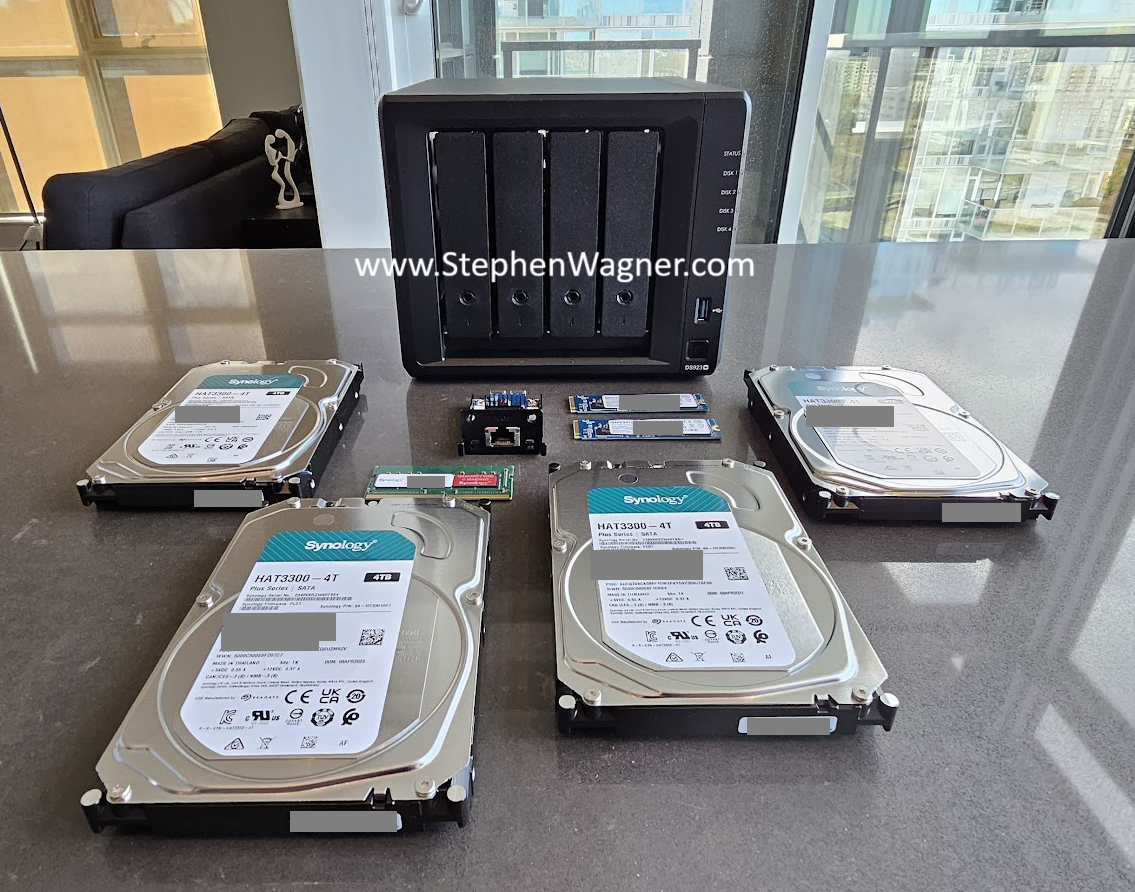
The Synology DS923+ is a tiny yet powerful 4-Bay NAS, offering 2x1Gb NICs built-in, with the ability to add in a user-installable 10Gb NIC module. You can also add 2 x NVME drives for NVME SSD cache, giving you the perfect iSCSI target, in our case particularly for VMware vSphere and ESXi.
Synology DS923+ w/ 10Gb NIC, Disks, and 2 x NVME SSD for Cache
The highlights of this specific unit and configuration:
NVME SSD Cache – Provides high speed storage (also good at random I/O)
Redundant NICs – 1 x 10Gig (add-on) and 2 x 1GB (built-in)
Looking at the networking capabilities, we have 3 NICs when the optional 10Gb NIC is installed. This gives us a number of different potential configurations, but for VMware vSphere, we’ll map out the following:
NIC #1 – 10Gig: iSCSI Primary *(and SMB if using VLAN interfaces)*
NIC #2 – 1Gig: Management (and SMB w/o VLAN interfaces)
NIC #3 – 1Gig: iSCSI Fallback
Note: You could add VLAN interfaces to your Synology device on the 10Gig interface, and use VLANs to provide SMB and other services over the 10Gig link as well. Please note that adding VLAN interfaces is unsupported and may cause issues (including when performing upgrades).
What’s particularly nice about this NAS is that for the price point you’re able to provide 10Gb iSCSI to your ESXi hosts, while also having a fallback connection for redundancy. While the fallback NIC is limited to 1Gig which is substantially slower, it does allow your workload to continue to run, and most importantly without corruption or loss of data due to an iSCSI paths down situation.
Synology DS923+ iSCSI Configuration for VMware vSphere
So now that we’ve established the use case for the Synology DS923+, lets go over how to best configure it for your VMware vSphere environment, and get it connected to your ESXi hosts.
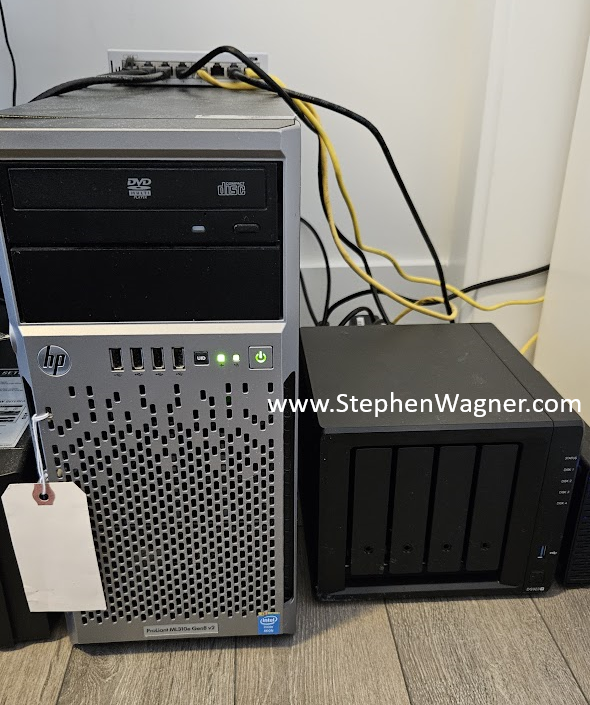
HPE Proliant Server running VMware ESXi with Synology DS923+
There’s a few things to note for the design of the configuration:
iSCSI should be using Jumbo Frames
Both the ESXi vmk iSCSI adapters and the iSCSI NIC on the Synology NAS
All iSCSI networking (switches) should have jumbo frames enabled
iSCSI Multi-pathing policy will be VMW_PSP_FIXED (Fixed Pathing)
We will NOT be using Round-Robin MPIO (VMW_PSP_RR)
Fixed pathing will be used with the 10Gig link being preferred, and 1Gig link acting as fallback
The Synology NAS iSCSI target should only be configured to listen and advertise on the iSCSI NICs (primary active and fallback)
Configure iSCSI on the Synology DS923+
To configure iSCSI on your Synology:
Perform Basic Configuration
Configure NAS
Configure Static IP for Management on 1Gb NIC Interface
Enable the 10Gb NIC Interface (For use with iSCSI Primary)
Configure a Static IP
Configure Jumbo Frames
Enable the 1Gb NIC Interface (For use as fallback iSCSI)
Configure a Static IP
Configure Jumbo Frames
Use the Synology “SAN Manager” to Configure the iSCSI Target
Create an iSCSI LUN and Target
Configure a LUN with your preferences (Thin provisioned, etc)
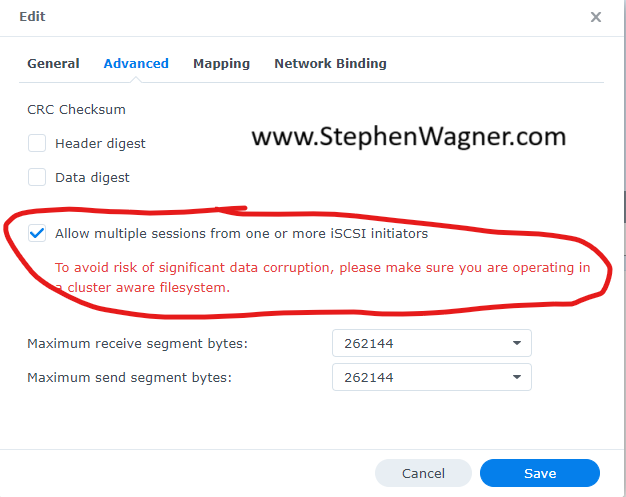
Configure the iSCSI Target
Enable “Allow multiple sessions from one or more iSCSI initiators” to allow multiple initiators to access (both from single hosts and/or multiple hosts)
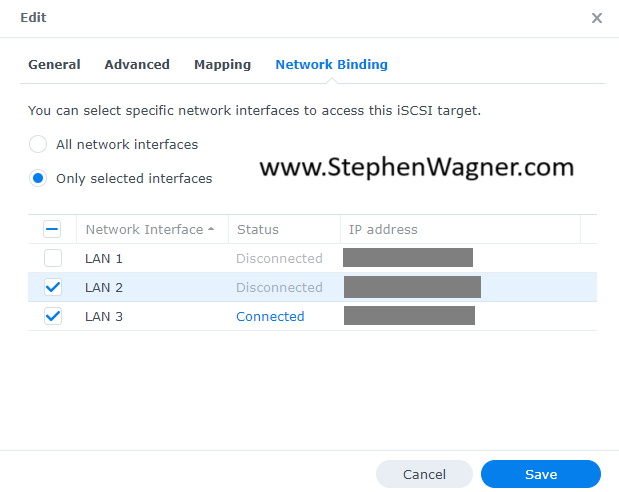
Configure “Network Binding” to the 10Gig Primary link and 1Gb fallback NIC. We do not want it to advertise on the management interface
Configure “Host” initiator settings
This is where you will add your iSCSI host initiator IQNs, and provide “Read/Write” access
Overall, this is a basic iSCSI target configuration, with the only exception is that we are only using select interfaces for iSCSI connections. While we can use both the 10Gb and 1Gb connections, we’ll use the host settings to only use the primary and have the secondary as a fall back.
Note that the networks (and IPs) used above for iSCSI are on a network dedicated to iSCSI. We do not want to use our data networks for storage related traffic. They are separated not only for security, but also because they are using different frame/MTU sizes.
Configure ESXi to connect to the Synology DS923+
To configure the Synology NAS iSCSI Target on your ESXi hosts:
Configure your ESXi host networking on your iSCSI Network
Configure Networking on your hosts
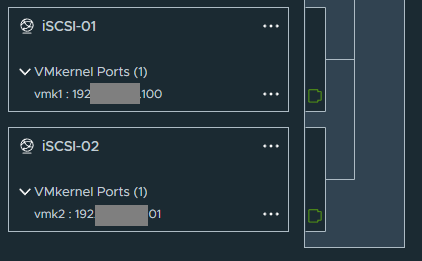
Configure your storage vSwitch and create a portgroup for each physical NIC
Configure a vmk adapter with IP for each portgroup you have
Configure each portgroup to only use one physical NIC as active, the rest unused
Each physical NIC should be used by only one portgroup
Configure your iSCSI Initiator
If not already enabled, “Add Software Adapter” under “Storage Adapters” to add the iSCSI Software Adapter initiator.
Note the “iSCSI Name”. This is your initiator IQN, and needs to be added to the Synology iSCSI Target “Host” settings to provide access and add permissions (last item listed in the previous section configuring the Synology NAS).
Add your Synology’s Primary iSCSI interface and Secondary Fallback iSCSI interface IP addresses to your ESXi hosts “Dynamic Discovery” list. Do not use “Static Discovery” as this will auto-populate.
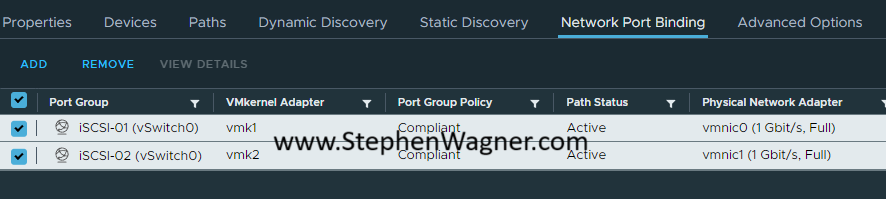
If you’re using the same IP subnet for all your iSCSI vmk adapters, enable iSCSI Port Binding.
Under “Network Port Binding”, click add, and select all your iSCSI vmk adapters which should auto-bind to the physical NIC owned by the port group they are using. They will not show active until you have completed all steps in this guide.
Configure your LUN
Rescan your storage adapters
If you already have a VMFS volume, it should auto-mount and be added to the host.
If you haven’t already, create a new datastore by right clicking on the host, “Storage”, and “New Datastore”. Follow the wizard to create a new VMFS volume on your Synology iSCSI target.
Configure proper fallback for the 10Gb and 1Gb link
On your ESXi hosts, under “Configure”, navigate to the “Storage Devices” tab, and identify all your “SYNOLOGY iSCSI Disk” devices.
For each “SYNOLOGY iSCSI Disk” device, under “Properties”, go to “Multipathing Policies”, “ACTIONS”, “Edit Multipathing”, and set it to “Fixed (VMware)”, while also setting the 10Gb path below under “Select the preferred path for this policy”.
Repeat steps for each ESXi host.
As always, I recommend doing a “Rescan Storage” after any storage related changes. You may need to restart the host after enabling iSCSI Port binding.
Conclusion
You have now configured your VMware ESXi host(s) to connect to your Synology DS923+ with multiple paths for redundancy while favoring the faster 10Gb connection.
Today we’ll go over how to install the vSphere vCenter Root Certificate on your client system.
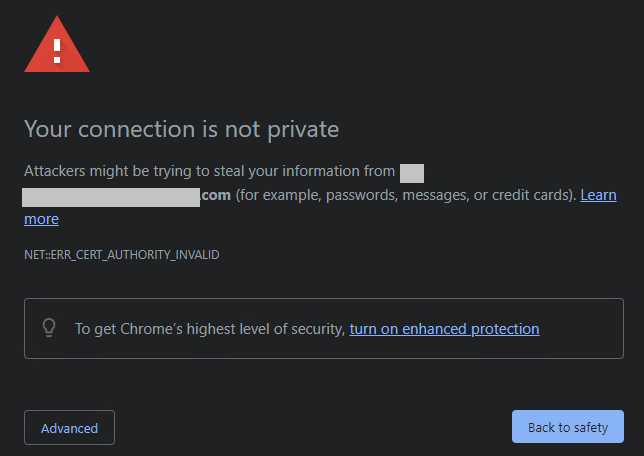
Certificates are designed to verify the identity of the systems, software, and/or resources we are accessing. If we aren’t able to verify and authenticate what we are accessing, how do we know that the resource we are sending information to, is really who they are?
Installing the vSphere vCenter Root Certificate on your client system, allows you to verify the identity of your VMware vCenter server, VMware ESXi hosts, and other resources, all while getting rid of those pesky certificate errors.
Certificate warning when connecting to vCenter vCSA
I see too many VMware vSphere administrators simply dismiss the certificate warnings, when instead they (and you) should be installing the Root CA on your system.
Why install the vCenter Server Root CA
Installing the vCenter Server’s Root CA, allows your computer to trust, verify, and validate any certificates issued by the vSphere Root Certification authority running on your vCenter appliance (vCSA). Essentially this translates to the following:
Your system will trust the Root CA and all certificates issued by the Root CA
This includes: VMware vCenter, vCSA VAMI, and ESXi hosts
When connecting to your vCenter server or ESXi hosts, you will not be presented with certificate issues
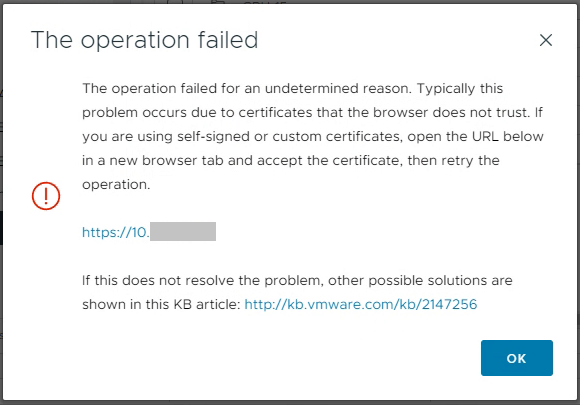
This includes errors when uploading files directly to a datastore
File Upload in vCenter to ESXi host operation failed
In addition to all of the above, you will start to take advantage of certificate based validation. Your system will verify and validate that when you connect to your vCenter or ESXi hosts, that you are indeed actually connecting to the intended system. When things are working, you won’t be prompted with a notification of certificate errors, whereas if something is wrong, you will be notifying of a possible security event.
How to install the vCenter Root CA
To install the vCenter Root CA on your system, perform the following:
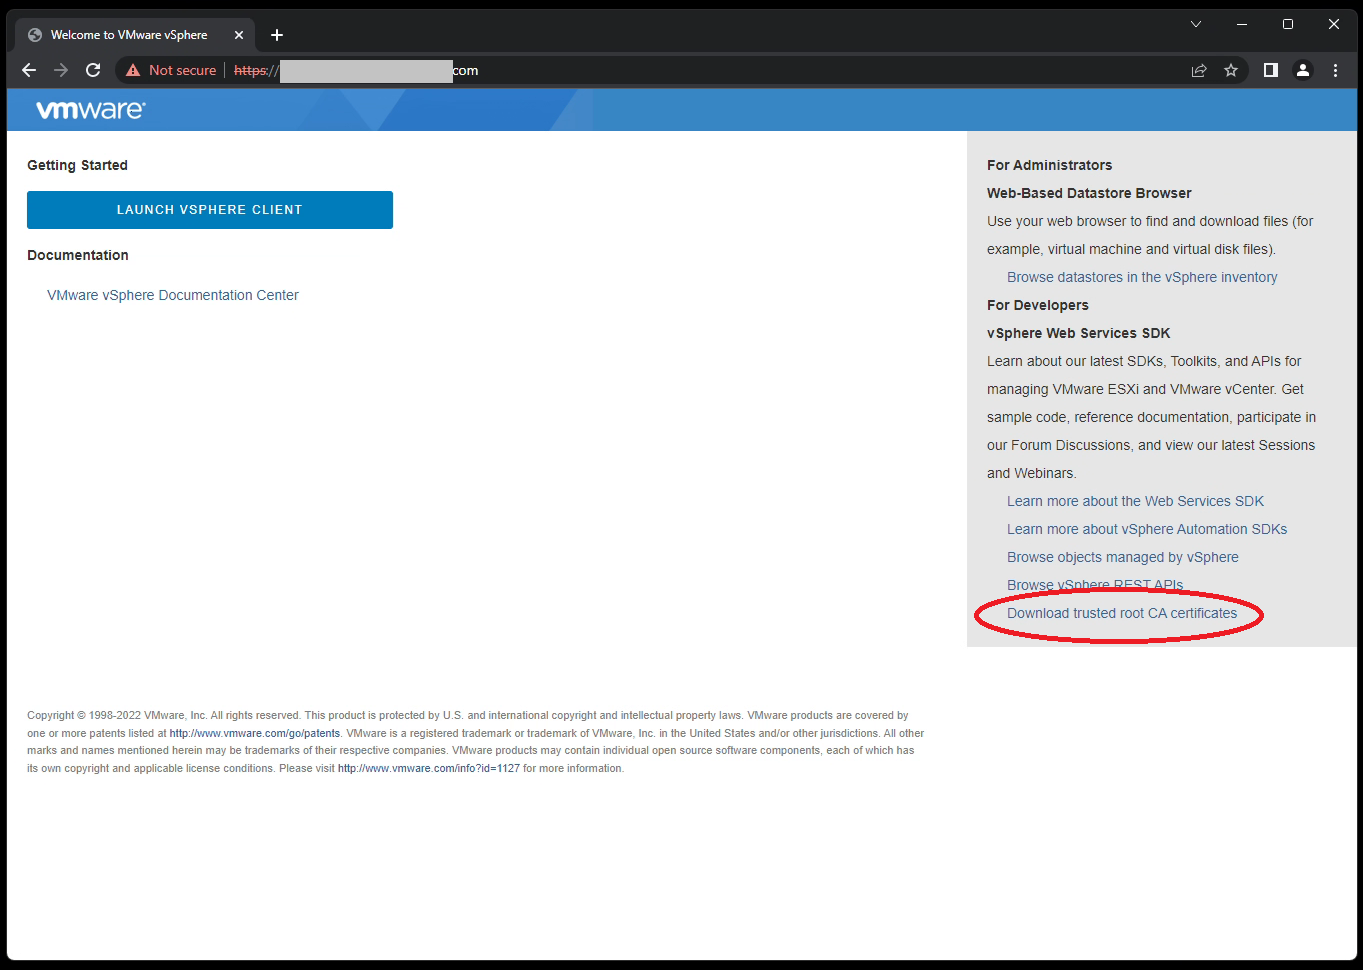
Navigate to your VMware vCenter “Getting Started” page.
This is the IP or FQDN of your vCenter server without the “ui” after the address. We only want to access the base domain.
Do not click on “Launch vSphere Client”.
Right click on “Download trusted root CA certificates”, and click on save link as.
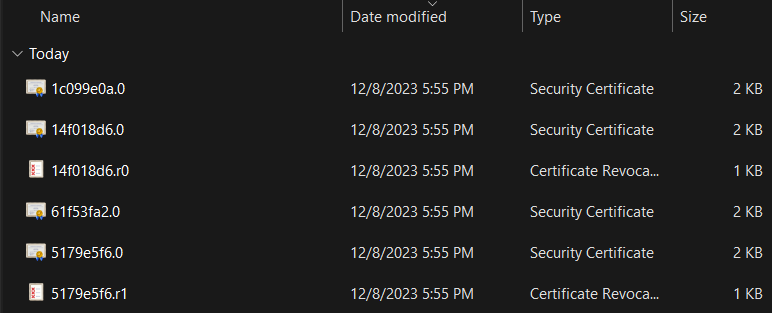
Save this ZIP file to your computer, and extract the archive file
You must extract the ZIP file, do not open it by double-clicking on the ZIP file.
Open and navigate through the extracted folders (certs/win in my case) and locate the certificates.
For each file that has the type of “Security Certificate”, right click on it and choose “Install Certificate”.
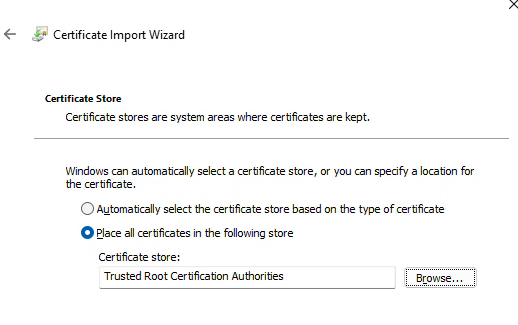
Change “Store Location” to “Local Machine”
This makes your system trust the certificate, not just your user profile
Choose “Place all certificates in the following store”, click Browse, and select “Trusted Root Certification Authorities”.
Complete the wizard. If successful, you’ll see: “The import was successful.”.
Repeat this for each file in that folder with the type of “Security Certificate”.
Alternatively, you can use a GPO with Active Directory or other workstation management techniques to deploy the Root CAs to multiple systems or all the systems in your domain.
This website uses cookies to improve your experience. We'll assume you're ok with this, but you can opt-out if you wish.
Do you accept the use of cookies and accept our privacy policy? AcceptRejectCookie and Privacy Policy
Privacy & Cookies Policy
Privacy Overview
This website uses cookies to improve your experience while you navigate through the website. Out of these cookies, the cookies that are categorized as necessary are stored on your browser as they are essential for the working of basic functionalities of the website. We also use third-party cookies that help us analyze and understand how you use this website. These cookies will be stored in your browser only with your consent. You also have the option to opt-out of these cookies. But opting out of some of these cookies may have an effect on your browsing experience.