I noticed after upgrading to VMware Horizon View 7.8 and VMware Unified Access Gateway 3.5, when attempting to log in to a VMware Horizon View Connection Server via the Horizon Client, I would get stuck on “Authenticating”. If using the HTML client, it would get stuck on “Logging in”.
This will either timeout, or eventually (after numerous minutes) finally load. This occurs both with standard authentication, as well as 2FA/MFA/RADIUS authentication.
The Problem
Originally, I thought this issue was related to 2FA and/or RADIUS, however after disabling both, the issue was still present. In the VDM debug logs, you may find something similar to below:
2019-03-19T16:07:44.971-06:00 INFO  (1064-181C)  UnManagedMachineInformation Wake-on-LAN packet sent to machine comp.domain.com

2019-03-19T16:07:34.296-06:00 INFO  (1064-17F0)  UnManagedMachineInformation wait ended for startup update, returning false
2019-03-19T16:07:34.296-06:00 INFO  (1064-17F0)  UnManagedMachineInformation Could not wake up PM comp.domain.com within timeout
The Fix
The apparent delay “Authenticating” or “Logging In” is caused by a Wake On LAN packet being sent to an unmanaged physical workstation that has the VMware View Agent installed. This is occurring because the system is powered off.
After powering on all unmanaged View agents running on physical computers, the issue should be resolved.
Upgrading to Exchange 2016 CU12 may fail when using Let’s Encrypt SSL Certificates
On a Microsoft Exchange 2016 Server, utilizing Let’s Encrypt SSL Certificates, an upgrade to Cumulative Update 12 may fail. This is due to security permissions on the SSL certificate.
I later noticed that this occurs on all cumulative updates when using the Let’s Encrypt SSL certificates. This includes Exchange 2016 CU13 and CU14.
The CU install will fail, some services may function, but the server will not accept e-mail, or allow connections from Microsoft Outlook, or ActiveSync devices. PowerShell and EAC will not function.
The issue can be identified on this failure log:
[02/18/2019 19:24:28.0862] [2] Beginning processing Install-AuthCertificate
 [02/18/2019 19:24:28.0867] [2] Ending processing Install-AuthCertificate
 [02/18/2019 19:24:28.0868] [1] The following 1 error(s) occurred during task execution:
 [02/18/2019 19:24:28.0868] [1] 0.  ErrorRecord: Could not grant Network Service access to the certificate with thumbprint XXXXXXXXXXXXXXXXXXXXXXXXXXXXXXXXXXXX because a cryptographic exception was thrown.
 [02/18/2019 19:24:28.0868] [1] 0.  ErrorRecord: Microsoft.Exchange.Management.SystemConfigurationTasks.AddAccessRuleCryptographicException: Could not grant Network Service access to the certificate with thumbprint XXXXXXXXXXXXXXXXXXXXXXXXXXXXXXXXXXXX because a cryptographic exception was thrown. ---> System.Security.Cryptography.CryptographicException: Access is denied.
 at Microsoft.Exchange.Security.Cryptography.X509Certificates.TlsCertificateInfo.CAPIAddAccessRule(X509Certificate2 certificate, AccessRule rule)
    at Microsoft.Exchange.Security.Cryptography.X509Certificates.TlsCertificateInfo.AddAccessRule(X509Certificate2 certificate, AccessRule rule)
    at Microsoft.Exchange.Management.SystemConfigurationTasks.ManageExchangeCertificate.EnableForServices(X509Certificate2 cert, AllowedServices services, String websiteName, Boolean requireSsl, ITopologyConfigurationSession dataSession, Server server, List`1 warningList, Boolean allowConfirmation, Boolean forceNetworkService)
    --- End of inner exception stack trace ---
    at Microsoft.Exchange.Configuration.Tasks.Task.ThrowError(Exception exception, ErrorCategory errorCategory, Object target, String helpUrl)
    at Microsoft.Exchange.Configuration.Tasks.Task.WriteError(Exception exception, ErrorCategory category, Object target)
    at Microsoft.Exchange.Management.SystemConfigurationTasks.InstallExchangeCertificate.EnableForServices(X509Certificate2 cert, AllowedServices services)
    at Microsoft.Exchange.Management.SystemConfigurationTasks.InstallExchangeCertificate.InternalProcessRecord()
    at Microsoft.Exchange.Configuration.Tasks.Task.b__91_1()
    at Microsoft.Exchange.Configuration.Tasks.Task.InvokeRetryableFunc(String funcName, Action func, Boolean terminatePipelineIfFailed)
 [02/18/2019 19:24:28.0883] [1] [ERROR] The following error was generated when "$error.Clear();
           Install-ExchangeCertificate -services "IIS, POP, IMAP" -DomainController $RoleDomainController
           if ($RoleIsDatacenter -ne $true -And $RoleIsPartnerHosted -ne $true)
           {
           Install-AuthCertificate -DomainController $RoleDomainController
           }
         " was run: "Microsoft.Exchange.Management.SystemConfigurationTasks.AddAccessRuleCryptographicException: Could not grant Network Service access to the certificate with thumbprint XXXXXXXXXXXXXXXXXXXXXXXXXXXXXXXXXXXX because a cryptographic exception was thrown. ---> System.Security.Cryptography.CryptographicException: Access is denied.
 at Microsoft.Exchange.Security.Cryptography.X509Certificates.TlsCertificateInfo.CAPIAddAccessRule(X509Certificate2 certificate, AccessRule rule)
    at Microsoft.Exchange.Security.Cryptography.X509Certificates.TlsCertificateInfo.AddAccessRule(X509Certificate2 certificate, AccessRule rule)
    at Microsoft.Exchange.Management.SystemConfigurationTasks.ManageExchangeCertificate.EnableForServices(X509Certificate2 cert, AllowedServices services, String websiteName, Boolean requireSsl, ITopologyConfigurationSession dataSession, Server server, List`1 warningList, Boolean allowConfirmation, Boolean forceNetworkService)
    --- End of inner exception stack trace ---
    at Microsoft.Exchange.Configuration.Tasks.Task.ThrowError(Exception exception, ErrorCategory errorCategory, Object target, String helpUrl)
    at Microsoft.Exchange.Configuration.Tasks.Task.WriteError(Exception exception, ErrorCategory category, Object target)
    at Microsoft.Exchange.Management.SystemConfigurationTasks.InstallExchangeCertificate.EnableForServices(X509Certificate2 cert, AllowedServices services)
    at Microsoft.Exchange.Management.SystemConfigurationTasks.InstallExchangeCertificate.InternalProcessRecord()
    at Microsoft.Exchange.Configuration.Tasks.Task.b__91_1()
    at Microsoft.Exchange.Configuration.Tasks.Task.InvokeRetryableFunc(String funcName, Action func, Boolean terminatePipelineIfFailed)".
 [02/18/2019 19:24:28.0883] [1] [ERROR] Could not grant Network Service access to the certificate with thumbprint XXXXXXXXXXXXXXXXXXXXXXXXXXXXXXXXXXXX because a cryptographic exception was thrown.
 [02/18/2019 19:24:28.0883] [1] [ERROR] Access is denied.
 [02/18/2019 19:24:28.0883] [1] [ERROR-REFERENCE] Id=CafeComponent___ece23aa8c6744163B617570021d78090 Component=EXCHANGE14:\Current\Release\Shared\Datacenter\Setup
 [02/18/2019 19:24:28.0895] [1] Setup is stopping now because of one or more critical errors.
 [02/18/2019 19:24:28.0895] [1] Finished executing component tasks.
 [02/18/2019 19:24:28.0925] [1] Ending processing Install-CafeRole
 [02/18/2019 19:35:09.0688] [0] CurrentResult setupbase.maincore:396: 0
 [02/18/2019 19:35:09.0689] [0] End of Setup
The Fix
Unfortunately because Exchange is not working, you won’t be able to use Powershell or the EAC to configure SSL certs.
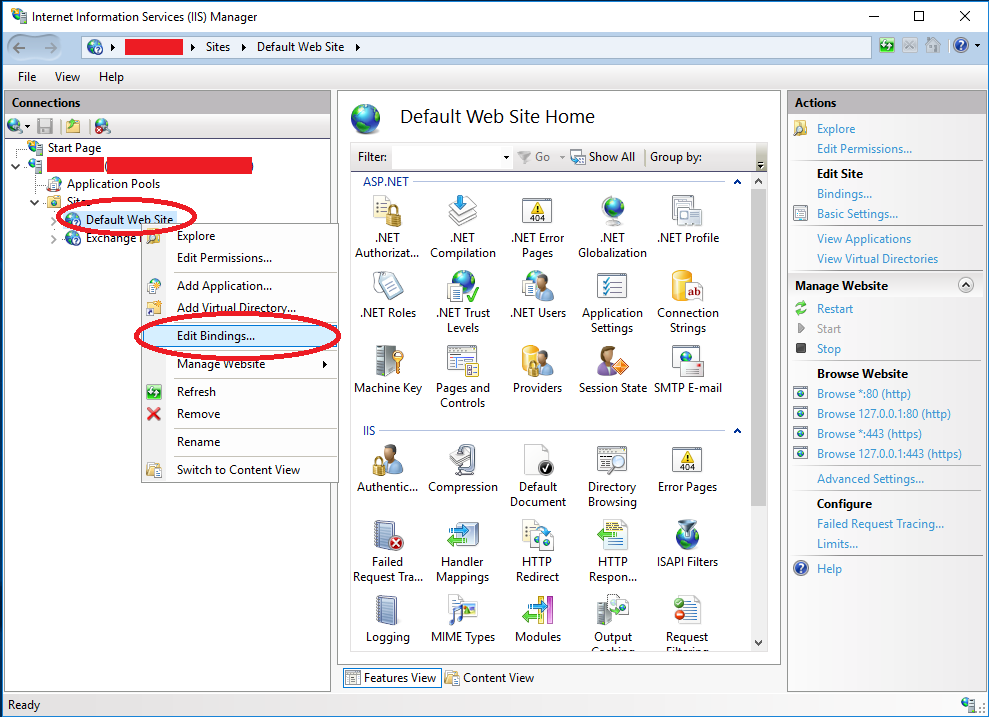
To resolve this, open up the IIS Manager, right click on the Exchange Web Site, click “Edit Bindings”
IIS Exchange Edit Bindings
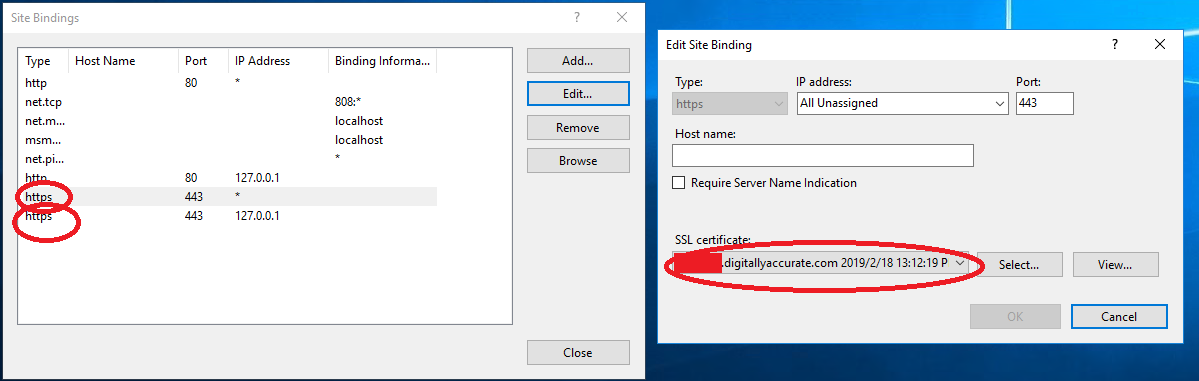
Once the “Edit Bindings” windows is open, you’ll want to open BOTH https bindings, and click “Edit”, and then change the SSL Certificate from the Let’s Encrypt SSL cert, to the self-signed Exchange certificate that ships on the brand new install. The self-signed certification most likely will be labelled as the computer name.
Exchange SSL Bindings
If you configured the Let’s Encrypt SSL certificate on the “Exchange Backend” IIS site, you’ll also need to repeat these steps on that as well.
You can now restart the server, run the “setup.exe” on CU12 again, and it will attempt to continue and repair Exchange 2016 Cumulative Update 12.
Final Note
After the update is complete, you’ll want to restart the server. You’ll notice that the acme script, whether run automatically or manually, will not set the Let’s Encrypt certificate up again (because it’s not due for renewal). You’ll need to run the letsencrypt.exe file, and force an auto renewal which will kick off the Exchange configuration scripts (or you can manually set the certificate if you’re comfortable applying Exchange SSL certificates via PowerShell.
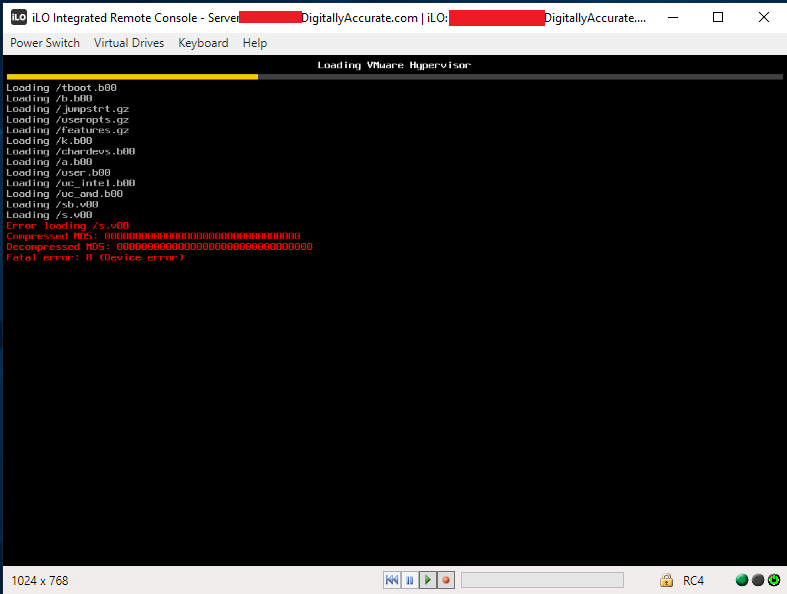
Unable to boot ESXi from USB or SD Card on HPE Proliant Server
After installing HPE iLO Amplifier on your network and updating iLO 4 firmware to 2.60 or 2.61, you may notice that your HPE Proliant Servers may fail to boot ESXi from a USB drive or SD-Card.
This was occuring on 2 ESXi Hosts. Both were HPE Proliant DL360p Gen8 Servers. One server was using an internal USB drive for ESXi, while the other was using an HPE branded SD Card.
The issue started occuring on both hosts after a planned InfoSight implementation. Both hosts iLO controllers firmware were upgraded to 2.61, iLO Amplifier was deployed (and the servers added), and the amplifier was connected to an HPE InfoSight account.
Update – May 24th 2019: As an HPE partner, I have been working with HPE, the product manager, and development team on this issue. HPE has provided me with a fix to test that I have been able to verify fully resolves this issue! Stay tuned for more information!
Update – June 5th 2019: Great news! As Bob Perugini (WW Product Manager at HPE) put it: “HPE is happy to announce that this issue has been fixed in latest version of iLO Amplifier Pack, v1.40. To download iLO Amplifier Pack v1.40, go to http://www.hpe.com/servers/iloamplifierpack and click “download”.” Scroll to the bottom of the post for more information!
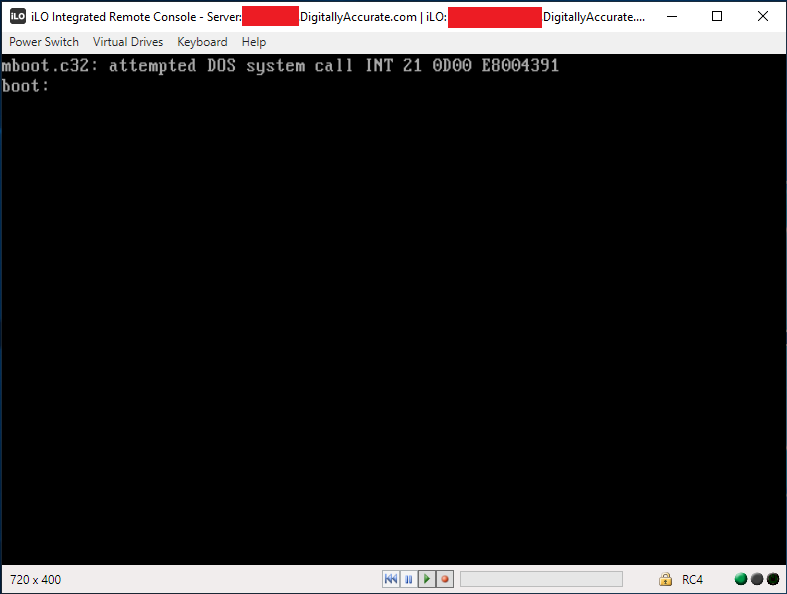
mboot.c32: attempted DOS system call INT 21 0d00 E8004391
 boot:
Symptoms
This issue may occur intermittently, on the majority of boots, or on all boots. Re-installing ESXi on the media, as well as replacing the USB/SD Card has no effect. Installation will be successful, however you the issue is still experiences on boot.
HPE technical support was unable to determine the root of the issue. We found the source of the issue and reported it to HPE technical support and are waiting for an update.
The Issue and Fix
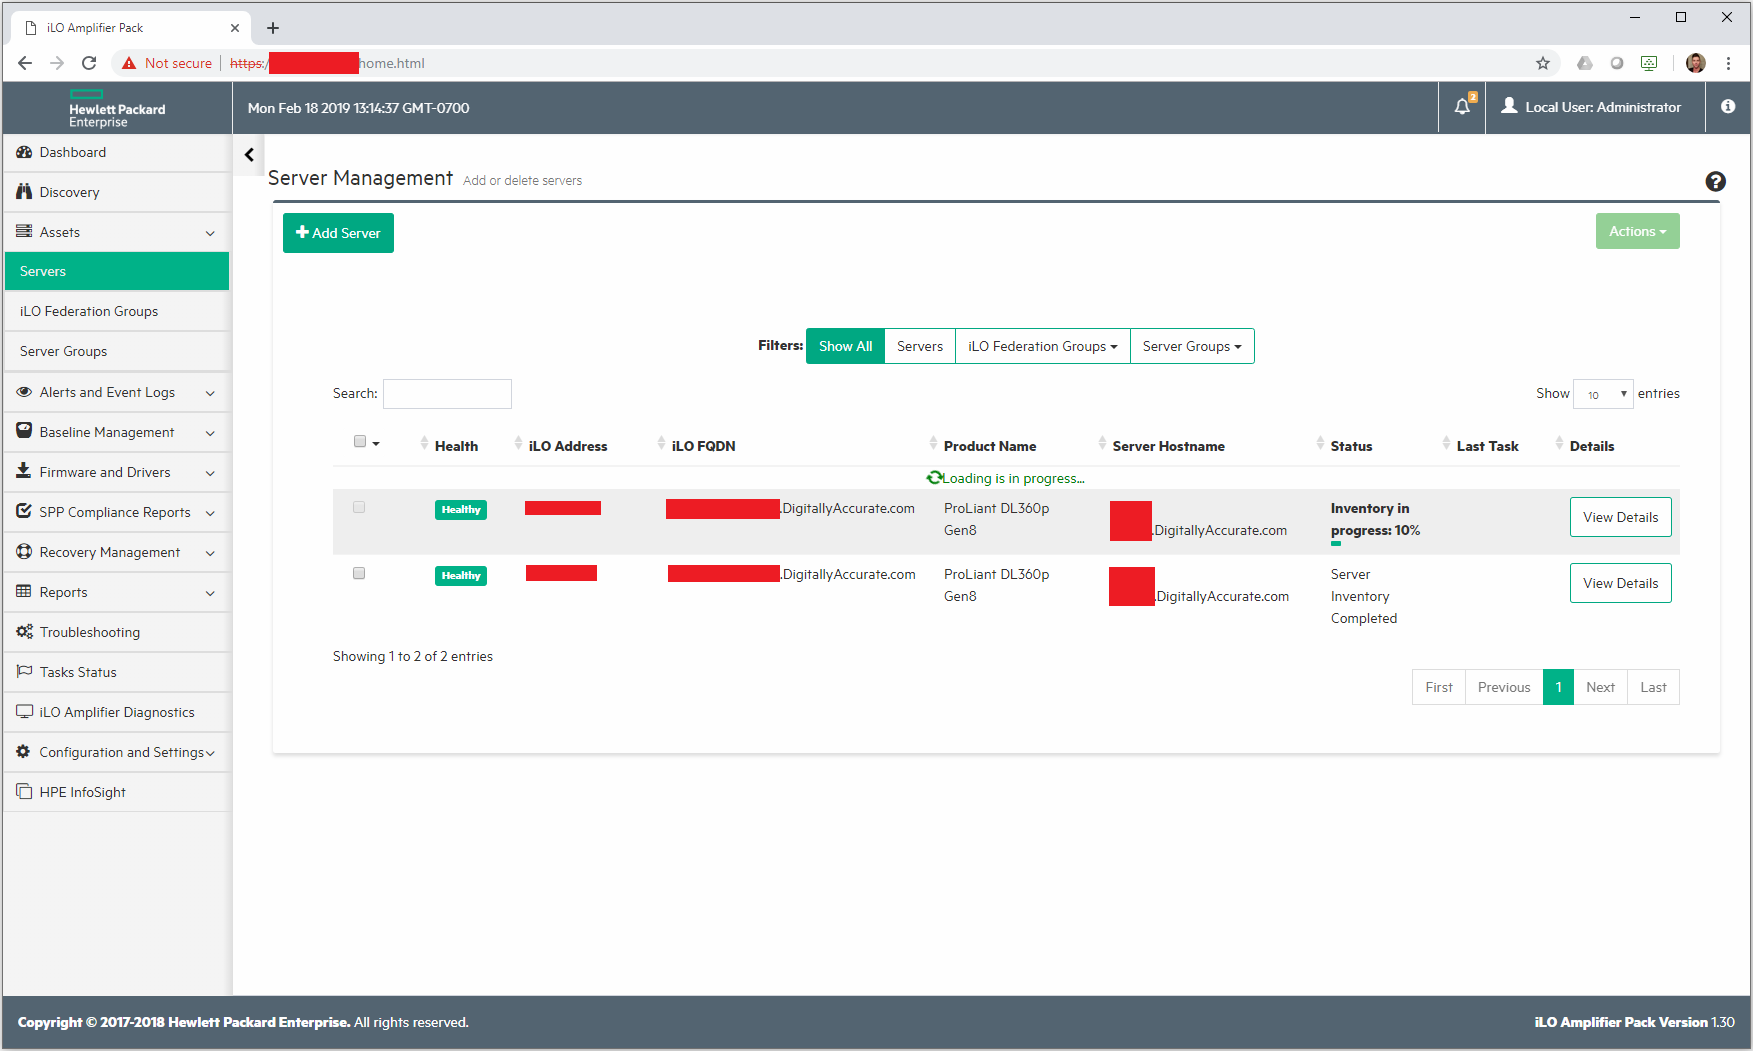
This issue occurs because the HPE iLO Amplifier is running continuous server inventory scans while the hosts are booting. When one inventory completes, it restarts another scan.
The following can be noted:
iLO Amplifier inventory percentage resets back to 0% and starts again numerous times during the server boot
Inventory scan completes, only to restart again numerous times during the server boot
Inventory scan resets back to 0% during numerous different phases of BIOS initialization and POST.
HPE iLO Amplifier Inventory
We noticed that once the HPE iLO Amplifier Virtual Machine was powered off, not only did the servers boot faster, but they also booted 100% succesfully each time. Powering on the iLO Amplifier would cause the ESXi hosts to fail to boot once again.
I’d also like to note that on the host using the SD-Card, the failed boot would actually completely lock up iLO, and would require physical intervention to disconnect and reconnect the power to the server. We were unable to restart the server once it froze (this did not happen to the host using the USB drive).
There are some settings on the HPE iLO amplifier to control performance and intervals of inventory scans, however we noticed that modifying these settings did not alter or stop the issue, and had no effect.
As a temporary workaround, make sure your iLO amplifier is powered off during any maintenance to avoid hosts freezing/failing to boot.
To fully resolve this issue, upgrade your iLO Amplifier to the latest version (1.40 as of the time of this update). The latest version can be downloaded at: http://www.hpe.com/servers/iloamplifierpack.
Update – April 10th 2019
I’ve attempted to try downgrading to the earliest supported iLo version 2.54, and the issue still occurs.
I also upgraded to the newest version 2.62 which presented some new issues.
On the first boot, the BIOS reported memory access issues on Processor 1 socket 1, then another error reporting memory access issues on Processor 1 socket 4.
I disconnected the power cables, reconnected, and restarted the server. This boot, the server didn’t even detect the bootable USB stick.
Again, after shutting down the iLo Amplifier, the server booted properly and the issue disappeared.
Update – May 24th 2019
As an HPE partner, I have been working with HPE, the product manager, and development team on this issue. HPE has provided me with a fix to test that I have been able to verify fully resolves this issue! Stay tuned for more information!
Update – June 5th 2019 – ITS FIXED!!!
Great news as the issue is now fixed! As Bob Perugini (WorldWide Product Manager at HPE) said it:
HPE is happy to announce that this issue has been fixed in latest version of iLO Amplifier Pack, v1.40.
Here’s what’s new in iLO Amplifier Pack v1.40: ─ Available as a VMware ESXi appliance and as a Hyper-V appliance (Hyper-V is new) ─ VMware tools have been added to the ESXi appliance ─ Ability to schedule the time of the daily transmission of Active Health System (AHS) data to InfoSight ─ Ability to opt-in and allow the IP address and hostname of the server to be transmitted to InfoSight and displayed ─ Test connectivity button to help verify iLO Amplifier Pack has successfully connected to InfoSight ─ Allow user authentication credentials for the proxy server when connecting to InfoSight ─ Added ability to specify IP address or hostname for the HPE RDA connection when connection to InfoSight ─ Ability to send updated AHS data “now” for an individual server ─ Ability to stage firmware and driver updates to the iLO Repository and then deploy the staged updates at a later date or time (HPE Gen10 servers only) ─ Allow the firmware and driver updates of servers whose iLO has been configured in CNSA (Commercial National Security Algorithm) mode (HPE Gen10 servers only)
When running VMware vSphere 6 or vSphere 7 and ESXi on your hosts with VMFS6, you may notice that auto unmap (space reclamation) is not working even though it is enabled. In addition, you’ll find that manual unmap functions still work.
Why is UNMAP not working
This is because your storage array (SAN) may have a larger unmap granularity block size than 1MB. VMFS version 6 (source) requires an unmap granularity of 1MB and does not support automatic unmap on arrays that are larger.
For example, on the HPE MSA 2040 the page size when using virtual storage is 4MB, hence auto unmap is not supported and does not work. You can still manually perform unmap on arrays with block/page sizes larger than 1MB.
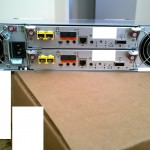
This weekend I came across a big issue with my HPE MSA 2040 where one of the SAN controllers became unresponsive, and appeared to had failed because it would not boot.
It all started when I decided to clean the MSA SAN. I try to clean the components once or twice a year to remove dust and make sure it’s not getting all jammed up. Sometimes I’ll shut the entire unit down and remove the individual components, other times I’ll remove them while operating. Because of the redundancies and since I have two controllers, I can remove and clean each controller individually at separate times.
Please Note: When dusting equipment with fans, never allow the fans to spin up with compressed air as this can generate current which can damage components. Never allow compressed air flow to spin up fans.
After cleaning out the power supplies, it came time to clean the controllers.
The Problem
As always, I logged in to the SMU to shutdown controller A (storage). I shut it down, the blue LED illuminated it was safe for removal. I then proceeded to remove it, clean it, and re-insert it. The controller came back online, and ownership of the applicable disk groups were successfully moved back. Controller A was now completed successfully. I continued to do the same for controller B: I logged in to shutdown controller B (storage). It shut down just like controller A, the blue LED removable light illuminated. I was able to remove it, clean it, and re-insert it.
However, controller B did not come back online.
After inserting controller B, the status light was flashing (as if it was booting). I waited 20 minutes with no change. The SMU on controller B was responding to HTTPS requests, however you could not log on due to the error “system is initializing”. SSH was functioning and you could log in and issue commands, however any command to get information would return “Please wait while this information is pulled from the MC controller”, and ultimately fail. The SMU on controller A would report a controller fault on controller B, and not provide any other information (including port status on controller B).
I then tried to re-seat the controller with the array still running. Gave it plenty of time with no effect.
I then removed the failed controller, shutdown the unit, powered it back on (only with controller A), and re-inserted Controller B. Again, no effect.
The Fix
At this point I’m thinking the controller may have failed or died during the cleaning process. I was just about to call HPE support for a replacement until I noticed the “Power LED” light inside of the failed controller would flash every 5 seconds while removed.
This made me start to wonder if there was an issue writing the cache to the compact flash card, or if the controller was still running off battery power but had completely frozen.
I tried these 3 things on the failed controller while it was unplugged and removed:
I left the controller untouched for 1 hour out of the array (to maybe let it finish whatever it was doing while on battery power)
There’s an unlabeled button on the back of the controller. As a last resort (thinking it was a reset button), I pressed and held it for 20 seconds, waited a minute, then briefly pressed it for 1 second while it was out of the unit.
I removed the Compact Flash card from the controller for 1 minute, then re-inserted it. In hoping this would fail the cache copy if it was stuck in the process of writing cache to compact flash.
I then re-inserted the controller, and it booted fine! It was not functioning and working (and came up very fast). Looking at the logs, it has no record of what occurred between the first shutdown, and final boot. I hope this post helps someone else with the same issue, it can save you a support ticket, and time with a controller down.
Disclaimer
PLEASE NOTE: I could not find any information on the unlabeled button on the controller, and it’s hard to know exactly what it does. Perform this at your own risk (make sure you have a backup). Since I have 2 controllers, and my MSA 2040 was running fine on Controller A, I felt comfortable doing this, as if this did reset controller B, the configuration would replicate back from controller A. I would not do this in a single controller environment.
Update – 24 Hours later
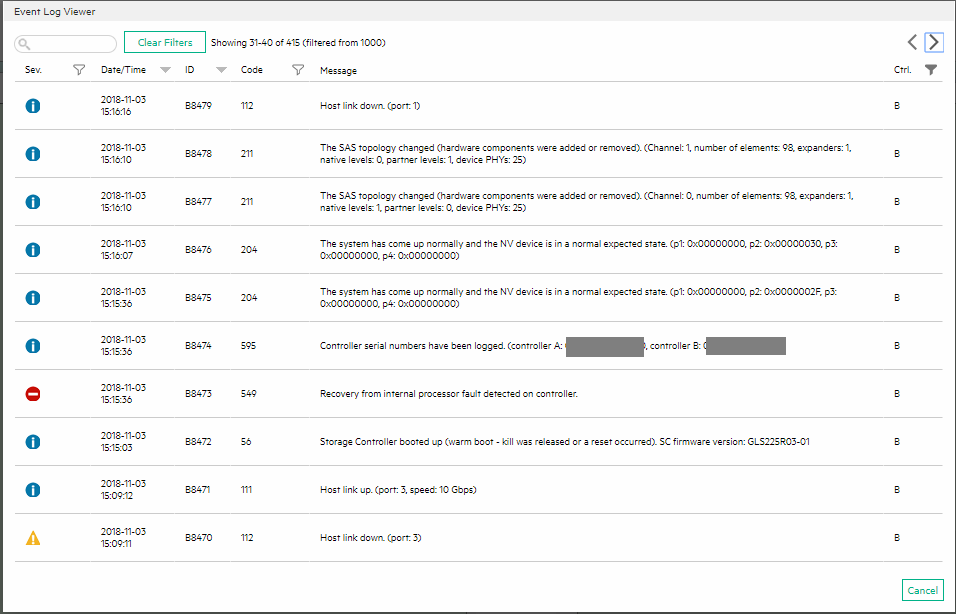
After I got everything up and running, I checked the logs of the unit and couldn’t find anything on controller B that looked out of ordinary. However, 24 hours later, I logged back in and noticed some new events showed up from the day before (from the day I had the issues):
MSA 2040 Code 549
You’ll notice the event log with severity error:
Recovery from internal processor fault detected on controller.
Code 549
One thing that’s very odd is that I know for a fact the time is wrong on the error severity log entry, this could be due to the fact we had a daylight savings time change last night at midnight. Either way it appears that it finally did detect that the Storage controller was in an error state and logged it, but it still would have been nice for some more information.
On a final note, the unit has been running perfectly for over 24 hours.
Update – April 2nd 2019
Well, in March a new firmware update was released for the MSA. I went to upgrade and the same issue as above occurred. During the firmware upgrade, at one point of the firmware update process a step had failed and repeated 4 times until successful.
During the Storage Controller restarting process, the controller never came back up. I removed the controller 1 hour, re-inserted and the above fix did not work. I then tried it after 2 hours of disconnection.
At this point I contacted HPE, who is sending a replacement controller.
The following day (12 hours of controller removed), I re-inserted it again and it actually booted up, was working with the new firmware, and then did a PFU (Partner Firmware Update) of controller A.
While it is working now, I’m still going to replace the controller as I believe something is not functioning correctly.
This website uses cookies to improve your experience. We'll assume you're ok with this, but you can opt-out if you wish.
Do you accept the use of cookies and accept our privacy policy? AcceptRejectCookie and Privacy Policy
Privacy & Cookies Policy
Privacy Overview
This website uses cookies to improve your experience while you navigate through the website. Out of these cookies, the cookies that are categorized as necessary are stored on your browser as they are essential for the working of basic functionalities of the website. We also use third-party cookies that help us analyze and understand how you use this website. These cookies will be stored in your browser only with your consent. You also have the option to opt-out of these cookies. But opting out of some of these cookies may have an effect on your browsing experience.