Dec 082023
 
vCenter-Root-CA-Missing

Today we’ll go over how to install the vSphere vCenter Root Certificate on your client system.

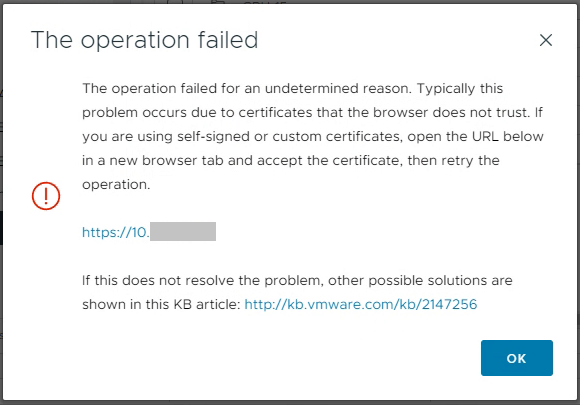
Certificates are designed to verify the identity of the systems, software, and/or resources we are accessing. If we aren’t able to verify and authenticate what we are accessing, how do we know that the resource we are sending information to, is really who they are?

Installing the vSphere vCenter Root Certificate on your client system, allows you to verify the identity of your VMware vCenter server, VMware ESXi hosts, and other resources, all while getting rid of those pesky certificate errors.

Certificate warning when connecting to vCenter vCSA

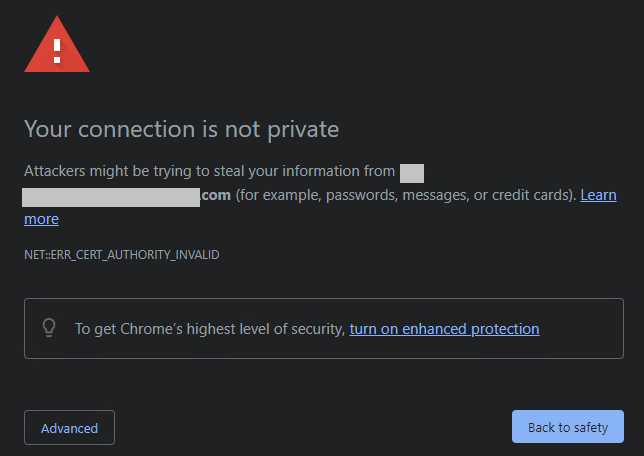
I see too many VMware vSphere administrators simply dismiss the certificate warnings, when instead they (and you) should be installing the Root CA on your system.

Why install the vCenter Server Root CA

Installing the vCenter Server’s Root CA, allows your computer to trust, verify, and validate any certificates issued by the vSphere Root Certification authority running on your vCenter appliance (vCSA). Essentially this translates to the following:

  • Your system will trust the Root CA and all certificates issued by the Root CA
    • This includes: VMware vCenter, vCSA VAMI, and ESXi hosts
  • When connecting to your vCenter server or ESXi hosts, you will not be presented with certificate issues
  • You will no longer have vCenter OVF Import and Datastore File Access Issues
    • This includes errors when deploying OVF templates
    • This includes errors when uploading files directly to a datastore
File Upload in vCenter to ESXi host operation failed

In addition to all of the above, you will start to take advantage of certificate based validation. Your system will verify and validate that when you connect to your vCenter or ESXi hosts, that you are indeed actually connecting to the intended system. When things are working, you won’t be prompted with a notification of certificate errors, whereas if something is wrong, you will be notifying of a possible security event.

How to install the vCenter Root CA

To install the vCenter Root CA on your system, perform the following:

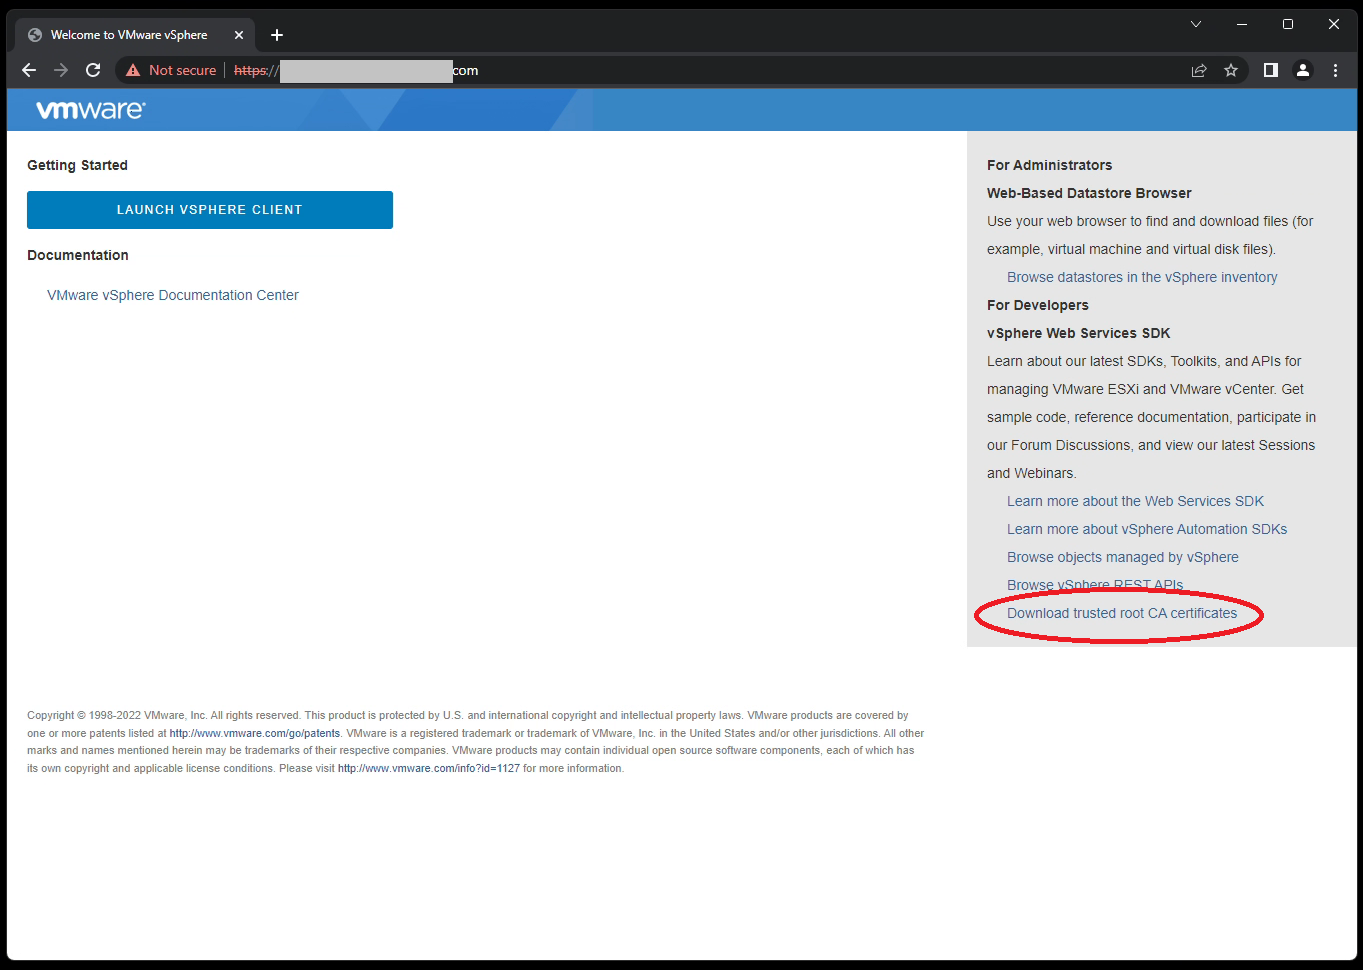
  1. Navigate to your VMware vCenter “Getting Started” page.
    • This is the IP or FQDN of your vCenter server without the “ui” after the address. We only want to access the base domain.
    • Do not click on “Launch vSphere Client”.
  2. Right click on “Download trusted root CA certificates”, and click on save link as.
    Link to download vCenter trusted root CA Certificates
  3. Save this ZIP file to your computer, and extract the archive file
    • You must extract the ZIP file, do not open it by double-clicking on the ZIP file.
  4. Open and navigate through the extracted folders (certs/win in my case) and locate the certificates.
    VMware vCenter Root Certificates
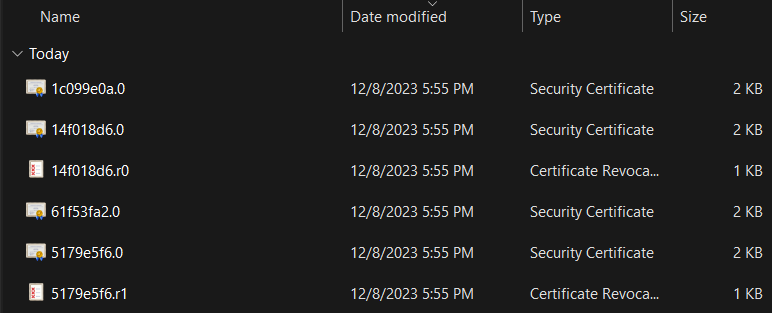
  5. For each file that has the type of “Security Certificate”, right click on it and choose “Install Certificate”.
  6. Change “Store Location” to “Local Machine”
    • This makes your system trust the certificate, not just your user profile
  7. Choose “Place all certificates in the following store”, click Browse, and select “Trusted Root Certification Authorities”.
    Screenshot to Place in Trusted Root Certification Authorities
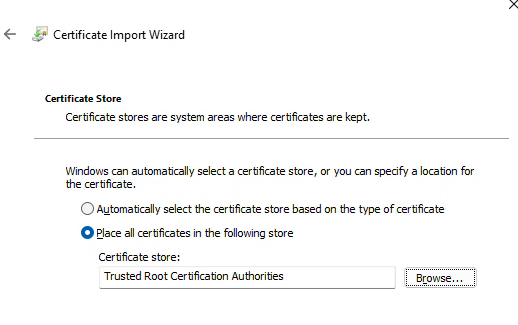
  8. Complete the wizard. If successful, you’ll see: “The import was successful.”.
  9. Repeat this for each file in that folder with the type of “Security Certificate”.

Alternatively, you can use a GPO with Active Directory or other workstation management techniques to deploy the Root CAs to multiple systems or all the systems in your domain.

Jul 252023
 

When it comes to virtualized workloads, one thing I commonly see overlooked in the design of the solution, is the placement of workloads. In this post, I want to cover VMware vSphere VM placement rules using the “VM/Host Rules” feature.

This is a feature that I commonly see overlooked and not configured, especially in smaller single cluster environments, however I’ve also seen this happen in very large scale environments as well.

Let’s cover the why, what, who, and how…

VM Workloads

While VMware vSphere does have a number of technologies built in for redundancy, load-balancing, and availability, as part of the larger solution we often find our workloads, specifically 3rd party platforms, with their own solutions that accomplish the same thing.

We need to identify which HA (High Availability) or redundancy solution to use, based on the application, service, and how it works.

For example, using VMware vSphere HA, or High Availability, if vCenter (and/or vCLS) detects a host goes offline, it can restart the workload on other online hosts. There is time associated with the detection and boot time, resulting in a loss of service during this period.

Third party solutions often have their own high availability or redundancy built in to the solution, such as Microsoft Active Directory. In this case with a standard configuration, at any time, any domain controller can respond to a clients request for resources. If one DC goes offline, other DCs can respond to the request resulting in no downtime.

Obviously, in the case of Active Directory Domain Controllers, you’d much prefer to have multiple DCs in your environment, instead of using one with vSphere HA.

Additionally, if you did have multiple domain controllers, you’d want to make sure they aren’t all placed on the same ESXi host. This is where we start to incorporate VM placement in to our solution.

VM Placement

When it comes to 3rd party solutions like mentioned above, we need to identify these workloads and factor them in to the design of the solution we are either implementing, maintaining, or improving.

Example of VM workloads used with VM Placement

A few examples of these workloads with their own load-balancing and availability technologies:

  • Microsoft Windows Active Directory Domain Controllers
  • Microsoft Windows Servers running DNS/DHCP Servers
  • Virtualized Active/Active or Active/Passive Firewall Appliances
  • VMware Horizon UAG (Unified Access Gateway) configured in HA mode
  • Other servers/services that have their own availability systems

As you can see, the applications all have their own special solution for availability, so we must insure the different “nodes” or “instances” are running on different ESXi hosts to avoid a host failure bringing down the entire solution.

Unless otherwise specified by the 3rd party vendor, I would recommend using VM/Host Rules in combination with vSphere DRS and HA.

Configuring VM Placement with VM/Host Rules

To configure these rules, follow the instructions below:

  1. Log on to your VMware vCenter Server
  2. Select a Cluster
  3. Click on the “Configure” tab, and then “VM/Host Rules”
    • Here you can Add/Edit/Delete VM Host Rules
  4. Click on “Add”, and give the rule a new name (Example: Domain Controllers)
  5. For “Type”, select “Separate Virtual Machines”
  6. Click “Add” and select your Domain Controllers and add them to the rule.
Screenshot rule creation for VM placement using VM Host Rules
Domain Controller VM Placement VM Host Rule

After you click “OK”, the rule should now be saved, and DRS will make sure these VMs are now running on separate hosts.

Below you can see another example of a configured system, separating 2 Active/Passive Firewall appliances.

VM placement and VM/Host Rules for Firewall appliances
VM/Host Rules for Firewall Appliances

As you can see, VM placement with VM/Host Rules is very easy to configure and deploy.

Additional Considerations

Note, if you implement these rules and do not have enough hosts to fullfill the requirements, the hosts may fail to be evacuated by DRS when placing in maintenance mode, or remediating with vLCM (Lifecycle Manager).

In this case, you’ll need to manually vMotion the VM’s to other hosts (to violate the rule) or shut some down.

Jul 242023
 
Picture of an DL360p Gen8 1U Rack Server with IO-PEX40152 Installed

A few months ago, you may have seen my post detailing my experience with ESXi 7.0 on HP Proliant DL360p Gen8 servers. I now have an update as I have successfully loaded ESXi 8.0 on HPE Proliant DL360p Gen8 servers, and want to share my experience.

It wasn’t as eventful as one would have expected, but I wanted to share what’s required, what works, and stability observations.

Please note, this is NOT supported and NOT recommended for production environments. Use the information at your own risk.

A special thank you goes out to William Lam and his post on Homelab considerations for vSphere 8, which provided me with the boot parameter required to allow legacy CPUs.

ESXi on the DL360p Gen8

With the release of vSphere 8.0 Update 1, and all the new features and functionality that come with the vSphere 8 release as a whole, I decided it was time to attempt to update my homelab.

In my setup, I have the following:

  • 2 x HPE Proliant DL360p Gen8 Servers
    • Dual Intel Xeon E5-2660v2 Processors in each server
    • USB and/or SD for booting ESXi
    • No other internal storage
    • NVIDIA A2 vGPU (for use with VMware Horizon)
  • External SAN iSCSI Storage

Since I have 2 servers, I decided to do a fresh install using the generic installer, and then use the HPE addon to install all the HPE addons, drivers, and software. I would perform these steps on one server at a time, continuing to the next if all went well.

I went ahead and documented the configuration of my servers beforehand, and had already had upgraded my VMware vCenter vCSA appliance from 7U3 to 8U1. Note, that you should always upgrade your vCenter Server first, and then your ESXi hosts.

To my surprise the install went very smooth (after enabling legacy CPUs in the installer) on one of the hosts, and after a few days with no stability issues, I then proceeded and upgraded the 2nd host.

I’ve been running with 100% for 25+ days without any issues.

The process – Installing ESXi 8.0

I used the following steps to install VMware vSphere ESXi 8 on my HP Proliant Gen8 Server:

  1. Download the Generic ESXi installer from VMware directly.
    1. Link: Download VMware vSphere
  2. Download the “HPE Custom Addon for ESXi 8.1”.
    1. Link: HPE Custom Addon for ESXi 8.0 U1 June 2023
    2. Other versions of the Addon are here: HPE Customized ESXi Image.
  3. Boot server with Generic ESXi installer media (CD or ISO)
    • IMPORTANT: Press “Shift + o” (Shift key, and letter “o”) to interrupt the ESXi boot loader, and add “AllowLegacyCPU=true” to the kernel boot parameters.
  4. Continue to install ESXi as normal.
    • You may see warnings about using a legacy CPU, you can ignore these.
  5. Complete initial configuration of ESXi host
  6. Mount NFS or iSCSI datastore.
  7. Copy HPE Custom Addon for ESXi zip file to datastore.
  8. Enable SSH on host (or use console).
  9. Place host in to maintenance mode.
  10. Run “esxcli software vib install -d /vmfs/volumes/datastore-name/folder-name/HPE-801.0.0.11.3.1.1-Jun2023-Addon-depot.zip” from the command line.
  11. The install will run and complete successfully.
  12. Restart your server as needed, you’ll now notice that not only were HPE drivers installed, but also agents like the Agentless management agent, and iLO integrations.

After that, everything was good to go… Here you can see version information from one of the ESXi hosts:

ESXi 8 on HPE Proliant DL360p Gen8
VMware ESXi version 8.0.1 Build 21813344 on HPE Proliant DL360p Gen8 Server

What works, and what doesn’t

I was surprised to see that everything works, including the P420i embedded RAID controller. Please note that I am not using the RAID controller, so I have not performed extensive testing on it.

HPE P420i RAID Controller with VMware vSphere ESXi 8

All Hardware health information is present, and ESXi is functioning as one would expect if running a supported version on the platform.

Additional Information

Note that with vSphere 8, VMware is deprecating vLCM baselines. Your focus should be to update your ESXi instances using cluster image based update images. You can incorporate vendor add-ons and components to create a customized image for deployment.

Mar 062023
 
VMware vSphere 7 Logo

You might ask if/what the procedure is for updating Enhanced Linked Mode vCenter Server Instances, or is there even any considerations that apply?

vCenter Enhanced Link Mode is a feature that allows you to link a total of 15 vCenter Instances in to a single, Single Sign On (SSO) vSphere domain. This allows you to have a single set of credentials to manage all 15 instances, as well as the ability to manage all of them from a single pane of glass.

When it comes to environments with multiple vCenter instance and/or vCSA appliances, this really helps manageability, and visibility.

Enhanced Linked Mode Upgrade Considerations

To answer the question above: Yes, when you’re running Enhanced Linked Mode (ELM) to link multiple vCenter Server, special considerations and requirements exist when it comes to updating or upgrading your vCenter Server instances and vCSA appliances.

Multiple VMware vCenter Server Instances (vCSA) Running in Enhanced Link Mode (ELM)

Not only have these procedures been documented in older VMware documentation, but I recently reviewed and confirmed the best practices with VMware GSS while on a support case.

Procedure for updating vCenter with ELM

  1. Configure/Confirm that the vCenter File-Based Backup in VAMI is configured, functioning, and that you are creating valid file based backups.
  2. Create a manual file-based backup with VAMI
  3. Power down all vCenter Instances and vCSA Appliances in your environment
  4. Perform a cold snapshot of all vCenter Instances and vCSA appliances
    • *This is critical* – You need a valid offline snapshot taken of all appliances powered off at the same point in time
  5. Power on the vCenter/vCSA Virtual Machines (VMs)
  6. Perform the update or upgrade

Recovering from a failed Update

IMPORTANT: In the event that an update or upgrade fails, you must revert all vCenter Instances and/or vCSA appliances back to the previous snapshot!

You cannot selectively choose single or individual instances, as this may cause mismatches in data and configuration between the instances as they have databases that are not in sync, and are from different points in time.

Additionally, if you are in a situation where you’re considering or planning to restore previous snapshots to recover from a failed update, you should do so sooner than later. As time progresses, service accounts and identifiers update in the VMware vSphere infrastructure. Delaying the restore too long could cause this information to get out of sync with the ESXi hosts after performing a snapshot restore/revert.

Feb 252023
 
vCenter-Root-CA-Missing

When using VMware vSphere, you may notice vCenter OVF Import and Datastore File Access Issues, when performing various tasks with OVF Imports, as well as uploading and/or downloading files from datastores.

These issues can cause a number of symptoms including errors, unexpected status codes, and also just simply failing for an undetermined reason.

vCenter File Upload failed error "The Operation failed."
vCenter File Upload: The Operation failed.

The Problem

For this situation, the symptoms will occur when performing one of the following tasks:

  • Cannot Upload File to datastore
  • Cannot Download File from datastore
  • Cannot Import OVF Template
  • Cannot Export OVF Template

An example of errors that the user may see:

  • The operation failed for an undetermined reason.
  • The operation failed.
  • unexpectedStatusCode":0
  • unexpectedStatusCode (0)
  • HTTP 500 Error
  • NET::ERR_CERT_AUTHORITY_INVALID

See below for some example screenshots of errors you may see.

vCenter Error: "The operation failed for an undetermined reason."
The Operation failed: The Operation failed for an undetermined reason.
Chrome and vCenter report "NET::ERR_CERT_AUTHORITY_INVALID" error
“NET::ERR_CERT_AUTHORITY_INVALID”

Please note, that this condition can cause other issues and errors as well.

The Solution

When using VMware vSphere, the vCenter server acts as it’s own Root Certification Authority, and uses SSL certificates to facilitate communication and encryption between various services in the solution, as well as the communication between the vCenter Server, ESXi hosts, and any client computers accessing vCenter via the web HTML5 interface.

This Root Certification Authority running on the vCenter Server creates and issues certificates to these services and hosts, which are issues under the Root CA Certificate.

While vCenter automatically handles the certificate trusts between the services, as well as the communicate between the vCenter Server and ESXi hosts (this is automatically setup when adding hosts to vCenter), it cannot automatically make your (client) computer trust the entire certificate authority, as well as all the child certificates.

To resole this issue, you’ll need to follow my guide on How to Install the vSphere vCenter Root Certificate on your computer you are using to connect to the vCenter interface.

After installing the vCenter Root CA on your system, the issue will be resolved.