Mar 062022
 
Azure AD SSO with Horizon

Whether deploying VDI for the first time or troubleshooting existing Azure AD SSO issues for an existing environment, special consideration must be made for Microsoft Azure AD SSO and VDI.

When you implement and use Microsoft 365 and Office 365 in a VDI environment, you should have your environment configured to handle Azure AD SSO for a seamless user experience, and to avoid numerous login prompts when accessing these services.

Microsoft Azure Active Directory has two different methods for handling SSO (Single Sign On), these include SSO via a Primary Refresh Token (PRT) and Azure Seamless SSO. In this post, I’ll explain the differences, and when to use which one.

Microsoft Azure AD SSO and VDI

What does Azure AD SSO do?

Azure AD SSO allows your domain joined Windows workstations (and Windows Servers) to have a Single Sign On experience so that users can have an single sign-on integrated experience when accessing Microsoft 365 and/or Office 365.

When Azure AD SSO is enabled and functioning, your users will not be prompted nor have to log on to Microsoft 365 or Office 365 applications or services (including web services) as all this will be handled transparently in the background with Azure AD SSO.

For VDI environments, especially non-persistent VDI (VMware Instant Clones), this is an important function so that users are not prompted to login every time they launch an Office 365 application.

Persistent VDI is not complex and doesn’t have any special considerations for Azure AD SSO, as it will function the same way as traditional workstations, however non-persistent VDI requires special planning.

Please Note: Organizations often associate the Office 365 login prompts to activation issues when in fact activation is functioning fine, however Azure AD SSO is either not enabled, incorrect configured, or not functioning which is why the users are being prompted for login credentials every time they establish a new session with non-persistent VDI. After reading this guide, it should allow you to resolve the issue of Office 365 login prompts on VDI non-persistent and Instant Clone VMs.

Azure AD SSO methods

There are two different ways to perform Azure AD SSO in an environment that is not using ADFS. These are:

  • Azure AD SSO via Primary Refresh Token
  • Azure AD Seamless SSO

Both accomplish the same task, but were created at different times, have different purposes, and are used for different scenarios. We’ll explore this below so that you can understand how each works.

Screenshot of a Hybrid Azure AD Joined login
Hybrid Azure AD Joined Login

Fun fact: You can have both Azure AD SSO via PRT and Azure AD Seamless SSO configured at the same time to service your Active Directory domain, devices, and users.

Azure SSO via Primary Refresh Token

When using Azure SSO via Primary Refresh Token, SSO requests are performed by Windows Workstations (or Windows Servers), that are Hybrid Azure AD Joined. When a device is Hybrid Azure AD Joined, it is joined both to your on-premise Active Directory domain, as well registered to your Azure Active Directory.

Azure SSO via Primary Refresh token requires the Windows instance to be running Windows 10 (or later), and/or Windows Server 2016 (or later), as well the Windows instance has to be Azure Hybrid AD joined. If you meet these requirements, SSO with PRT will be performed transparently in the background.

If you require your non-persistent VDI VMs to be Hybrid Azure AD joined and require Azure AD SSO with PRT, special considerations and steps are required:

This includes:

  • Scripts to automatically unjoin non-persistent (Instant Clone) VDI VMs from Azure AD on logoff.
  • Scripts to cleanup old entries on Azure AD

If you properly deploy this, it should function. If you don’t require your non-persistent VDI VMs to be Hybrid Azure AD joined, then Azure AD Seamless SSO may be better for your environment.

VMware Horizon 8 2303 now supports Hybrid Azure AD joined non-persistent VDI, using Azure AD Connect, providing Azure AD SSO with PRT. Using Horizon 8 version 2303, no scripts are required to manage Azure AD Devices.

Azure AD Seamless SSO

Microsoft Azure AD Seamless SSO after configured and implemented, handles Azure AD SSO requests without the requirement of the device being Hybrid Azure AD joined.

Seamless SSO works on Windows instances instances running Windows 7 (or later, including Windows 10 and Windows 11), and does NOT require the the device to be Hybrid joined.

Seamless SSO allows your Windows instances to access Azure related services (such as Microsoft 365 and Office 365) and provides a single sign-on experience.

This may be the easier method to use when deploying non-persistent VDI (VMware Instant Clones), if you want to implement SSO with Azure, but do not have the requirement of Hybrid AD joining your devices.

Additionally, by using Seamless SSO, you do not need to implement the require log-off and maintenance scripts mentioned in the above section (for Azure AD SSO via PRT).

To use Azure AD Seamless SSO with non-persistent VDI, you must configure and implement Seamless SSO, as well as perform one of the following to make sure your devices do not attempt to Hybrid AD join:

  • Exclude the non-persistent VDI computer OU containers from Azure AD Connect synchronization to Azure AD
  • Implement a registry key on your non-persistent (Instant Clone) golden image, to disable Hybrid Azure AD joining.

To disable Hybrid Azure AD join on Windows, create the registry key on your Windows image below:

HKLM\SOFTWARE\Policies\Microsoft\Windows\WorkplaceJoin: "BlockAADWorkplaceJoin"=dword:00000001

Conclusion

Different methods can be used to implement SSO with Active Directory and Azure AD as stated above. Use the method that will be the easiest to maintain and provide support for the applications and services you need to access. And remember, you can also implement and use both methods in your environment!

After configuring Azure AD SSO, you’ll still be required to implement the relevant GPOs to configure Microsoft 365 and Office 365 behavior in your environment.

Additional Resources

Please see below for additional information and resources:

May 022019
 
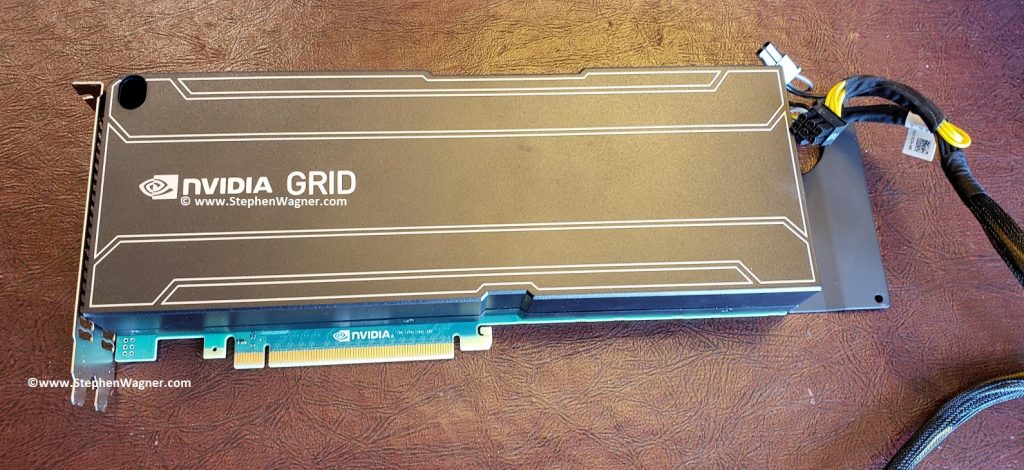
Nvidia GRID Logo

I can’t tell you how excited I am that after many years, I’ve finally gotten my hands on and purchased an Nvidia Quadro K1 GPU. This card will be used in my homelab to learn, and demo Nvidia GRID accelerated graphics on VMware Horizon View. In this post I’ll outline the details, installation, configuration, and thoughts. And of course I’ll have plenty of pictures below!

The focus will be to use this card both with vGPU, as well as 3D accelerated vSGA inside in an HPE server running ESXi 6.5 and VMware Horizon View 7.8.

Please Note: As of late (late 2020), hardware h.264 offloading no longer functions with VMware Horizon and VMware BLAST with NVidia Grid K1/K2 cards. More information can be found at https://www.stephenwagner.com/2020/10/10/nvidia-vgpu-grid-k1-k2-no-h264-session-encoding-offload/

Please Note: Some, most, or all of what I’m doing is not officially supported by Nvidia, HPE, and/or VMware. I am simply doing this to learn and demo, and there was a real possibility that it may not have worked since I’m not following the vendor HCL (Hardware Compatibility lists). If you attempt to do this, or something similar, you do so at your own risk.

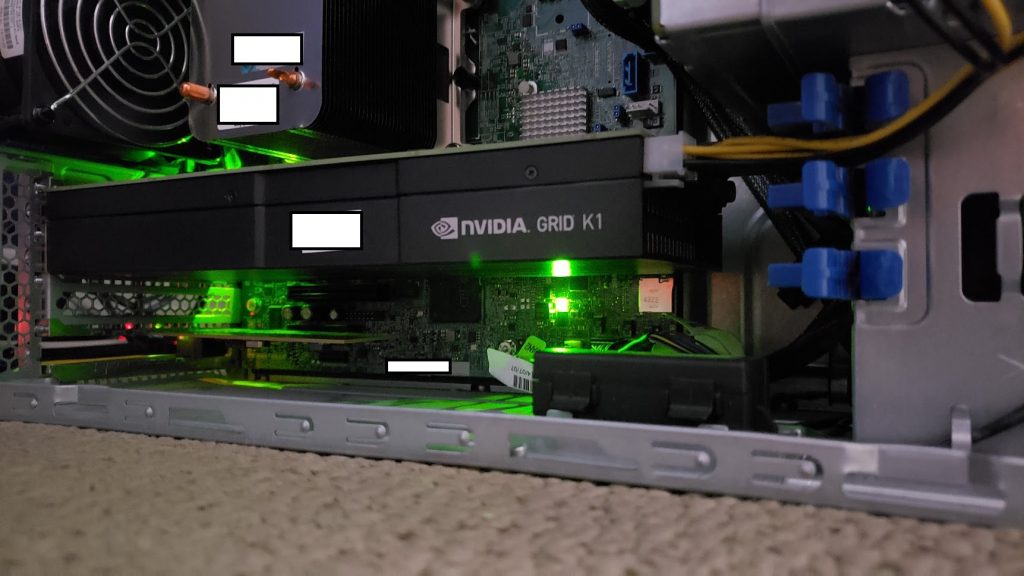
Nvidia GRID K1 Image

For some time I’ve been trying to source either an Nvidia GRID K1/K2 or an AMD FirePro S7150 to get started with a simple homelab/demo environment. One of the reasons for the time it took was I didn’t want to spend too much on it, especially with the chances it may not even work.

Essentially, I have 3 Servers:

  1. HPE DL360p Gen8 (Dual Proc, 128GB RAM)
  2. HPE DL360p Gen8 (Dual Proc, 128GB RAM)
  3. HPE ML310e Gen8 v2 (Single Proc, 32GB RAM)

For the DL360p servers, while the servers are beefy enough, have enough power (dual redundant power supplies), and resources, unfortunately the PCIe slots are half-height. In order for me to use a dual-height card, I’d need to rig something up to have an eGPU (external GPU) outside of the server.

As for the ML310e, it’s an entry level tower server. While it does support dual-height (dual slot) PCIe cards, it only has a single 350W power supply, misses some fancy server technologies (I’ve had issues with VT-d, etc), and only a single processor. I should be able to install the card, however I’m worried about powering it (it has no 6pin PCIe power connector), and having ESXi be able to use it.

Finally, I was worried about cooling. The GRID K1 and GRID K2 are typically passively cooled and meant to be installed in to rack servers with fans running at jet engine speeds. If I used the DL360p with an external setup, this would cause issues. If I used the ML310e internally, I had significant doubts that cooling would be enough. The ML310e did have the plastic air baffles, but only had one fan for the expansion cards area, and of course not all the air would pass through the GRID K1 card.

The Purchase

Because of a limited budget, and the possibility I may not even be able to get it working, I didn’t want to spend too much. I found an eBay user local in my city who had a couple Grid K1 and Grid K2 cards, as well as a bunch of other cool stuff.

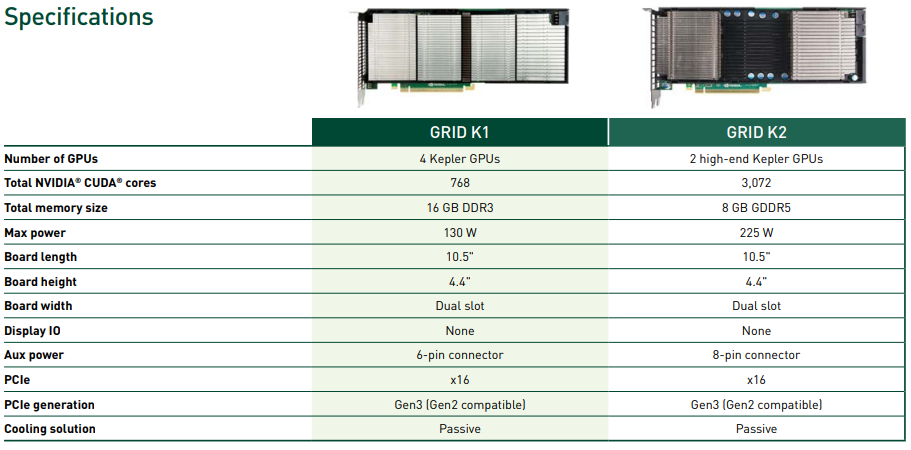
We spoke and he decided to give me a wicked deal on the Grid K1 card. I thought this was a fantastic idea as the power requirements were significantly less (more likely to work on the ML310e) on the K1 card at 130 W max power, versus the K2 card at 225 W max power.

NVIDIA GRID K1 and K2 Specifications
NVIDIA GRID K1 and K2 Specification Table

The above chart is a capture from:
https://www.nvidia.com/content/cloud-computing/pdf/nvidia-grid-datasheet-k1-k2.pdf

We set a time and a place to meet. Preemptively I ran out to a local supply store to purchase an LP4 power adapter splitter, as well as a LP4 to 6pin PCIe power adapter. There were no available power connectors inside of the ML310e server so this was needed. I still thought the chances of this working were slim…

These are the adapters I purchased:

Preparation and Software Installation

I also decided to go ahead and download the Nvidia GRID Software Package. This includes the release notes, user guide, ESXi vib driver (includes vSGA, vGPU), as well as guest drivers for vGPU and pass through. The package also includes the GRID vGPU Manager. The driver I used was from:
https://www.nvidia.com/Download/driverResults.aspx/144909/en-us

To install, I copied over the vib file “NVIDIA-vGPU-kepler-VMware_ESXi_6.5_Host_Driver_367.130-1OEM.650.0.0.4598673.vib” to a datastore, enabled SSH, and then ran the following command to install:

esxcli software vib install -v /path/to/file/NVIDIA-vGPU-kepler-VMware_ESXi_6.5_Host_Driver_367.130-1OEM.650.0.0.4598673.vib

The command completed successfully and I shut down the host. Now I waited to meet.

We finally met and the transaction went smooth in a parking lot (people were staring at us as I handed him cash, and he handed me a big brick of something folded inside of grey static wrap). The card looked like it was in beautiful shape, and we had a good but brief chat. I’ll definitely be purchasing some more hardware from him.

Hardware Installation

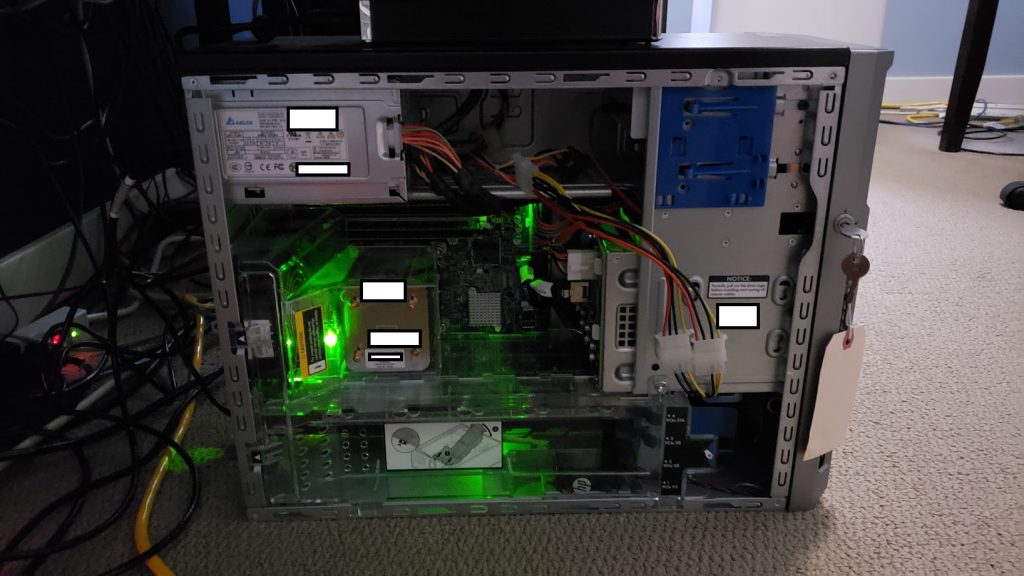
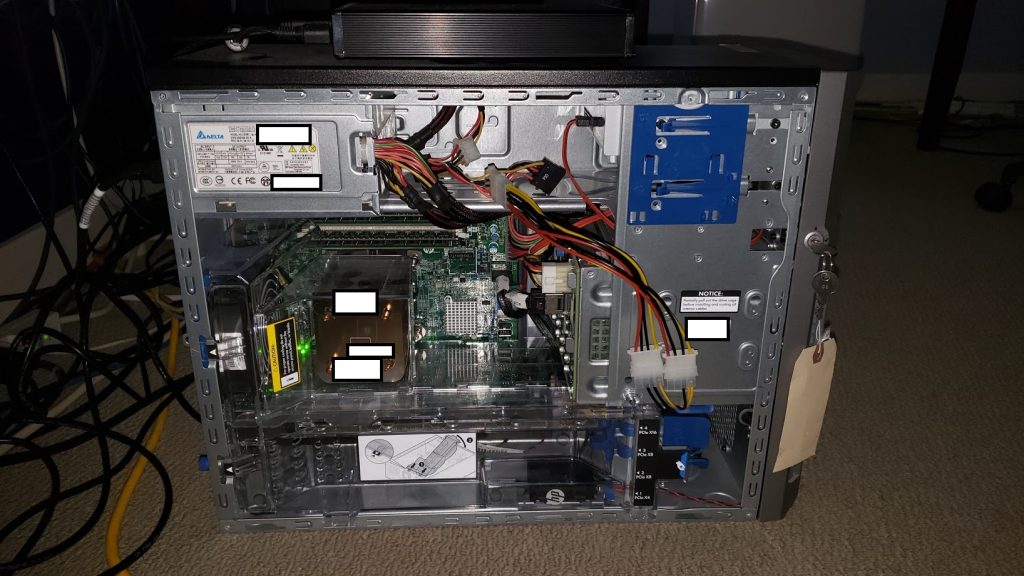
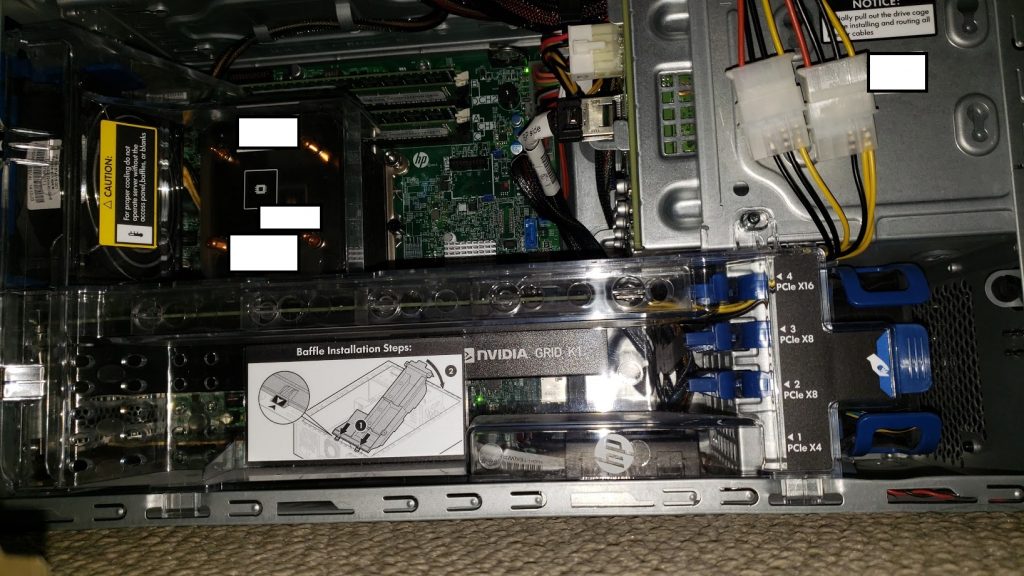
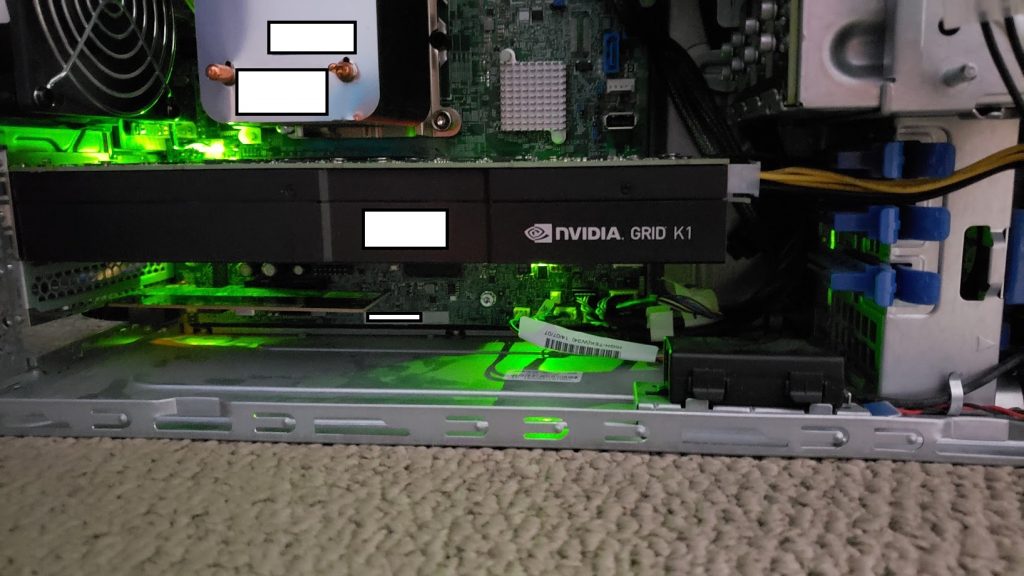
Installing the card in the ML310e was difficult and took some time with care. First I had to remove the plastic air baffle. Then I had issues getting it inside of the case as the back bracket was 1cm too long to be able to put the card in. I had to finesse and slide in on and angle but finally got it installed. The back bracket (front side of case) on the other side slid in to the blue plastic case bracket. This was nice as the ML310e was designed for extremely long PCIe expansion cards and has a bracket on the front side of the case to help support and hold the card up as well.

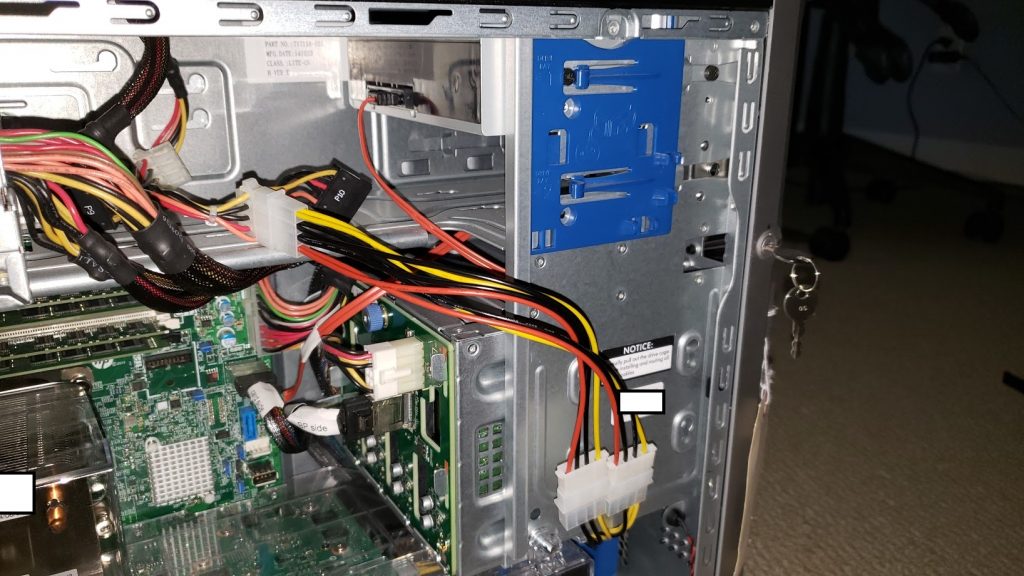
For power I disconnected the DVD-ROM (who uses those anyways, right?), and connected the LP5 splitter and the LP5 to 6pin power adapter. I finally hooked it up to the card.

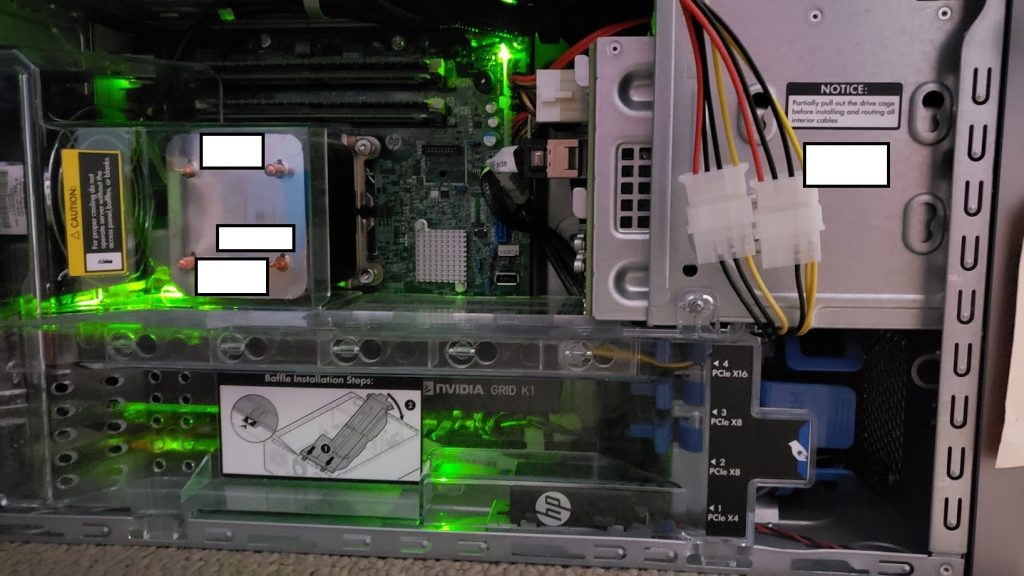
I laid the cables out nicely and then re-installed the air baffle. Everything was snug and tight.

Please see below for pictures of the Nvidia GRID K1 installed in the ML310e Gen8 V2.

Host Configuration

Powering on the server was a tense moment for me. A few things could have happened:

  1. Server won’t power on
  2. Server would power on but hang & report health alert
  3. Nvidia GRID card could overheat
  4. Nvidia GRID card could overheat and become damaged
  5. Nvidia GRID card could overheat and catch fire
  6. Server would boot but not recognize the card
  7. Server would boot, recognize the card, but not work
  8. Server would boot, recognize the card, and work

With great suspense, the server powered on as per normal. No errors or health alerts were presented.

I logged in to iLo on the server, and watched the server perform a BIOS POST, and start it’s boot to ESXi. Everything was looking well and normal.

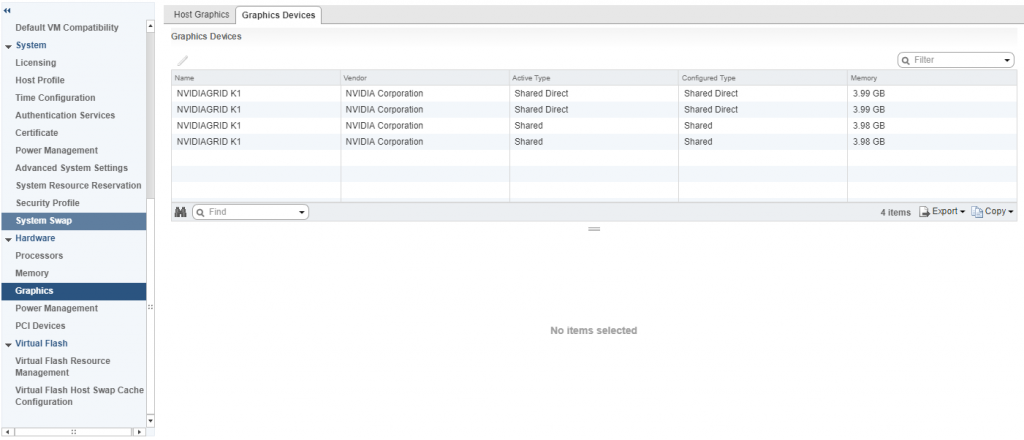
After ESXi booted, and the server came online in vCenter. I went to the server and confirmed the GRID K1 was detected. I went ahead and configured 2 GPUs for vGPU, and 2 GPUs for 3D vSGA.

ESXi Graphics Settings for Host Graphics and Graphics Devices
ESXi Host Graphics Devices Settings

VM Configuration

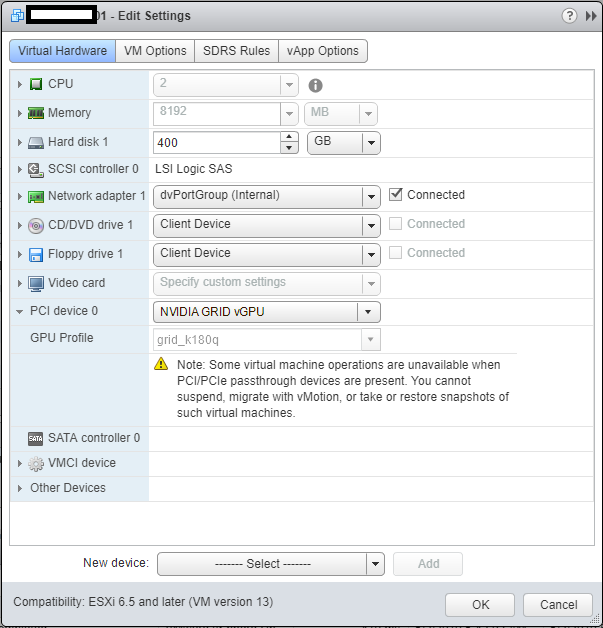
I restarted the X.org service (required when changing the options above), and proceeded to add a vGPU to a virtual machine I already had configured and was using for VDI. You do this by adding a “Shared PCI Device”, selecting “NVIDIA GRID vGPU”, and I chose to use the highest profile available on the K1 card called “grid_k180q”.

Virtual Machine Edit Settings with NVIDIA GRID vGPU and grid_k180q profile selected
VM Settings to add NVIDIA GRID vGPU

After adding and selecting ok, you should see a warning telling you that must allocate and reserve all resources for the virtual machine, click “ok” and continue.

Power On and Testing

I went ahead and powered on the VM. I used the vSphere VM console to install the Nvidia GRID driver package (included in the driver ZIP file downloaded earlier) on the guest. I then restarted the guest.

After restarting, I logged in via Horizon, and could instantly tell it was working. Next step was to disable the VMware vSGA Display Adapter in the “Device Manager” and restart the host again.

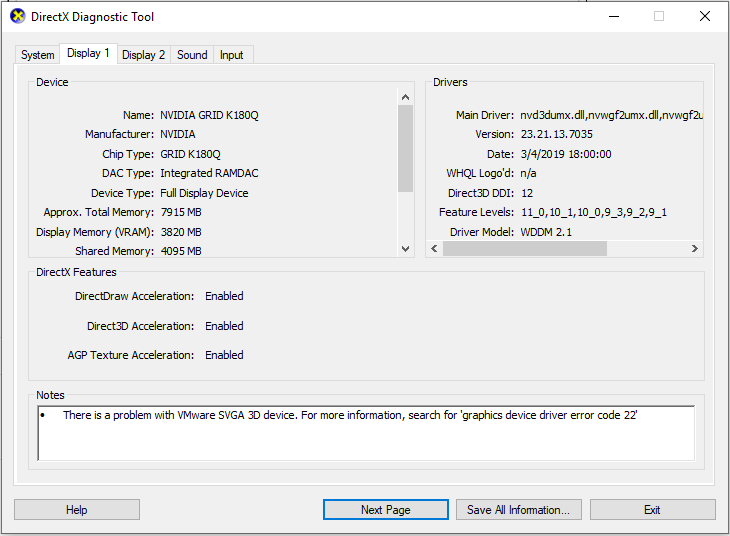
Upon restarting again, to see if I had full 3D acceleration, I opened DirectX diagnostics by clicking on “Start” -> “Run” -> “dxdiag”.

DirectX Diagnostic Tool (dxdiag) showing Nvidia Grid K1 on VMware Horizon using vGPU k180q profile
dxdiag on GRID K1 using k180q profile

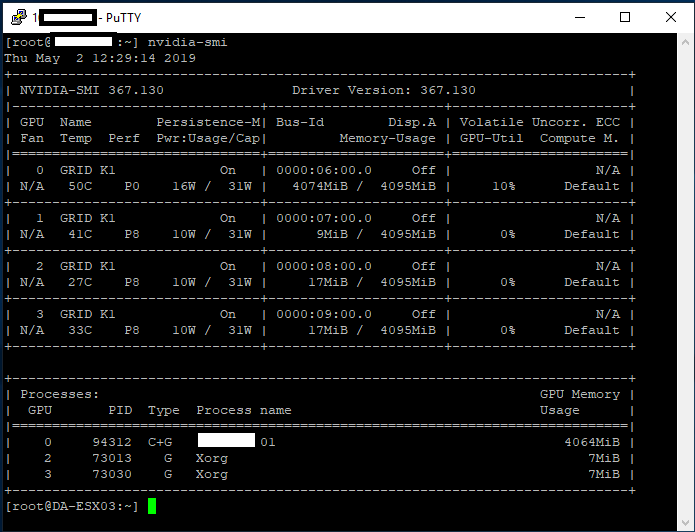
It worked! Now it was time to check the temperature of the card to make sure nothing was overheating. I enabled SSH on the ESXi host, logged in, and ran the “nvidia-smi” command.

nvidia-smi command on ESXi host showing GRID K1 information, vGPU information, temperatures, and power usage
“nvidia-smi” command on ESXi Host

According to this, the different GPUs ranged from 33C to 50C which was PERFECT! Further testing under stress, and I haven’t gotten a core to go above 56. The ML310e still has an option in the BIOS to increase fan speed, which I may test in the future if the temps get higher.

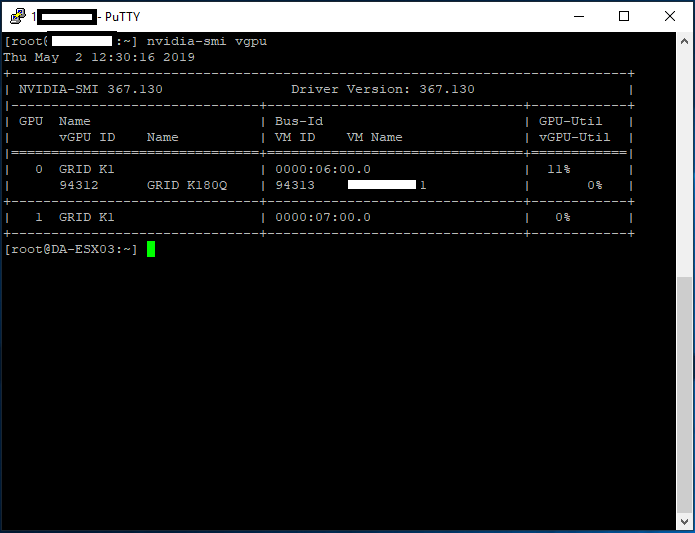
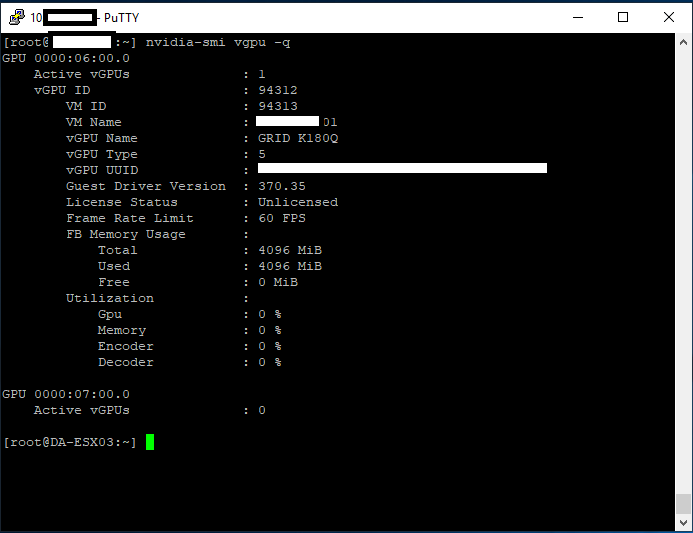
With “nvidia-smi” you can see the 4 GPUs, power usage, temperatures, memory usage, GPU utilization, and processes. This is the main GPU manager for the card. There are some other flags you can use for relevant information.

nvidia-smi with vgpu flag for vgpu information
“nvidia-smi vgpu” for vGPU Information
nvidia-smi with vgpu -q flag
“nvidia-smi vgpu -q” to Query more vGPU Information

Final Thoughts

Overall I’m very impressed, and it’s working great. While I haven’t tested any games, it’s working perfect for videos, music, YouTube, and multi-monitor support on my 10ZiG 5948qv. I’m using 2 displays with both running at 1920×1080 for resolution.

I’m looking forward to doing some tests with this VM while continuing to use vGPU. I will also be doing some testing utilizing 3D Accelerated vSGA.

The two coolest parts of this project are:

  • 3D Acceleration and Hardware h.264 Encoding on VMware Horizon
  • Getting a GRID K1 working on an HPE ML310e Gen8 v2

Highly recommend getting a setup like this for your own homelab!

Uses and Projects

Well, I’m writing this “Uses and Projects” section after I wrote the original article (it’s now March 8th, 2020). I have to say I couldn’t be impressed more with this setup, using it as my daily driver.

Since I’ve set this up, I’ve used it remotely while on airplanes, working while travelling, even for video editing.

Some of the projects (and posts) I’ve done, can be found here:

Leave a comment and let me know what you think! Or leave a question!