Jan 182018
 

The Problem

I run a Sophos UTM firewall appliance in my VMware vSphere environment and noticed the other day that I was getting warnings on the space used on the ESXi host for the thin-provisioned vmdk file for the guest VM. I thought “Hey, this is weird”, so I enabled SSH and logged in to check my volumes. Everything looked fine and my disk usage was great! So what gives?

After spending some more time troubleshooting and not finding much, I thought to myself “What if it’s not unmapping unused blocks from the vmdk to the host ESXi machine?”. What is unampping you ask? When files get deleted in a guest VM, the free blocks aren’t automatically “unmapped” and released back to the host hypervisor in some cases.

Two things need to happen:

  1. The guest VM has to release these blocks (notify the hypervisor that it’s not using them, making the vmdk smaller)
  2. The host has to reclaim these and issue the unmap command to the storage (freeing up the space on the SAN/storage itself)

On a side note: In ESXi 6.5 and when using VMFS version 6 (VMFS6), the datastores can be configured for automatic unmapping. You can still kick it off manually, but many administrators would prefer it to happen automatically in the background with low priority (low I/O).

Most of my guest VMs automatically do the first step (releasing the blocks back to the host). On Windows this occurs with the defrag utility which issues trim commands and “trims” the volumes. On linux this occurs with the fstrim command. All my guest VMs do this automatically with the exception being the Sophos UTM appliance.

The fix

First, a warning: Enable SSH on the Sophos UTM at your own risk. You need to know what you are doing, this also may pose a security risk and should be disabled once your are finished. You’ll need to “su” to root once you log in with the “loginuser” account.

This fix not only applies to the Sophos UTM, but most other linux based guest virtual machines.

Now to fix the issue, I used the “df” command which provides a list of the filesystems, their mount points, and storage free for those fileystems. I’ve included an example below (this wasn’t the full list):

hostname:/root # df
Filesystem                       1K-blocks     Used Available Use% Mounted on
/dev/sda6                          5412452  2832960   2281512  56% /
udev                               3059712       72   3059640   1% /dev
tmpfs                              3059712      100   3059612   1% /dev/shm
/dev/sda1                           338875    15755    301104   5% /boot
/dev/sda5                         98447760 13659464  79513880  15% /var/storage
/dev/sda7                        129002700  4624468 117474220   4% /var/log
/dev/sda8                          5284460   274992   4717988   6% /tmp
/dev                               3059712       72   3059640   1% /var/storage/chroot-clientlessvpn/dev


You’ll need to run the fstrim command on every mountpoint for file systems “/dev/sdaX” (X means you’ll be doing this for multiple mountpoints). In the example above, you’ll need to run it on “/”, “/boot”, “/var/storage”, “/var/log”, “/tmp”, and any other mountpoints that use “/dev/sdaX” filesytems.

Two examples:

fstrim / -v

fstrim / -v


fstrim /var/storage -v

fstrim /var/storage -v


Again, you’ll repeat this for all mount points for your /dev/sdaX storage (X is replaced with the volume number). The command above only works with mountpoints, and not the actual device mappings.

Time to release the unused blocks to the SAN:

The above completes the first step of releasing the storage back to the host. Now you can either let the automatic unmap occur slowly overtime if you’re using VMFS6, or you can manually kick it off. I decided to manually kick it off using the steps I have listed at: https://www.stephenwagner.com/2017/02/07/vmfs-unmap-command-on-vsphere-6-5-with-vmfs-6-runs-repeatedly/

You’ll need to use esxcli to do this. I simply enabled SSH on my ESXi hosts temporarily.

Please note: Using the unmap command on ESXi hosts is very storage I/O intensive. Do this during maintenance window, or at a time of low I/O as this will perform MAJOR I/O on your hosts…

I issue the command (replace “DATASTORENAME” with the name of your datastore):

esxcli storage vmfs unmap --volume-label=DATASTORENAME --reclaim-unit=8

This could run for hours, possibly days depending on your “reclaim-unit” size (this is the block size of the unit you’re trying to reclaim from the VMFS file-system). In this example I choose 8, but most people do something larger like 100, or 200 to reduce the load and time for the command to complete (lower values look for smaller chunks of free space, so the command takes longer to execute).

I let this run for 2 hours on a 10TB datastore, however it may take way longer (possibly 6+ hours, to days).

Finally, not only are we are left with a smaller vmdk file, but we’ve released the space back to the SAN as well!

Oct 192017
 

In the past few days, I’ve noticed that some Sophos UTM firewalls I manage for clients haven’t been sending their daily reports (or other notification e-mails). When I first noticed this, checking my own SMTP proxy, I noticed that the e-mails were being sent from the firewalls, but were being dropped due to an SPF check failure.

Originally I thought this may have just been an overnight glitch with the DNS providers, however I later noticed that it’s stopped all e-mails coming from all the UTMs.

Further investigation, I realized that by default, the Sophos UTMs send their firewall notifications (and configuration backups) from the domain “fw-notify.net”, specifically, the e-mail address “[email protected]”. That’s when I had a brainfart and realized the e-mails weren’t being sent from my clients owned domains, but this fw-notify.net domain.

It appears that recently some SPF records have been created for the domain “fw-notify.net”, which is what is causing this issue. Also, I’m not quite sure if the domain underwent ownership change, or it his was overlooked by someone at Sophos.

I’m assuming numerous other longtime UTM users will be experiencing this as well.

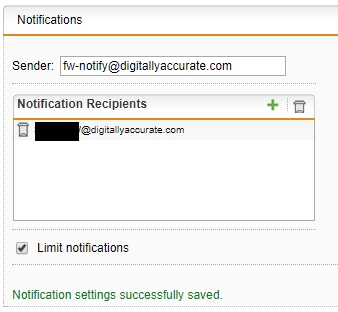
To fix this, just log in to the problem UTMs, and change the notification Sender address as shown below to a domain you own. I changed mine to [email protected] (which has valid SPF since it’s my domains relay).

Jul 032010
 

I’ve had my main web server directly on the net for some time now. The box runs CentOS and I always have it fully up to date, with a minimal install just to act as a web server.

It’s always concerned me a little bit, the fact is I keep the box up to date as much as possible, but it’s still always in the back of my mind.

This weekend I had some time to mess around with some stuff. I wanted to get it setup behind my Sophos UTM, however I did NOT want it to use the public IP address that it’s setup for as I have numerous static IPs all for different services.

I spent a good 3-4 hours doing lots of searching on Google, and Astaro.org. I saw a few people that wanted to do the same thing as me, but didn’t really find an explanation for anything.

Ultimately I wanted to setup another external IP address on the Sophos UTM software appliance box, and have that external IP dedicated to JUST the web server. Everything else would continue to run as configured before I started modifying anything.

I finally got it going, and I thought I would do a little write up on this since I saw a lot of people were curious, however no one was having luck with it. So far I’ve just done it for my main web server, however in the future I’ll be doing this with a few more external IPs and servers of mine. So let’s log into the Astaro web interface and get started!

PLEASE NOTE: I performed this configuration on Astaro Security Gateway Version 8, this will also work on a Sophos UTM

  1. Configure the additional IP  –              “Interfaces & Routing”, then choose “Interfaces”. Select the “Additional Addresses” tab on the top of the screen. Hit the “New additional address…” button and configure the additional IP. Please note this worked for me as all my static IPs use the same gateway for the most part, if you have multiple statics that use different gateways this may not work for you. In my case I called this address “DA-Web”. Make sure you enable this afterwards by hitting the green light!
  2. Configure the NAT Rules      –              On the left select “Network Security”, then choose the sub item “NAT”. We do not want to touch anything under “Masquerading” so lets go ahead and select the “DNAT/SNAT” tab. In this section we need to create two rules, one for DNAT, and one for SNAT. Keep in mind that “Full NAT” is available, but due to the setup of the traffic initiation I don’t think we want to touch this at all.
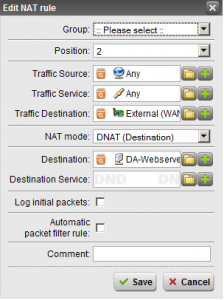
    1. Create the DNAT Rule            –              Hit the “New NAT rule” button. Set “Position” to Top”. “Traffic Source” and “Traffic Service” to “Any”. “Traffic Destination” set to the additional address you created (keep in mind this has the same name as the main external, only with the name of the connection inside of it). Set “NAT mode” to “DNAT”. And finally set Destination to the server you want this going to, or create a new definition for the server. Make sure “Automatic packet filter rule” is NOT checked. See image below for my setup.
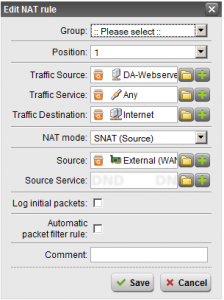
    2. Create the SNAT Rule            –              Hit the “New NAT rule” button. Set the “Position” to top. “Traffic Source” should be set to the definition you created for the server you are doing this for. “Traffic Service” should be “Any”. “Traffic Destination” should be “Internet”. Keep in mind this is very important, we want to make sure that if you use multiple subnets inside your network that SNAT is ONLY performed when needed when data gets shipped out to the Internet, and NOT when your internal boxes are accessing it. Set “NAT mode” to SNAT. And finally “Source” being the additional IP you created (again this looks like your normal External IP, but hold the mouse over when selecting the definition to make sure it’s the “additional” IP you created). Make sure “Automatic packet filter rule” is NOT checked. See image below for my setup.
    3. Create Packet Filter Rules    –              Now it’s time to open some ports up so that your server can offer services to the internet. This is fairly standard so I’m sure that you can do it on your own. In my example I created a few rules that allowed HTTP, DNS, and FTP from “any” using the service, to the destination “DA-Webserver” to allow the traffic I needed.

This should be it, it should be working now. If you don’t want to create the packet filter rules and want ALL traffic allowed, you can simply forget section c above, and when creating the DNAT and SNAT rules check the “Create automatic packet filter rules” box on both rules. Keep in mind this will be opening your box up to the internet!

If you find this useful, have any questions, or want to comment or tell me how to do it better, please leave me a comment!

Thanks!