May 032021
 

This guide will show you to install Microsoft (Classic) Teams and deploy Microsoft Teams VDI Optimization on VMWare Horizon for Manual Pools, Automated Pools, and Instant Clone Pools, for use with both persistent and non-persistent VDI. This guide works for Microsoft Teams on Windows 10 and Windows 11, including the new Windows 11 22H2.

Please see my post Deploy and install the New Teams for VDI to learn how to deploy the new Teams client for VDI. The Classic client will go end of support on June 30, 2024.

Please make sure to check out Microsoft’s documentation on “Teams for Virtualized Desktop Infrastructure“, and VMware’s document “Microsoft Teams Optimization with VMware Horizon” for more information.

I also have a guide on how to Deploy, Install, and Configure Microsoft Office 365 in a VDI Environment, so make sure you check it out!

Requirements

To get started, you’ll need the following:

  • Microsoft Teams MSI Installer (Available here: 64-Bit, 32-Bit)
  • VMware Horizon Client (Available here)
  • VDI Desktop or VDI Base Image
  • Ability to create and/or modify GPOs on domain
  • VMware Horizon GPO Bundle

Background

Before Microsoft Teams VDI Optimization, VMware’s RTAV (Real-Time Audio-Video) was generally used. This offloaded audio and video to the VMware Horizon Client utilizing a dedicated channel over the connection to optimize the data exchange. With minor tweaks (check out my post on enhancing RTAV webcam with VMware Horizon), this actually worked quite well with the exception of microphone quality on the end-users side, and high bandwidth requirements.

Starting with Horizon View 7.13 and Horizon View 8 (2006), VMware Horizon now supports Microsoft Teams Optimization. This technology offloads the Teams call directly to the endpoint (or client device), essentially drawing over the VDI VM’s Teams visual interface and not involving the VDI Virtual Machine at all. The client application (or thin client) handles this and connects directly to the internet for the Teams Call. One less hop for data, one less processing point, and one less load off your server infrastructure.

Microsoft Teams Optimization uses WebRTC to function.

Deploying Microsoft Teams Optimization on VMware Horizon VDI

There are two components required to deploy Microsoft Teams Optimization for VDI.

  • Microsoft Specific Setup and Configuration of Microsoft Teams
  • VMware Specific Setup and Configuration for Microsoft Teams

We’ll cover both in this blog post.

Microsoft Specific Setup and Configuration of Microsoft Teams Optimization

First and foremost, do NOT bundle the Microsoft Teams install with your Microsoft 365 (Office 365) deployment, they should be installed separately.

We’re going to be installing Microsoft Teams using the “per-machine” method, where it’s installed in the Program Files of the OS, instead of the usual “per-user” install where it’s installed in the user “AppData” folder.

Non-persistent (Instant Clones) VDI requires Microsoft Teams to be installed “Per-Machine”, whereas persistent VDI can use both “Per-Machine” and “Per-User” for Teams. I use the “Per-Machine” for almost all VDI deployments. This allows you to manage versions utilizing MSIs and GPOs.

Please Note that when using “Per-Machine”, automatic updates are disabled. In order to upgrade Teams, you’ll need to re-install the newer version. Take this in to account when planning your deployment. If you use the per-user, it will auto-update.

For Teams Optimization to work, your endpoints and/or clients MUST have internet access.

Let’s Install Microsoft Teams (VDI Optimized)

For Per-Machine (Non-Persistent Desktops) Install, use the following command:

msiexec /i C:\Location\Teams_windows_x64.msi ALLUSER=1 ALLUSERS=1

For Per-User (Persistent VDI) Install, you can use the following command:

msiexec /i C:\Location\Teams_windows_x64.msi ALLUSERS=1

If in the event you need to uninstall Microsoft Teams to deploy an upgrade, you can use the following command:

msiexec /passive /x C:\Location\Teams_windows_x64.msi

And that’s it for the Microsoft Specific side of things!

VMware Specific Setup and Configuration for Microsoft Teams Optimization

When it comes to the VMware Specific Setup and Configuration for Microsoft Teams Optimization, it’s a little bit more complex.

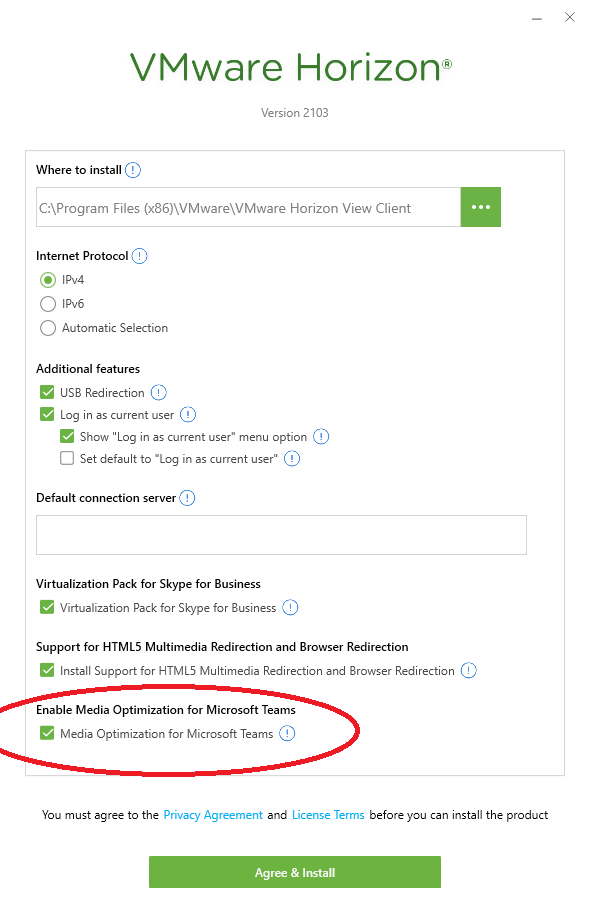
VMware Horizon Client Installation

When installing the VMware Horizon Client, the Microsoft Teams optimization feature should be installed by default. However, doing a custom install, make sure that “Media Optimization for Microsoft Teams” is enabled (as per the screenshot below):

Screenshot of VMware View Client Install with Microsoft Teams Optimization
VMware View Client Install with Microsoft Teams Optimization

Group Policy Object to enable WebRTC and Microsoft Teams Optimization

You’ll only want to configure GPOs for those users and sessions where you plan on actually utilizing Microsoft Teams Optimization. Do not apply these GPOs to endpoints where you wish to use RTAV and don’t want to use Teams optimization, as it will enforce some limitations that come with the technology (explained in Microsoft’s documentation).

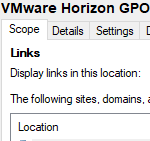
We’ll need to enable VMware HTML5 Features and Microsoft Teams Optimization (WebRTC) inside of Group Policy. Head over and open your existing VDI GPO or create a new GPO. You’ll need to make sure you’ve installed the latest VMware Horizon GPO Bundle. There are two switches we need to set to “Enabled”.

Expand the following, and set “Enable HTML5 Features” to “Enabled”:

Computer Configuration -> Policies -> Administrative Templates -> VMware View Agent Configuration -> VMware HTML5 Features -> Enable VMware HTML5 Features

Next, we’ll set “Enable Media Optimization for Microsoft Teams” to “Enabled”. You’ll find it in the following:

Computer Configuration -> Policies -> Administrative Templates -> VMware View Agent Configuration -> VMware HTML5 Features -> VMware WebRTC Redirection Features -> Enable Media Optimization for Microsoft Teams

And that’s it, you’re GPOs are now configured.

If you’re running a persistent desktop, run “gpupdate /force” in an elevated command prompt to grab the updated GPOs. If you’re running a non-persistent desktop pool, you’ll need to push the base image snapshot again so your instant clones will have the latest GPOs.

Confirming Microsoft Teams Optimization for VDI

There’s a simple and easy way to test if you’re currently running Microsoft Teams Optimized for VDI.

  1. Open Microsoft Teams
  2. Click on your Profile Picture to the right of your Company Name
  3. Expand “About”, and select “Version”
Screenshot of Microsoft Teams - About and Version to check Teams Optimization for VDI
Microsoft Teams – About and Version to check Teams Optimization for VDI

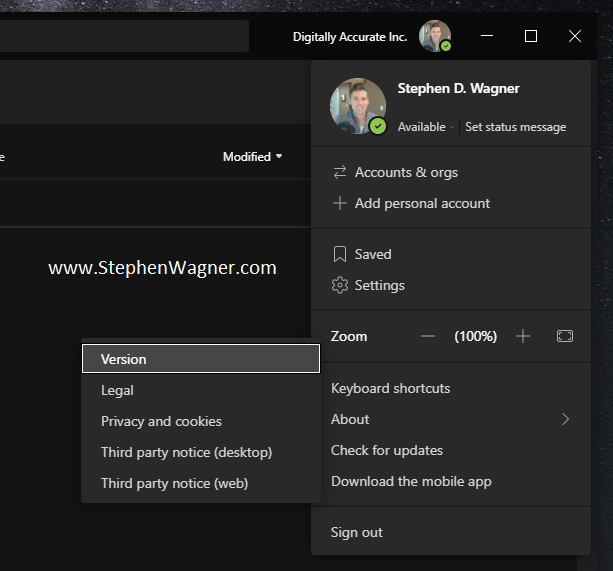
After selecting this, you’ll see a toolbar appear horizontally underneath the search, company name, and your profile picture with some information. Please see the below examples to determine if you’re running in 1 of 3 modes.

The following indicates that Microsoft Teams is running in normal mode (VDI Teams Optimization is Disabled). If you have configured VMware RTAV, then it will be using RTAV.

Screenshot indicator of Microsoft Teams VDI Optimization disabled
Microsoft Teams VDI Optimization disabled

The following indicates that Microsoft Teams is running in VDI Optimized mode (VDI Teams Optimization is Enabled showing “VMware Media Optimized”).

Screenshot indicator of Microsoft Teams VDI Optimization enabled
Microsoft Teams VDI Optimization enabled

The following indicates that Microsoft Teams is configured for VDI Optimization, however is not functioning and running in fallback mode. If you have VMware RTAV configured, it will be falling back to using RTAV. (VDI Teams Optimization is Enabled but not working showing “VMware Media Not Connected”, and is using RTAV if configured).

Screenshot of Microsoft Teams VDI Optimization Fallback
Microsoft Teams VDI Optimization Fallback

If you’re having issues or experiencing unexpected results, please go back and check your work. You may also want to review Microsoft’s and VMware’s documentation.

Conclusion

This guide should get you up and running quickly with Microsoft Teams Optimization for VDI. I’d recommend taking the time to read both VMware’s and Microsoft’s documentation to fully understand the technology, limitations, and other configurables that you can use and fine-tune your VDI deployment.

May 022021
 
Ubuntu Orange Logo

In this post, I’m going to provide instructions and a guide on how to install the Horizon Agent for Linux on Ubuntu 20.04 LTS. This will allow you to run and connect to an Ubuntu VDI VM with VMware Horizon View.

In the past I’ve created instructions on how to do this on earlier versions of Ubuntu, as well as RedHat Linux, but it’s getting easier than ever and requires less steps than previous guides.

I decided to create the updated tutorial after purchasing an AMD S7150 x2 and wanted to get it up and running with Ubuntu 20.04 LTS and see if it works.

Screenshot of VMware Horizon for Linux on Ubuntu 20.04 LTS
VMware Horizon for Linux on Ubuntu 20.04 LTS

I also highly recommend reading the documentation made available for VMware Horizon: Setting Up Linux Desktops in Horizon.

Requirements

  • VMware Horizon View 8 (I’m running version 2103)
  • Horizon Enterprise or Horizon for Linux Licensing
  • Horizon VDI environment that’s functioning and working
  • Ubuntu 20.04 LTS Installer ISO (download here)
  • Horizon Agent for Linux (download here)
  • Functioning internal DNS

Instructions

  1. Create a VM on your vCenter Server, attached the Ubuntu 20.04 LTS ISO, and install Ubuntu
  2. Install any Root CA’s or modifications you need for network access (usually not needed unless you’re on an enterprise network)
  3. Update Ubuntu as root
    apt update
    apt upgrade
  4. Install software needed for VMware Horizon Agent for Linux as root
    apt install openssh-server python python-dbus python-gobject open-vm-tools-desktop
  5. Install your software (Chrome, etc.)
  6. Install any vGPU or GPU Drivers you need before installing the Horizon Agent
  7. Install the Horizon Agent For Linux as root (Enabling Audio, Disabling SSO)
    ./install_viewagent.sh -a yes -S no
  8. Reboot the Ubuntu VM
  9. Log on to your Horizon Connection Server
  10. Create a manual pool and configure it
  11. Add the Ubuntu 20.04 LTS VM to the manual desktop pool
  12. Entitle the User account to the desktop pool and assign to the VM
  13. Connect to the Ubuntu 20.04 Linux VDI VM from the VMware Horizon Client

And that’s it, you should now be running.

As for the AMD S7150 x2, I noticed that Ubuntu 20.04 LTS came with the drivers for it called “amdgpu”. Please note that this driver does not work with VMware Horizon View. After installing “mesa-utils”, running “glxgears” and “glxinfo” it did appear that 3D Acceleration was working, however after further investigation it turned out this is CPU rendering and not using the S7150 x2 GPU.

You now have a VDI VM running Ubuntu Linux on VMware Horizon View.

May 012021
 

Do you have a VMware Horizon View VDI environment and some power users you’d like to optimize? I’ve got some optimizations that you can easily apply via the VMware Horizon GPO (Group Policy Object) bundle.

These are performance optimizations and configurations that I have rolled out for my own persistent desktop to optimize the experience for myself. These optimizations may use more resources to provide a better experience for power users.

Please note that these optimizations are not meant to be deployed for large numbers of users unless you have the resources to handle it. Always test these settings before rolling out in to production.

VMware Horizon GPO Bundle

As part of any VMware Horizon View deployment, you should have installed the VMware Horizon GPO Bundle. This is a collection of ADMX GPO (Group Policy Object) templates that you can upload to your domain controllers and use to configure various aspects of your VMware Horizon deployment.

These GPOs can be used to configure both the server, VDI VMs, VMware Horizon Clients, and various configurables with the protocols (including VMware Blast) being used in your deployment such as VMware BLAST, PCoIP, and RDP.

Below, you’ll find some of my favorite customizations and optimizations that I use in my own environment to enhance my experience.

For more information on the VMware Horizon GPO Bundle, please visit the VMware Horizon Documentation – Using Horizon Group Policy Administrative Template Files.

In this post, I’ll be covering the following:

  1. VMware Blast: Framerate
  2. VMware Blast: H. 264 Quality
  3. VMware Blast: Max Session Bandwidth kbit/s Megapixel Slope
  4. VMware Horizon Client Configuration: Allow display scaling
  5. VMware Horizon Client Configuration/View USB Configuration: Allow keyboard and Mouse (HID) Devices
  6. VMware View Agent Configuration/View RTAV Configuration/View RTAV Webcam Settings
  7. VMware View Agent Configuration/VMware HTML5 Features/Enable VMware HTML5 Features
  8. VMware View Agent Configuration/VMware HTML5 Features/VMware HTML5 Multimedia Redirection
  9. VMware View Agent Configuration/VMware HTML5 Features/VMware WebRTC Redirection Features

Let’s begin!

VMware Blast: Framerate

Do you have a GPU for your VDI session and extra bandwidth? If so, let’s crank that framerate up for a smoother experience! Configuring this variable will increase the default framerate to 60 fps (frames per second).

Computer Configuration -> Policies -> Administrative Templates -> VMware Blast -> Max Frame Rate

Let’s set this to “Enabled” and set it to 60.

VMware Blast: H. 264 Quality

If you have a GPU to offload H. 264 and the available bandwidth, you can change this setting to reduce the

Computer Configuration -> Policies -> Administrative Templates -> VMware Blast -> H. 264 Quality

There are two values for this setting, “H. 264 Maximum QP” and “H. 264 Minimum QP”. These control how much processing and compression is used on the VMware Blast h. 264 session.

To increase the quality (and bandwidth usage) of the session, you can decrease these to reduce the amount of compression. In my case I reduced both by “5” from their default values which made a big change.

VMware Blast: Max Session Bandwidth kbit/s Megapixel Slope

This setting will increase the amount of available bandwidth for the Horizon Blast h.264 video stream.

Computer Configuration -> Policies -> Administrative Templates -> VMware Blast -> Max Session Bandwidth kbit/s Megapixel Slope

The default is “6200” and I recommend playing with this a little to find out what suits you best depending on the other changes you made, especially with the 2 items above.

You can try doubling, tripling, or quadrupling this value depending on what’s required and how much available bandwidth you have.

VMware Horizon Client Configuration: Allow display scaling

Users are usually connecting from all sorts of devices, including laptops, tablets, and more. When connecting to a VDI session with a laptop or tablet that is using display scaling because it has a high native resolution, it may be extremely difficult to read any text because scaling is disabled on the VDI session.

To allow display scaling in the VDI session, we need to enable it via GPO on both the “Computer Configuration” and “User Configuration”.

Computer Configuration -> Policies -> Administrative Templates -> VMware Horizon Client Configuration -> Allow display scaling

And we’ll set “Allow Display Scaling” to “Enabled”.

User Configuration -> Policies -> Administrative Templates -> VMware Horizon Client Configuration -> Allow display scaling

And we’ll also set that “Allow Display Scaling” to “Enabled”.

Configuring this will allow you to configure display scaling on the VMware Horizon View client. After enabling this, it automatically configures scaling to match what I have configured on my connecting workstation (such as my Microsoft Surface Tablet, or my Lenovo X1 Carbon laptop). You also have the ability to manually configure the scaling on the session.

VMware Horizon Client Configuration/View USB Configuration: Allow keyboard and Mouse Devices

While you never want to use USB Redirection for keyboards and mice, you may need to use USB redirection for various HID (Human Interface Devices) that appear as keyboards or mice. You may need to enable this to make the following devices work:

  • 2FA/MFA Security Tokens
  • Security Keys
  • One Touch Tokens

In my case, I had a Yubico Yubikey security key that I needed passed through using USB Redirection (more on that here) to authenticate 2FA sessions inside of my VDI session.

To enable the passthrough of keyboards and mice (HID) devices, change the following.

Computer Configuration -> Policies -> Administrative Templates -> VMware Horizon Client Configuration -> View USB Configuration -> Allow keyboard and Mouse Devices

We’re going to go ahead and set “Allow keyboard and Mouse Devices” to “Enabled”.

VMware View Agent Configuration/View RTAV Configuration/View RTAV Webcam Settings

Using a webcam with VMware Horizon and RTAV (Real Time Audio Video), you may notice a slow frame rate and low resolution on your webcam going through the VDI session.

Here, we’re going to increase the fps (frames per second) and resolution of RTAV for VMware Horizon.

Computer Configuration -> Policies -> Administrative Templates -> VMware View Agent Configuration -> View RTAV Configuration -> View RTAV Webcam Settings

We’re going to “Enable” the following and set the values below:

Max frames per second = 25
Resolution - Default image resolution height in pixels = 600
Resolution - Default image resolution width in pixels = 800
Resolution - Max image height in pixels = 720
Resolution - Max image width in pixels = 1280

You’ll now notice a clearer and higher resolution webcam running at a faster framerate.

VMware View Agent Configuration/VMware HTML5 Features/Enable VMware HTML5 Features

There’s numerous HTML5 optimizations that VMware has incorporated in to the latest versions of VMware Horizon View. These include, but are not limited to:

  • HTML5 Multimedia Redirection
  • Geolocation Redirection
  • Browser Redirection
  • Media Optimization for Microsoft Teams

We want all this good stuff, so we’ll head over to the following:

Computer Configuration -> Policies -> Administrative Templates -> VMware View Agent Configuration -> VMware HTML5 Features -> Enable VMware HTML5 Features

We’ll set “Enable VMware HTML5 Features” to “Enabled”.

I highly recommend reading up and briefing yourself on HTML5 Multimedia Redirection, along with over Remote Desktop Features over on the VMware Horizon 2013 Documentation – Configurating Remote Desktop Features.

VMware View Agent Configuration/VMware HTML5 Features/VMware HTML5 Multimedia Redirection

So there’s this little thing called “HTML5 Multimedia Redirection”, where when configured and the plugins are installed, VMware Horizon will essentially redirect HTML5 based multimedia from the VDI session to your local system to handle.

This offload makes video extremely crisp and smooth, however comes with some concerns, security risks, and learning on your part. When you enable this, you only want to do so for trusted websites.

Computer Configuration -> Policies -> Administrative Templates -> VMware View Agent Configuration -> VMware HTML5 Features -> VMware HTML5 Multimedia Redirection

In this location, we need to set “Enable VMware HTML5 Multimedia Redirection” to “Enabled”. After this, we need to configure the URL list for domains and websites that we will allow HTML5 Multimedia Redirection to work with.

To do this, we’ll set “Enable URL list for VMware HTML5 Multimedia Redirection” to “Enabled”, and then add YouTube to the exception list to allow HTML5 Multimedia Redirection for YouTube. In the URL list, we will add:

https://www.youtube.com/*

And that’s it!

VMware View Agent Configuration/VMware HTML5 Features/VMware WebRTC Redirection Features

We’re all using Microsoft Teams these days, and while Microsoft Teams does have VDI optimization, you need to enable what’s needed on the VMware Horizon side of things to make it work.

To do this, head over to:

Computer Configuration -> Policies -> Administrative Templates -> VMware View Agent Configuration -> VMware HTML5 Features -> VMware WebRTC Redirection Features

We’ll set “Enable Media Optimization for Microsoft Teams” to “Enabled”.

In order for Microsoft Teams VDI optimization to function, there are steps involved with the installation which aren’t covered in this post. For these steps, make sure you check out my guide on Microsoft Teams VDI Optimization for VMware Horizon.

Conclusion

Leave a comment and let me know if these helped you, or if you have any optimizations or tweaks you’d like to share with the community!

Apr 252021
 
Screenshot of a Hybrid Azure AD Joined login

If you’re using Azure AD, and have Hybrid Azure AD joined machines, special considerations must be made with non-persistent VDI workstations and VMs. This applies to Instant Clones on VMware Horizon.

Due to the nature of non-persistent VDI, machines are created and destroyed on the fly with a user getting an entirely new workstation on every login.

Hybrid Azure AD joined workstations not only register on the local domain Active Directory, but also register on the Azure AD (Azure Active Directory).

The Problem

If you have Hybrid Azure AD configured and machines performing the Hybrid Join, this will cause numerous machines to be created on Azure AD, in a misconfigured and/or unregistered state. When the non-persistent instant clone is destroyed and re-created, it will potentially have the same computer name as a previous machine, but will be unable to utilize the existing registration.

This conflict state could potentially make your Azure AD computer OU a mess.

VMware Horizon 8 version 2303 now supports Hybrid Azure AD joined non-persistent instant clones using Azure AD Connect. If you are using an older version, or using a different platform for non-persistent VDI, you’ll need to reference the solution below.

The Solution

Please see below for a few workarounds and/or solutions:

  1. Upgrade to VMware Horizon 8 2303
  2. Use Seamless SSO instead of Hybrid Azure AD join (click here for more information)
  3. Utilize login/logoff scripts to Azure AD join and unjoin on user login/logoff. You may have to create a cleanup script to remove old/stale records from Azure AD as this can and will create numerous computer accounts on Azure AD.
  4. Do not allow non-persistent virtual machines to Hybrid Domain Join. This can be accomplished either by removing the non-persistent VDI computer OU from synchronization with Azure AD Connect (OU Filtering information at https://docs.microsoft.com/en-us/azure/active-directory/hybrid/how-to-connect-sync-configure-filtering) or by disabling the scheduled task to perform an Azure AD join.

In my environment I elected to remove the non-persistent computer OU from Azure AD Connect sync, and it’s been working great. It also keeps my Azure Active Directory nice and clean.

Jan 172021
 

After upgrading from Horizon 8 2006 to Horizon 8 2012, audio stopped working. When connected to a VDI session, audio is not being passed through to the client.

The Problem

Audio simply does not work. Using the Chrome and multimedia redirection, audio will work, but this is most likely due to the fact the client is handling multimedia.

The Fix

Removing the audio drivers (forcing uninstall/deleting the audio driver) and re-installing the agent does not correct this.

Uninstalling and reinstalling the Horizon Client does not correct this.

Audio does function on the Horizon Android client so I isolated this to the Windows client.

After further troubleshooting, I opened the Windows Sound mixer (Right click on the audio icon in the system tray, select “Open Volume Mixer”). I noticed that not only was the VMware Horizon client at 0, but it was also muted.

VMware Horizon View Client Audio Mixer

Unmuting this and raising the volume slider resolved the issue.