Jan 212022
 
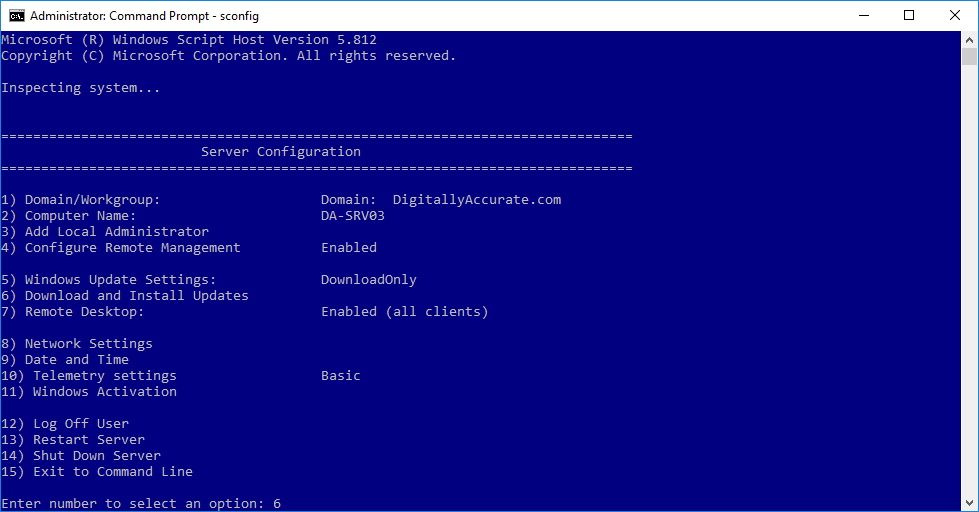
sconfig Server Configuration menu

We’re all used to updating our Windows Server operating systems with the Windows Update GUI, but did you know that you can update your server using command prompt and “sconfig”?

The past few years I’ve been managing quite a few Windows Server Core Instances that as we all know, do not have a GUI. In order to update those instances, you need to run Windows Update using the command line, but this method actually also works on normal Windows Server instances with the GUI as well!

Windows Update from CLI (Command Prompt)

Please enjoy this video or read on for why and how!

Why?

Using a GUI is great, however sometimes it’s not needed, and sometimes it even causes problems if it looses the backend connection where it’s pulling the data from. I’ve seen this true on newer Windows operating systems where the Windows Update GUI stops updating and you just sit there thinking the updates are running, when they are actually all complete.

The GUI also creates additional overhead and clutter. If there was an easier alternative to perform this function, wouldn’t it just make sense?

On Windows Server instances that have a GUI, I find it way faster and more responsive to just open an elevated (Administrative) command prompt, and kick off Windows Updates from there.

How

You can use this method on all modern Windows Server versions:

  • Windows Server (with a GUI)
  • Windows Server Core (without a GUI)

This also works with Windows Server Update Services so you can use this method either connecting to Windows Update (Microsoft Update) or Windows Server Update Services (WSUS).

Now lets get started!

  1. Open an Administrative (elevated) command prompt
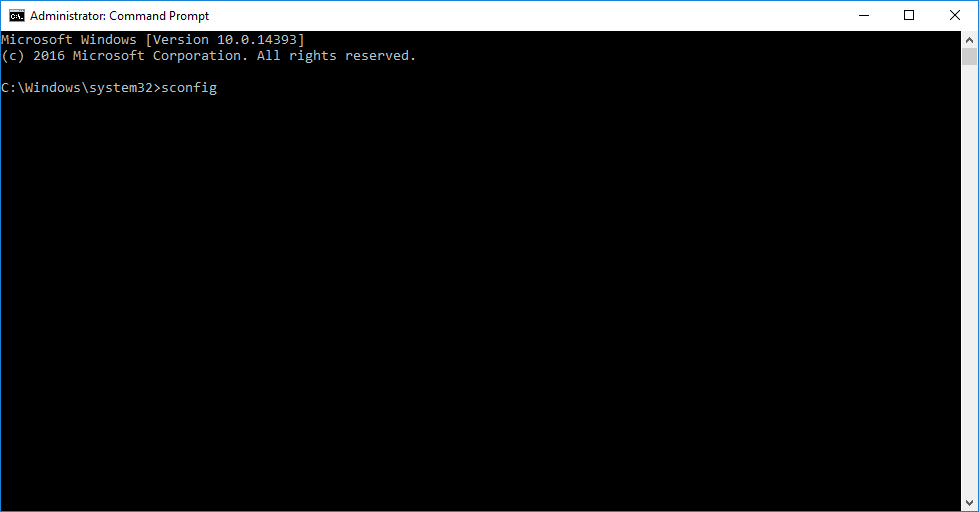
  2. Run “sconfig” to launch the “Server Configuration” application
    command prompt launch sconfig
  3. Select option “6” to “Download and Install Windows Updates”
    sconfig Server Configuration menu
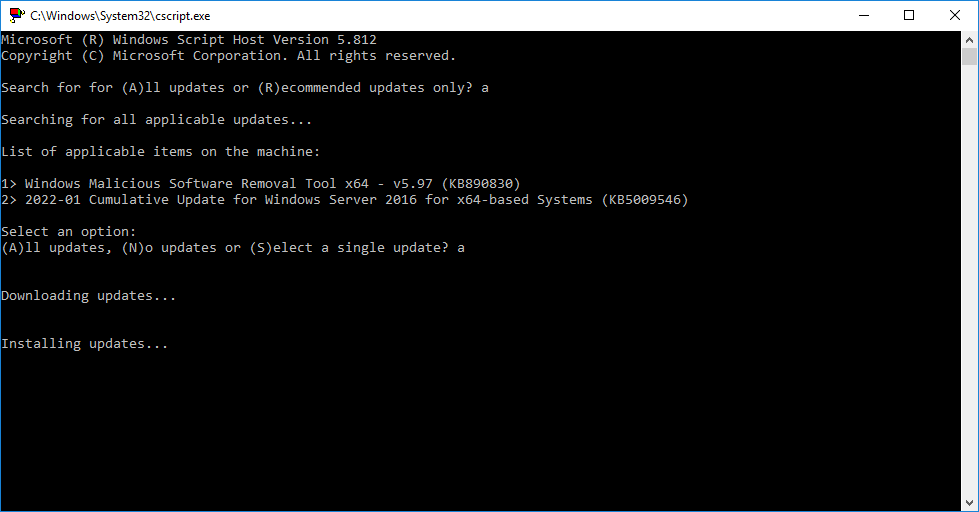
  4. Choose “A” for all updates, or “R” for recommended updates, and a scan will start
  5. After the available updates are shown, choose “A” for all updates, “N” for no updates, or “S” for single update selection

After performing the above, the updates will download and install.

sconfig Windows Update running
“sconfig” Windows Update downloading and installing

I find it so much easier to use this method when updating many/multiple servers instead of the GUI. Once the updates are complete and you’re back at the “Server Configuration” application, you can use option “13” to restart Windows.

Jan 312020
 
Microsoft Windows Server Logo Image

While us pros usually stay away from this tool, it is needed sometimes. Recently I found myself in a situation where I wanted to run the “Disk Cleanup” Windows app, on a Windows Server 2019 VM running Server Core.

As you all know, Server Core has a limited GUI. You’re able to run things like a command prompt, Task Manager, notepad, and other limited things. I wanted to see if we could get Disk Manager running on it, because of it’s light UI I was thinking it may be possible.

How to install Disk Cleanup (cleanmgr.exe) on Windows Server 2019, Server Core edition

Two files are required for Disk Cleanup:

  • cleangmgr.exe – The Disk Cleanup executable
  • cleanmgr.exe.mui – I’m assuming this is the language files required for the application

The above files when installed, are stored here:

  • C:\Windows\System32\cleanmgr.exe
  • C:\Windows\System32\en-US\cleanmgr.exe.mui

When it comes to installing Disk Cleanup, you need to have those two files placed in their appropriate directories.

You can source these files from other servers (preferably running the same version of Windows Server), or you can snag the files from the WinSXS folder on a valid Windows install. An example of the WinSXS paths can be found below:

Windows Server 2016

  • cleanmgr.exe – C:\Windows\WinSxS\amd64_microsoft-windows-cleanmgr_31bf3856ad364e35_10.0.14393.0_none_9ab8a1dc743e759a\cleanmgr.exe
  • cleanmgr.exe.mui – C:\Windows\WinSxS\amd64_microsoft-windows-cleanmgr.resources_31bf3856ad364e35_10.0.14393.0_en-us_8b4adb68af596a23\cleanmgr.exe.mui

After placing these files in their proper directory, you can open a command prompt and just type “cleanmgr” to launch the Disk Cleanup application.

These instructions also apply to the fully loaded version of Windows Server 2019 (full GUI), as well as previous versions.

May 162019
 

There may be a situation where you wish to completely reinstall WSUS from scratch. This can occur for a number of reasons, but most commonly is due to database corruption, or performance issues due to a WSUS database that hasn’t been maintained properly with the normal maintenance.

Commonly, when regular maintenance hasn’t occurred on a WSUS database, when an admin finally performs it, it can take days and weeks to re-index the database, clean up the database, and run the cleanup wizards.

Also, due to timeouts on IIS, the cleanup wizard may fail which could ultimately cause database corruption.

Administrators often want or choose to blast away their WSUS install, and completely start from scratch. I’ve done this numerous times in my own environment as well as numerous customer environments.

In this guide, we are going to assume that you’re running WSUS on a Windows Server that is dedicated to WSUS and is using the WID (Windows Internal Database) which is essentially a built-in version of SQL Express.

PLEASE NOTE: If you are using Microsoft SQL, these instructions will not apply to you and will require modification. Only use these instructions if the above applies to you.

What’s involved

WSUS (Windows Server Update Services) relies on numerous Windows roles and features to function. As part of the instructions we’ll need to completely clear out:

  • WSUS Role, Configuration, and Folders/Files
  • IIS Role, Configuration, and Folders/Files
  • WID Feature, Configuration, and Database Files

Since we are completely removing IIS (Role, Configuration, and Folders/Files), only proceed if the server is dedicated to WSUS. If you are using IIS for anything else, this will completely clear the configuration and files. You also do not want to run this on a domain controller as Active Directory also uses WID.

Let’s get to it!

Instructions

  1. Open “Server Manager” either on the host, or remotely and connect to the host you’d like to reinstall on.
  2. Open “Remove Roles and Features” wizard.
  3. Click “Next”, and select the Server, and click “Next” again.
  4. On the “Remove server roles” screen, under “Roles”, we want to de-select the following: “Web Server (IIS)” and “Windows Server Update Services” as shown below. Selecting WSUS and IIS Roles to be Removed
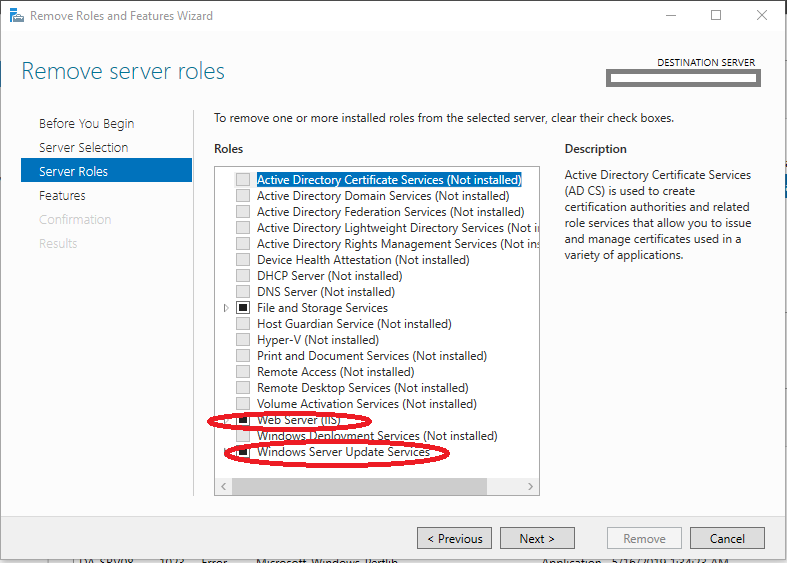
  5. Click “Next”
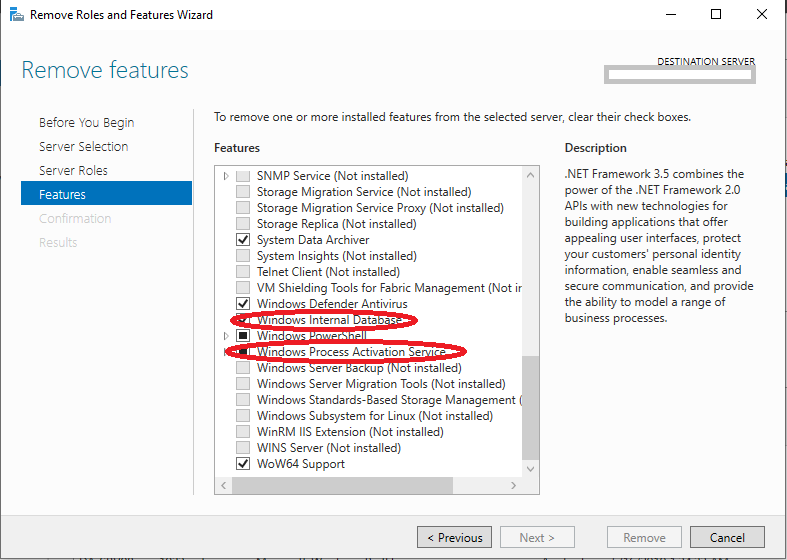
  6. On the “Remove features” screen, under “Features”, we want to de-select the following: “Windows Internal Database” and “Windows Process Activation Service” as shown below. Selecting WID and WPAS Features for Removal
  7. Click “Next” and follow the wizard to completion and remove the roles and features.
  8. Restart the Server.
  9. Open an administrative command prompt on the server, and run the command “powershell” or open powershell directly.
  10. Run the following command in powershell to remove any bits and pieces:
    Remove-WindowsFeature -Name UpdateServices,UpdateServices-DB,UpdateServices-RSAT,UpdateServices-API
  11. Restart the Server.
  12. We now must delete the WSUS folders and files. Delete the following folders:
    C:\WSUS
    C:\Program Files\Update Services

    Note: You may have stored the WSUS content directory somewhere else, please delete this as well.
  13. We now must delete the IIS folders and files (and configuration, including the WsusPool application pool, bindings, etc.). Delete the following folders:
    C:\inetpub
    C:\Windows\System32\inetsrv

    Note: You may have issues deleting the “inetsrv” directory. If this occurs, simply rename it to “inetsrv.bad”.
  14. We now must delete the WID (Windows Internal Database) folders and files (including the WSUS SQL Express database). Delete the following folder:
    C:\Windows\WID
  15. While we removed the IIS folders and files, we deleted a needed system file. Run the following command to restore the file:
    sfc /scannow
  16. Restart the Server.

WSUS, IIS, and WID have at this point been completely removed. We will now proceed to install, apply a memory fix, and configure WSUS.

For instructions on installing WSUS on Server Core, please click here: https://www.stephenwagner.com/2019/05/15/guide-using-installing-wsus-windows-server-core-2019/

  1. Open “powershell” (by typing powershell) and Install the WSUS Role with the following command:
    Install-WindowsFeature UpdateServices -Restart
  2. (Optional) If you want to install the WSUS MMC Snap-In/GUI, run the following command in the powershell window:
    Install-WindowsFeature UpdateServices-RSAT, UpdateServices-UI
  3. Run the post installation task command in command prompt to configure WSUS:
    "C:\Program Files\Update Services\Tools\wsusutil.exe" postinstall CONTENT_DIR=C:\WSUS
  4. AT THIS POINT DO NOT CONTINUE CONFIGURING WSUS AS YOU MUST APPLY A MEMORY FIX TO IIS.
  5. Apply the “Private Memory Limit (KB)” fix as provided here: https://www.stephenwagner.com/2019/05/14/wsus-iis-memory-issue-error-connection-error/
  6. Restart the Server.
  7. Open the WSUS MMC on the server or remotely from a workstation on the network and connect it to the WSUS instance on your Server Core install.
  8. Run through the wizard as you would normally and perform an synchronization.
  9. WSUS has been re-installed.

And that’s it. You’ve completely reinstalled WSUS from scratch on your Windows Server.
May 142019
 

You’re running WSUS (Windows Server Update Services) on Windows Server 2019 Server Core, and you want to run the WSUS Re-Index or WSUS Cleanup script, but you can’t because you cannot install the SQL Management Studio on Windows Server Core.

Well, there’s a way around this. To run SQL scripts on the WID (Windows Internal Database) on Windows Server Core, we’ll need to install “sqlcmd” (info here).

Now normally with Microsoft SQL, you’d simply connect remotely using the SQL Management Studio, and you can if you’re using fully blown Microsoft SQL Server with your WSUS implementation, however most of us aren’t. In most small deployments, WSUS is configured using WID (Windows Internal Database) which is essentially Microsoft SQL Express.

Microsoft SQL Express doesn’t support remote named pipe connections, and there’s no easy way to configure TCP connections with the registry editor, so the easiest way to accomplish executing SQL scripts is to install and use the “sqlcmd”.

Instructions

Install the SQLCMD command utility

  1. First we need to identify the version of SQL express that’s running WID on the server running Windows Server Core 2019.
  2. Open “notepad” and open the following file which containts the WID log.
    C:\Windows\WID\Log\error
  3. At the beginning of the log file, you’ll note the Microsoft SQL version that’s running. In my case it’s “Microsoft SQL Server 2014 (SP2-GDR)” specifically 12.0.5214.6 as shown below.
    2019-05-14 10:52:47.79 Server      Microsoft SQL Server 2014 (SP2-GDR) (KB4057120) - 12.0.5214.6 (X64) 
    	Jan  9 2018 15:03:12 
    	Copyright (c) Microsoft Corporation
    	Windows Internal Database (64-bit) on Windows NT 6.3  (Build 17763: ) (Hypervisor)
  4. The “sqlcmd” is part of the Microsoft SQL Server Feature Pack, so a quick search of “SQL Server 2014 SP2 Feature Pack” returned the following URL:
    https://www.microsoft.com/en-us/download/details.aspx?id=53164
  5. When you click download, you’ll notice multiple files. Choose the ”
    ENU\x64\MsSqlCmdLnUtils.msi” file to download.
  6. Copy this file over to your server running Windows Server Core.
  7. Execute and run the installer. Follow the prompts.
  8. You’ll notice the installer will error and require “Microsoft ODBC Driver 11 for SQL Server”. A quick search finds this download:
    https://www.microsoft.com/en-ca/download/details.aspx?id=36434
  9. Download the above file, install the “Microsoft ODBC Driver 11 for SQL Server”.
  10. Re-start the “MsSqlCmdLnUtils.msi” installer, and it should now complete.
  11. You have now installed the SQLcmd utility.

Run the WSUS Re-Index Script

  1. Download the WSUS Database Re-Index script from:
    https://gallery.technet.microsoft.com/scriptcenter/6f8cde49-5c52-4abd-9820-f1d270ddea61
  2. Copy the script to the server.
  3. Run the following command from the command prompt:
    sqlcmd -S np:\\.\pipe\Microsoft##WID\tsql\query –i C:\Folder\WsusDBMaintenance.sql

You’ve officially installed the sqlcmd and ran the WSUS Re-Index script on Windows Server Core. Congratulations!