
May 152019
 

Windows Server Core (on Windows Server 2019) is a great way to reduce the performance and security footprint of your servers. The operating system itself is minimalist and provides no GUI except for a command prompt, and some basic windows and tools.

All administration on Server Core must be performed via the command prompt, powershell, or remote administration tools (such as Server Manager, or the new Windows Admin Center.

Server Core provides a fantastic foundation for Windows Server Roles (roles that are integrated in the operating system), and can be installed with ease, managed remotely, and managed easily. It’s also nice too because you can allocate less CPU and RAM to virtual machines running Windows Server Core.

Getting started may be a bit tricky as you might need to learn and verse yourself with some commands, powershell, and remote management kung-fu, but overtime it’s easy!

Why WSUS?

I think I can speak for most admins out there when I say that a WSUS deployment typically consists of a single VM, with the WSUS, IIS, and WID roles installed.

WSUS is usually CPU and RAM intensive (when doing synchronizations), requires disk space, and doesn’t do much else. Because of the spikes, we usually keep this VM separate and don’t mix it with other LoBs or roles, with the exception of perhaps a file server.

Whether or not your VM runs WSUS alone, or also as a file server, since both of these roles are “Windows Roles and Features”, they are perfect to deploy on a Windows Server Core install.

There should be little administrative requirement on the WSUS server, other than re-indexing scripts, and cleanup scripts which can easily be ran from the command prompt, and the occasional Windows Update that will be installed.

Because you don’t require any 3rd party software, management consoles, or GUI related elements, it’s perfect for Server Core. By skipping on the GUI and applications, you’ll be able to allocate that memory, for WSUS/IIS itself.

How to Install and Configure WSUS on Windows Server Core

  1. Install Windows Server 2019 – Server Core
  2. Configure Network, Join to Domain, Update, etc.
  3. Open “powershell” (by typing powershell) and Install the WSUS Role with the following command:
    Install-WindowsFeature UpdateServices -Restart
  4. Exit powershell with “exit” and run the post installation task command in command prompt to configure WSUS:
    "C:\Program Files\Update Services\Tools\wsusutil.exe" postinstall CONTENT_DIR=C:\WSUS
  5. AT THIS POINT DO NOT CONTINUE CONFIGURING WSUS AS YOU MUST APPLY A MEMORY FIX TO IIS.
  6. Enable Remote IIS Management to manage and modify IIS config (to apply the memory fix below), as provided here: https://www.stephenwagner.com/2019/05/14/manage-remotely-iis-on-windows-server-2019-server-core/
  7. Apply “Private Memory Limit (KB)” fix as provided here: https://www.stephenwagner.com/2019/05/14/wsus-iis-memory-issue-error-connection-error/
  8. Install the “Windows Server Update Services” mmc applet which is included in the Windows 10 RSAT tools. Instructions to install the RSAT are provided here: https://www.stephenwagner.com/2018/10/05/windows-10-1809-october-update-rsat/
  9. Open the WSUS MMC on a server or workstation on the network and connect it to the WSUS instance on your Server Core install.
  10. Run through the wizard as you would normally and perform an synchronization.
  11. Modify your GPO to point your servers and workstations towards your WSUS server.
  12. Enable Windows Update “Features on Demand” and “Turn Windows features on or off” via GPO as provided here:
    https://www.stephenwagner.com/2018/10/08/enable-windows-update-features-on-demand-and-turn-windows-features-on-or-off-in-wsus-environments/
  13. Install the “sqlcmd” command so you can regularly run the WSUS re-index script, as provided here: https://www.stephenwagner.com/2019/05/14/run-wsus-cleanup-index-script-windows-server-core-without-sql-management-studio/

You’re done!

Don’t forget to regularly re-index your WSUS database and perform the routine maintenance!

Tips n Tricks

  • Need to view, modify, cut/paste, or delete files and folders? Open up notepad from the command prompt to get a simple GUI where you can do this.
  • CTRL + SHIFT + ESC will open a Task Manager to monitor the Server Core install
  • You can use “Server Manager” remotely to manage the Server Core install after you’ve enabled it inside of “sconfig”.
May 142019
 

You’re running WSUS (Windows Server Update Services) on Windows Server 2019 Server Core, and you want to run the WSUS Re-Index or WSUS Cleanup script, but you can’t because you cannot install the SQL Management Studio on Windows Server Core.

Well, there’s a way around this. To run SQL scripts on the WID (Windows Internal Database) on Windows Server Core, we’ll need to install “sqlcmd” (info here).

Now normally with Microsoft SQL, you’d simply connect remotely using the SQL Management Studio, and you can if you’re using fully blown Microsoft SQL Server with your WSUS implementation, however most of us aren’t. In most small deployments, WSUS is configured using WID (Windows Internal Database) which is essentially Microsoft SQL Express.

Microsoft SQL Express doesn’t support remote named pipe connections, and there’s no easy way to configure TCP connections with the registry editor, so the easiest way to accomplish executing SQL scripts is to install and use the “sqlcmd”.

Instructions

Install the SQLCMD command utility

  1. First we need to identify the version of SQL express that’s running WID on the server running Windows Server Core 2019.
  2. Open “notepad” and open the following file which containts the WID log.
    C:\Windows\WID\Log\error
  3. At the beginning of the log file, you’ll note the Microsoft SQL version that’s running. In my case it’s “Microsoft SQL Server 2014 (SP2-GDR)” specifically 12.0.5214.6 as shown below.
    2019-05-14 10:52:47.79 Server      Microsoft SQL Server 2014 (SP2-GDR) (KB4057120) - 12.0.5214.6 (X64) 
    	Jan  9 2018 15:03:12 
    	Copyright (c) Microsoft Corporation
    	Windows Internal Database (64-bit) on Windows NT 6.3  (Build 17763: ) (Hypervisor)
  4. The “sqlcmd” is part of the Microsoft SQL Server Feature Pack, so a quick search of “SQL Server 2014 SP2 Feature Pack” returned the following URL:
    https://www.microsoft.com/en-us/download/details.aspx?id=53164
  5. When you click download, you’ll notice multiple files. Choose the ”
    ENU\x64\MsSqlCmdLnUtils.msi” file to download.
  6. Copy this file over to your server running Windows Server Core.
  7. Execute and run the installer. Follow the prompts.
  8. You’ll notice the installer will error and require “Microsoft ODBC Driver 11 for SQL Server”. A quick search finds this download:
    https://www.microsoft.com/en-ca/download/details.aspx?id=36434
  9. Download the above file, install the “Microsoft ODBC Driver 11 for SQL Server”.
  10. Re-start the “MsSqlCmdLnUtils.msi” installer, and it should now complete.
  11. You have now installed the SQLcmd utility.

Run the WSUS Re-Index Script

  1. Download the WSUS Database Re-Index script from:
    https://gallery.technet.microsoft.com/scriptcenter/6f8cde49-5c52-4abd-9820-f1d270ddea61
  2. Copy the script to the server.
  3. Run the following command from the command prompt:
    sqlcmd -S np:\\.\pipe\Microsoft##WID\tsql\query –i C:\Folder\WsusDBMaintenance.sql

You’ve officially installed the sqlcmd and ran the WSUS Re-Index script on Windows Server Core. Congratulations!

Feb 182017
 
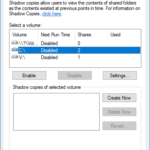
Windows Server Volume Shadow Copy Volumes Snapshot Screenshot

On VMware vSphere ESXi 6.5, 6.7, and 7.0, a condition exists where one is unable to take a quiesced snapshot. This is an issue that effects quite a few people and numerous forum threads can be found on the internet by those searching for the solution.

This issues can occur both when taking manual snapshots of virtual machines when one chooses “Quiesce guest filesystem”, or when using snapshot based backup applications such as vSphere Data Protection (vSphere vDP), Veeam, or other applications that utilize quiesced snapshots.

The Issue

I experienced this problem on one of my test VMs (Windows Server 2012 R2), however I believe it can occur on newer versions of Windows Server as well, including Windows Server 2016 and Windows Server 2019.

When this issue occurs, the snapshot will fail and the following errors will be present:

An error occurred while taking a snapshot: Failed to quiesce the virtual machine.
An error occurred while saving the snapshot: Failed to quiesce the virtual machine.

Performing standard troubleshooting, I restarted the VM, checked for VSS provider errors, and confirmed that the Windows Services involved with snapshots were in their correct state and configuration. Unfortunately this had no effect, and everything was configured the way it should be.

I also tried to re-install VMWare tools, which had no effect.

PLEASE NOTE: If you experience this issue, you should confirm the services are in their correct state and configuration, as outlined in VMware KB: 1007696. Source: https://kb.vmware.com/s/article/1007696

The Fix

In the days leading up to the failure when things were running properly, I did notice that the quiesced snapshots for that VM were taking a long time process, but were still functioning correctly before the failure.

This morning during troubleshooting, I went ahead and deleted all the Windows Volume Shadow Copies (VSS Snapshots) which are internal and inside of the Virtual Machine itself. These are the shadow copies that the Windows guest operating system takes on it’s own filesystem (completely unrelated to VMware).

To my surprise after doing this, not only was I able to create a quiesced snapshot, but the snapshot processed almost instantly (200x faster than previously when it was functioning).

If you’re comfortable deleting all your snapshots, it may also be a good idea to fully disable and then re-enable the VSS Snapshots on the volume to make sure they are completely deleted and reset.

I’m assuming this was causing a high load for the VMware snapshot to process and a timeout was being hit on snapshot creation which caused the issue. While Windows volume shadow copies are unrelated to VMware snapshots, they both utilize the same VSS (Volume Shadow Copy Service) system inside of windows to function and process. One must also keep in mind that the Windows volume shadow copies will of course be part of a VMware snapshot since they are stored inside of the VMDK (the virtual disk) file.

PLEASE NOTE: Deleting your Windows Volume Shadow copies will delete your Windows volume snapshots inside of the virtual machine. You will lose the ability to restore files and folders from previous volume shadow copy snapshots. Be aware of what this means and what you are doing before attempting this fix.