Jul 172022
 
VMware vSphere ESXi with vTPM from NKP

It’s been coming for a while: The requirement to deploy VMs with a TPM module… Today I’ll be showing you the easiest and quickest way to create and deploy Virtual Machines with vTPM on VMware vSphere ESXi!

As most of you know, Windows 11 has a requirement for Secureboot as well as a TPM module. It’s with no doubt that we’ll also possibly see this requirement with future Microsoft Windows Server operating systems.

While users struggle to deploy TPM modules on their own workstations to be eligible for the Windows 11 upgrade, ESXi administrators are also struggling with deploying Virtual TPM modules, or vTPM modules on their virtualized infrastructure.

What is a TPM Module?

TPM stands for Trusted Platform Module. A Trusted Platform Module, is a piece of hardware (or chip) inside or outside of your computer that provides secured computing features to the computer, system, or server that it’s attached to.

This TPM modules provides things like a random number generator, storage of encryption keys and cryptographic information, as well as aiding in secure authentication of the host system.

In a virtualization environment, we need to emulate this physical device with a Virtual TPM module, or vTPM.

What is a Virtual TPM (vTPM) Module?

A vTPM module is a virtualized software instance of a traditional physical TPM module. A vTPM can be attached to Virtual Machines and provide the same features and functionality that a physical TPM module would provide to a physical system.

vTPM modules can be can be deployed with VMware vSphere ESXi, and can be used to deploy Windows 11 on ESXi.

Deployment of vTPM modules, require a Key Provider on the vCenter Server.

For more information on vTPM modules, see VMware’s “Virtual Trust Platform Module Overview” documentation.

Deploying vTPM (Virtual TPM Modules) on VMware vSphere ESXi

In order to deploy vTPM modules (and VM encryption, vSAN Encryption) on VMware vSphere ESXi, you need to configure a Key Provider on your vCenter Server.

Traditionally, this would be accomplished with a Standard Key Provider utilizing a Key Management Server (KMS), however this required a 3rd party KMS server and is what I would consider a complex deployment.

VMware has made this easy as of vSphere 7 Update 2 (7U2), with the Native Key Provider (NKP) on the vCenter Server.

The Native Key Provider, allows you to easily deploy technologies such as vTPM modules, VM encryption, vSAN encryption, and the best part is, it’s all built in to vCenter Server.

Enabling VMware Native Key Provider (NKP)

To enable NKP across your vSphere infrastructure:

  1. Log on to your vCenter Server
  2. Select your vCenter Server from the Inventory List
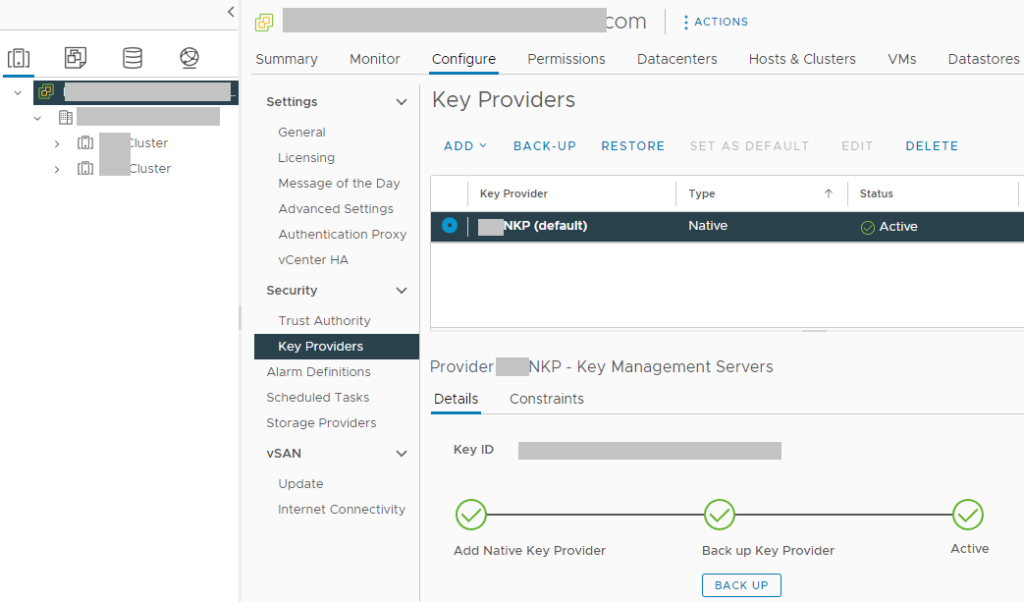
  3. Select “Key Providers”
  4. Click on “Add”, and select “Add Native Key Provider”
  5. Give the new NKP a friendly name
  6. De-select “Use key provider only with TPM protected ESXi hosts” to allow your ESXi hosts without a TPM to be able to use the native key provider.

In order to activate your new native key provider, you need to click on “Backup” to make sure you have it backed up. Keep this backup in a safe place. After the backup is complete, you NKP will be active and usable by your ESXi hosts.

Screenshot of VMware vCenter Server with Native Key Provider (NKP) Configured
VMware vCenter with Native Key Provider (NKP) Configured

There’s a few additional things to note:

  • Your ESXi hosts do NOT require a physical TPM module in order to use the Native Key Provider
    • Just make sure you disable the checkbox “Use key provider only with TPM protected ESXi hosts”
  • NKP can be used to enable vTPM modules on all editions of vSphere
  • If your ESXi hosts have a TPM module, using the Native Key Provider with your hosts TPM modules can provide enhanced security
    • Onboard TPM module allows keys to be stored and used if the vCenter server goes offline
  • If you delete the Native Key Provider, you are also deleting all the keys stored with it.
    • Make sure you have it backed up
    • Make sure you don’t have any hosts/VMs using the NKP before deleting

You can now deploy vTPM modules to virtual machines in your VMware environment.
Oct 092021
 
Windows 11 Logo

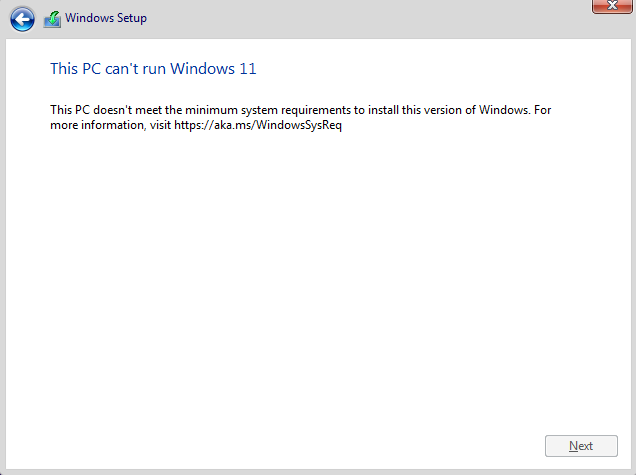
When attempting to do a fresh install of Windows 11 using the ISO, you may receive the message “This PC can’t run Windows 11”. Additionally, “This PC doesn’t meet the minimum system requirements to install this version of Windows.”

Windows 11 has a new set of minimum system requirements and these include certain CPUs as well as a TPM 2.0 (Trusted Platform Module Version 2.0) chip, Secure Boot, and 8GB of RAM.

If you’re trying to do an upgrade instead of a fresh install, please see Windows 11 Upgrade – This PC doesn’t currently meet Windows 11 system requirements.

Below you’ll find an explanation of the problem, and two different methods to workaround it.

The Problem

You’ll see this message while performing a fresh install if your system does not meet the minimum requirements.

Windows 11 Fresh Install - This PC can't run Windows 11
Windows 11 Fresh Install – This PC can’t run Windows 11

Just like my previous post on upgrading to Windows 11, you’ll encounter this when attempting a fresh install because some pre-requisite checks are failing:

  • CPU is not supported
  • Windows 11 Installer cannot find a TPM 2.0 chip
  • Secure Boot is not enabled
  • EFI or UEFI is Required

One thing to note is that you may see these messages even if your system has a TPM 2.0 chip.

Most computers purchased in the last 6 years probably have a TPM 2 chip that just needs to be enabled via the system UEFI/EFI. If you boot to your UEFI, you can attempt to enable the TPM 2.0 chip.

It may already be enabled, however it may be configured to run at version 1.2. If this is the case, change it to version 2.0. You’ll also need to make sure you have “Secure boot” enabled.

If this doesn’t work, please see below for multiple workarounds.

The Fix

At this point in time, there are two different methods to workaround the minimum system requirements:

  1. Method 1 – Use Rufus to create a modified Windows 11 Installer from ISO and disable the TPM 2.0, Secure Boot, and 8GB of RAM requirement.
  2. Method 2 – Use native Windows 11 installer and ISO to modify registry during Windows Setup.

You can either either method, depending on which one you may find easier or more convenient.

Method 1 – Use Rufus to create a modified Windows 11 Installer from ISO and disable the TPM 2.0, Secure Boot, and 8GB of RAM requirement.

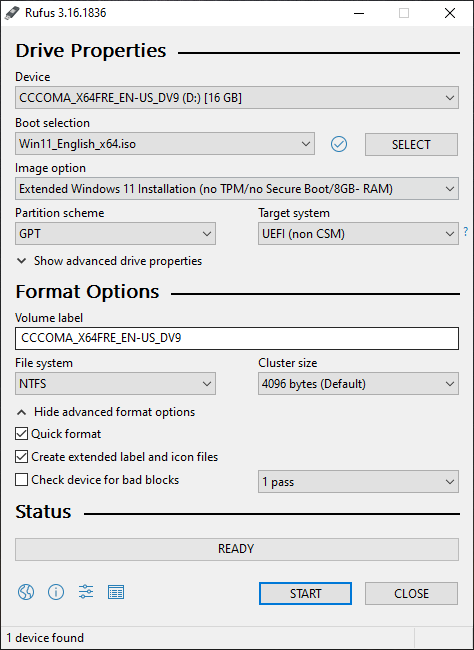
You can use a utility called “Rufus” (Reliable USB Formatting Utility, with Source) to convert the Windows 11 ISO in to a bottable USB key to install Windows.

Using the latest version of Rufus, you can modify the Windows 11 Setup installer to bypass the requirements for TPM 2.0, Secure Boot, and 8GB of RAM.

To use this method, you’ll need the following files:

Please enjoy this video demonstrating the process:

Windows 11 Fresh Install – TPM and Secure Boot Bypass for “This PC can’t run Windows 11”

To use this method as a workaround:

  1. Download Rufus and place in a folder
  2. Download Windows 11 ISO and place in a folder
  3. Insert USB key that is larger than the size of the Windows 11 ISO (larger than 5.5GB)
  4. Open Rufus
  5. Select your USB key under “Device”
  6. Under “Boot Selection”, click on “SELECT”
  7. Navigate to and select the Windows 11 ISO file
  8. Under “Image option”, choose “Extended Windows 11 Installation (no TPM/no Secure Boot/8GB- RAM”
  9. Click “Start”.
    PLEASE NOTE: This will erase and repartition your USB drive. All existing data on the USB drive will be deleted.
Rufus – Windows 11 Fresh Install TPM, Secure Boot, and RAM bypass

Now simply wait for the USB key to be created. It can take 30-90 minutes depending on the speed of your USB drive.

Once you have created the USB key, make sure your computer is configured to use UEFI and make sure you disable Secure Boot in the UEFI.

Simply boot from the USB Key your created above, and install Windows 11.

Method 2 – Use native Windows 11 installer and ISO to modify registry during Windows Setup.

Bypass the check for TPM 2.0

If you don’t have TPM 2.0 or it’s not working, you can disable the TPM 2.0 check on the Windows 11 installer. Please note, you still require TPM 1.2 for this bypass to function. This workaround only disables the requiremnt for TPM 2.0. You still need to have Secure Boot enabled, and you must have a TPM 1.2 chip.

To do this, boot from the Windows 10 ISO:

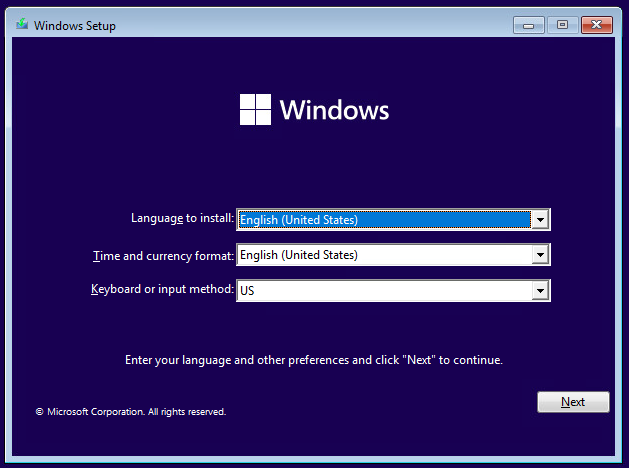
Windows 11 Installer
Windows 11 – Installer

When you see the above screen, press “SHIFT + F10” and a Windows Command Prompt should open.

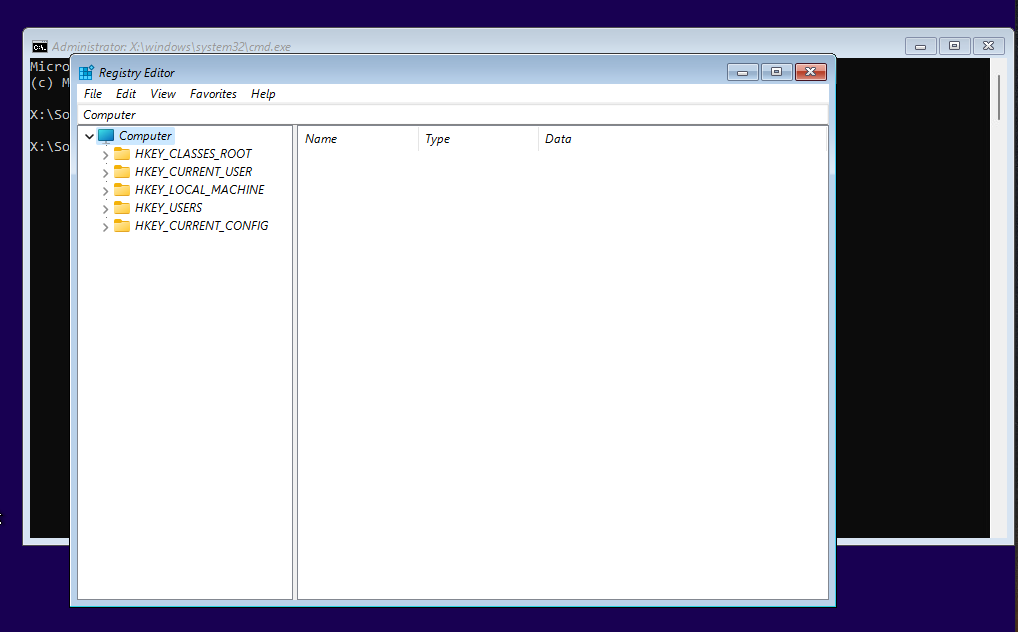
From the command prompt, type “regedit” and press enter.

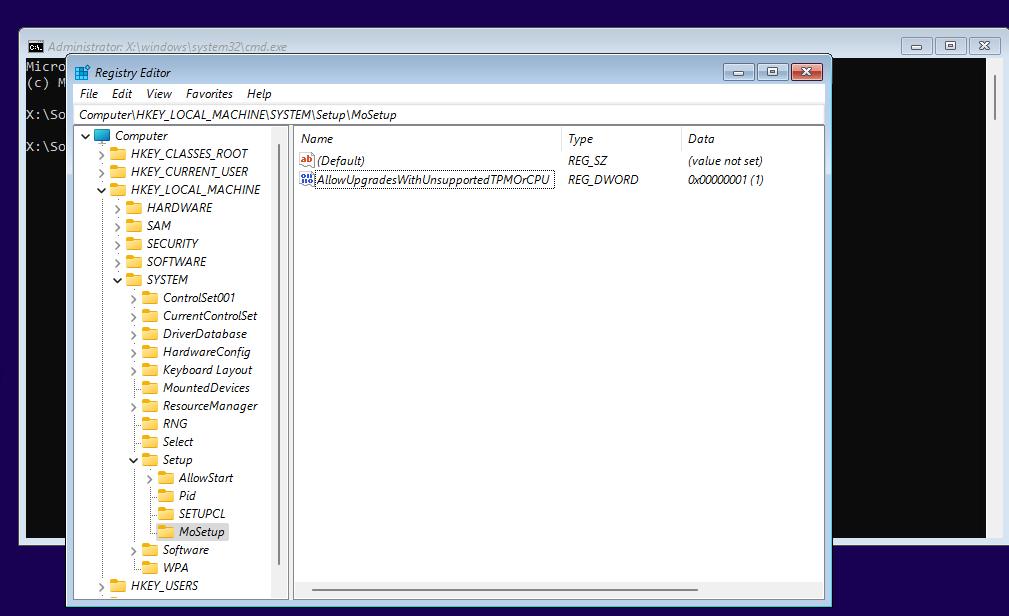
Windows 11 Installer with command prompt and Registry Editor "regedit"
Windows 11 Installer – Registry Editor “regedit”

Now we must create a registry key called “MoSetup” and a DWORD Value to disable the TPM and CPU check.

  1. Navigate to “HKEY_LOCAL_MACHINE\SYSTEM\Setup”
  2. Right click on “Setup”, select “New”, and choose “Key”, name it “MoSetup”
  3. Navigate to “MoSetup”
  4. On the right pane, right-click an empty space, select “New”, and select “DWORD (32-bit) Value”
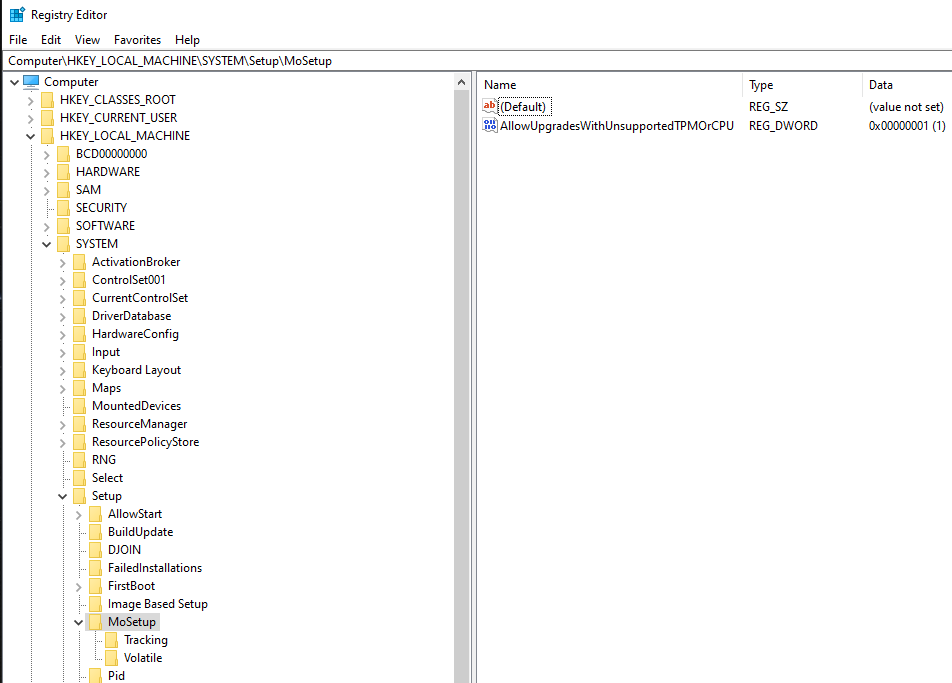
  5. Name it: “AllowUpgradesWithUnsupportedTPMOrCPU” (without quotations)
  6. Set it to “1” (without quotations)

After performing the above, it should look like this.

Windows 11 Installer - MoSetup and AllowUpgradesWithUnsupportedTPMOrCPU
Windows 11 Installer – MoSetup and AllowUpgradesWithUnsupportedTPMOrCPU

Now simply close the Registry Editor, type “exit” to close out of the command prompt and continue with the Windows 11 Installer.

After performing the above, you should now be able to successfully perform a fresh install of Windows 11 with the TPM and CPU check disabled.

Oct 072021
 
Windows 11 Logo

When attempting to upgrade to Windows 11, you may receive the message “This PC doesn’t currently meet Windows 11 system requirements”.

Windows 11 has a new set of minimum system requirements and these include certain CPUs as well as a TPM 2.0 (Trusted Platform Module Version 2.0) chip.

I ran in to this issue on a Lenovo X1 Carbon as well as an HP Z240 Workstation. The Lenovo X1 Carbon does have a TPM 2 chip, however still would not install.

If you’re trying to a fresh installation instead of an upgrade, please see Windows 11 Fresh Install – This PC can’t run Windows 11 for instructions on performing a Fresh install with TPM and Secure Boot bypass.

The Problem

You’ll see this message if your system doesn’t meet the minimum requirements.

Windows 11 installer failing with "Windows 11 - This PC doesn't currently meet Windows 11 system requirements"
Windows 11 – This PC doesn’t currently meet Windows 11 system requirements

On most systems, you’ll see the following 2 prequisite checks fail:

  • “The processor isn’t supported for this version of Windows”
  • “The PC must support TPM 2.0.”

One thing to note is that you may see these messages even if your system has a TPM 2.0 chip.

You’ll also need to make sure your system has UEFI/EFI and has Secure Boot enabled.

The Fix

You have TPM 2.0 but can’t upgrade to Windows 11

Try to check and see if you have a TPM 2.0 chip. Most systems purchased in the last 6 years probably have a TPM 2 chip that just needs to be enabled via the system BIOS or UEFI.

If you boot to your BIOS/UEFI, you can attempt to enable the TPM 2.0 chip.

You may also already have it enabled, however it is configured to run at version 1.2. If this is the case, change it to version 2.0.

You’ll also need to make sure you have “Secure boot” enabled.

Bypass the check for TPM 2.0

If you don’t have TPM 2.0, you can disable the TPM 2.0 check on the Windows 11 installer. Please note, you still require TPM 1.2 for this bypass to function.

To do this, we must make a registry key.

  1. Start -> Run -> “regedit.exe” (without quotations)
  2. Navigate to “HKEY_LOCAL_MACHINE\SYSTEM\Setup\MoSetup”
  3. On the right pane, right-click an empty space, select “New”, and select “DWORD (32-bit) Value”
  4. Name it: “AllowUpgradesWithUnsupportedTPMOrCPU” (without quotations)
  5. Set it to “1” (without quotations)

After creating this, it should appear like so:

REG_DWORD: AllowUpgradesWithUnsupportedTPMOrCPU set to “1”

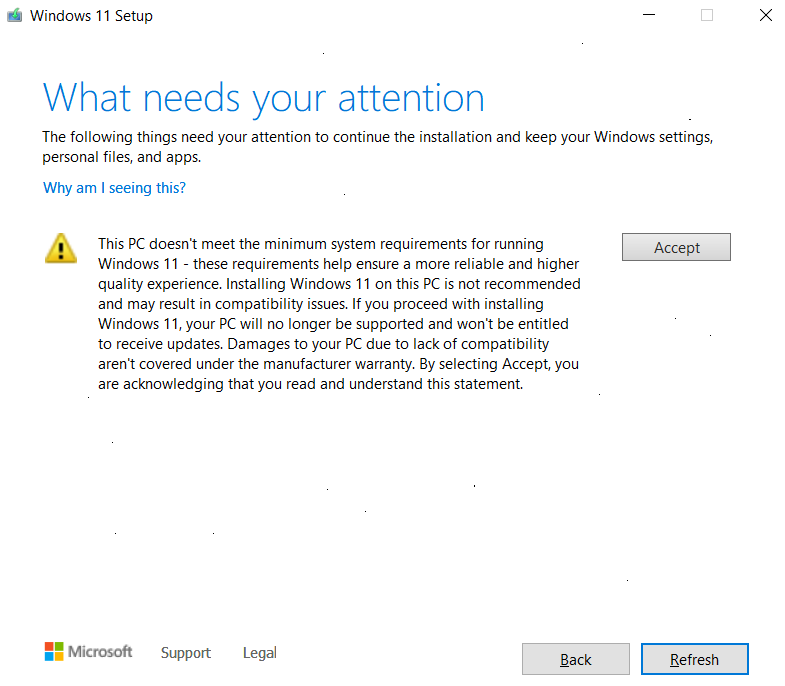
After setting this you should now be able re-launch the Windows 11 installer, and successfully install Windows 11. You’ll now notice the new message below:

Windows 11 – Bypass TPM and CPU Disclaimer

Simply “Accept” the warning and continue!

Please Note: Microsoft has warned that by using this TPM 2.0 bypass, you may run in to compatibility issues: “Your device might malfunction due to these compatibility or other issues. Devices that do not meet these system requirements will no longer be guaranteed to receive updates, including but not limited to security updates.”

You’ll see this disclaimer and warning on the Windows 11 installer after enabling the TPM 2.0 check bypass.

Additional Resources