Sep 042018
 
Microsoft Windows Logo

Microsoft is ending extended support for Windows 7 on January 14th 2020. With Windows 7 reaching it’s end of life, I highly recommend that you start planning your upgrade from Windows 7 to Windows 10.

When support ends, no more security patches or Windows updates will be available for the product. Expect numerous zero-day exploits to be released shortly after the product reaches EoL.


Important Points

  • Test all your applications (line of business applications) compatibility with Windows 10 before deploying
  • Test the OS compatibility on your infrastructure (example, SBS Small Business Server requires modification to support Windows 8 and Windows 10 properly)
  • Compare man-hours and support costs for an upgrade vs the cost of new computers which come pre-installed with Windows 10

More information can be found at https://www.digitallyaccurate.com/blog/2018/09/02/microsoft-windows-7-support-ending-january-2020-windows-7-end-of-life/

Aug 212018
 
Microsoft .NET Framework

You may notice on Windows Server 2012 R2, when applying Windows Updates that one or more .NET updates may fail with error code 0x80092004. This issue may affect all, or only some of your Windows Server 2012 R2 servers.

When troubleshooting this, you may notice numerous specific errors such as “Couldn’t find the hash of component: NetFx4-PenIMC”, or errors with a CAB file. These errors will probably come from update KB4054566 and KB4340558.

The Fix

To resolve this, we are going to download the updates MSU files from the Microsoft Update Catalog, and fully uninstall, then re-install the problematic updates.

Please Note: Always make sure you have a full backup before making modifications to your servers.

Please follow the instructions below:

  1. Create a folder called “updatefix” on the root of your C drive on the server
  2. Navigate to the Windows Update catalog at: https://www.catalog.update.microsoft.com/
  3. Search for KB4054566 and download the file for “Windows Server 2012 R2”, save it to the folder you created above called “updatefix” on the root of your C Drive. There should be one file in the download.
  4. Search for KB4340558 and download the files for “Windows Server 2012 R2”, save it to the folder you created above called “updatefix” on the root of your C Drive. There should be a total of 3 files in this download.
  5. Create a folder in the “updatefix” folder called “expanded”.
  6. Open an elevated command prompt, and run the following commands to extract the updates CAB files:
    expand -f:* "C:\updatefix\windows8.1-kb4338415-x64_cc34d1c48e0cc2a92f3c340ad9a0c927eb3ec2d1.msu" C:\updatefix\expanded\
    expand -f:* "C:\updatefix\windows8.1-kb4338419-x64_4d257a38e38b6b8e3d9e4763dba2ae7506b2754d.msu" C:\updatefix\expanded\
    expand -f:* "C:\updatefix\windows8.1-kb4338424-x64_e3d28f90c6b9dd7e80217b6fb0869e7b6dfe6738.msu" C:\updatefix\expanded\
    expand -f:* "C:\updatefix\windows8.1-kb4054566-x64_e780e6efac612bd0fcaf9cccfe15d6d05c9cc419.msu" C:\updatefix\expanded\
  7. Now let’s uninstall the problematic updates. Some of these commands may fail depending on which updates you have successfully installed. Run the following commands individually to remove the updates:
    dism /online /remove-package /packagepath:C:\updatefix\expanded\Windows8.1-KB4338424-x64.cab
    dism /online /remove-package /packagepath:C:\updatefix\expanded\Windows8.1-KB4338419-x64.cab
    dism /online /remove-package /packagepath:C:\updatefix\expanded\Windows8.1-KB4338415-x64.cab
    dism /online /remove-package /packagepath:C:\updatefix\expanded\Windows8.1-KB4054566-x64.cab
  8. Reboot your server.
  9. Now let’s cleanly install the updates. All of these commands should be successful when running. Run the following commands individually to install the updates:
    dism /online /add-package /packagepath:C:\updatefix\expanded\Windows8.1-KB4054566-x64.cab
    dism /online /add-package /packagepath:C:\updatefix\expanded\Windows8.1-KB4338415-x64.cab
    dism /online /add-package /packagepath:C:\updatefix\expanded\Windows8.1-KB4338419-x64.cab
    dism /online /add-package /packagepath:C:\updatefix\expanded\Windows8.1-KB4338424-x64.cab
  10. Reboot your server.
  11. You have now fixed the issue and all updates should now be cleanly installing via Windows Updates!

Leave a comment and let me know if this worked for you!

Aug 202018
 

An all too common problem is when users report e-mail delays ranging from 5 to 15 minutes. When troubleshing these types of issues, you’ll notice this commonly occurs when receiving e-mails from organizations that use Office 365. Specifically this occurs due to greylisting.

Why does this happen

You’re organization is using greylisting on your e-mail proxy/SMTP relay to reduce spam. Greylisting temporarily rejects the first send of an e-mail and waits for the sending server to re-transmit the message. This process usually takes around 5-15 minutes to complete. Greylisting is used because spammers won’t re-transmit the message, which leads to a massive reduction of spam messages coming through.

Once the sending server retransmits, the sending server IP address is added to your firewalls “safe senders” whitelist. From this point on the IP address (or server) will not be subject to greylisting (and any subsequent e-mails).

Office 365 has hundreds, if not thousands (possibly 10’s of thousands) of servers they use to transmit e-mail. The chance of multiple e-mails being sent from a single server is very slim, therefor greylisting is applied to every IP (server) that is sending e-mail because it’s different. Each e-mail from an Office 365 user can take 5-15 minutes, since a new server is used every time.

How to resolve

You’ll need to configure and add an exception to your e-mail proxy/SMTP relay/firewall. This exception can be based off domain, DNS name of sending server, or IP address ranges.

Scroll down for instructions on how to create an exception on a Sophos UTM.

Domain Exception

If you use domain based exceptions, you’ll need to configure these manually for each sending domain that you want your firewall to skip greylist checking. This is a very manual process, which requires lots of human intervention to continuously update your greylist exception.

DNS FQDN of MX Server

This method is the easiest, however most firewall or UTM’s will now allow these types of exceptions since a number of DNS queries will be needed everytime an e-mail comes in. One DNS query on the MX record, and then another DNS query on the DNS host contained in the MX record. If you can configure this type of exception, you’ll want to configure it as below:

*-com.mail.protection.outlook.com

IP Address Range

This is the best method. To create an IP address range exception, we’ll need a copy of all the IP address ranges or IP address spaces that Office 365 uses to send mail. This list can be found at: https://docs.microsoft.com/en-us/microsoft-365/enterprise/urls-and-ip-address-ranges?view=o365-worldwide.

We’ll need to create an exception that skips greylist checking on the IP addresses outlined in the above link. This will stop any greylist checking on e-mails from Office 365 servers.

In my case, I use a Sophos UTM firewall, and to create an exception I had to do the following:

  1. Log on to the Webmin interface.
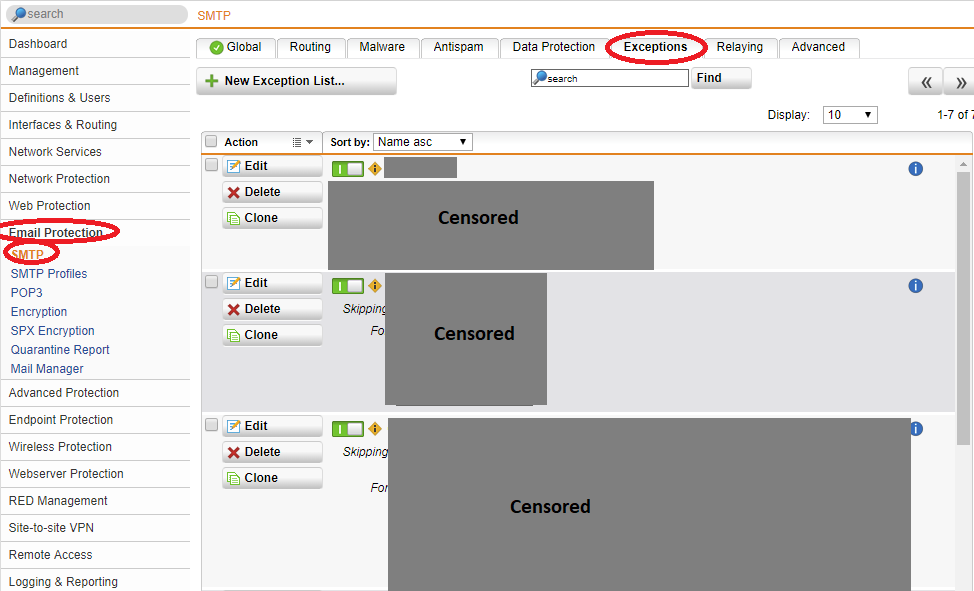
  2. Select “Email Protection”, then “STMP” on the left hand side, then “Exceptions” tab at the top.

    Sophos UTM E-Mail and SMTP Exception List

    Sophos UTM E-Mail and SMTP Exception List

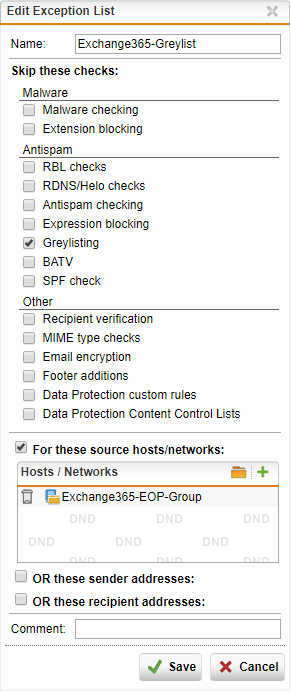
  3. Create a “New Exception List” and call it “Office 365 GreylistWhitelist”.
  4. Check the “Greylisting” box under “Antispam”, and then check the “For these source hosts/networks”.

    Sophos UTM SMTP Create Exception

    Sophos UTM SMTP Create Exception

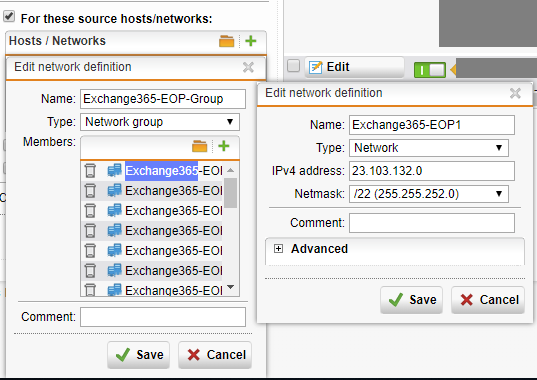
  5. Click the “+” button, and call the Network Definition “Exchange365-EOP-Group”. Change the type to “Network Group”.
  6. Click the “+” button in the members section, and start adding the IP spaces. Repeat this for each IP space (in total I added 23). Each network name (IP address space) requires a unique name, I named mine “Exchange365-EOP1” through “Exchange365-EOP23”.

    Sophos UTM SMTP Configure Exception

    Sophos UTM SMTP Configure Exception

  7. Click Save on the Network Group, and click Save on the exception.
  8. Enable the Exception

    Sophos UTM SMTP Exception Rule

    Sophos UTM SMTP Exception Rule

  9. Completed! You’ve now made the exception and delays should no longer occur.
Apr 292018
 
Directory Services Restore Mode

Running Veeam Backup and Replication, a Microsoft Windows Server Domain Controller may boot in to safe mode and directory services restore mode.

About a week ago, I loaded up Veeam Backup and Replication in to my test environment. It’s a fantastic product, and it’s working great, however today I had a little bit of an issue with a DC running Windows Server 2016 Server Core.

I woke up to a notification that the backup failed due to a VSS snapshot issue. Now I know that VSS can be a little picky at times, so I decided to restart the guest VM. Upon restarting, she came back up, was pingable, and appeared to be running fine, however the backup kept failing with new errors, the event log was looking very strange on the server, and numerous services that were set to automatic were not starting up.

This specific server was installed using Server Core mode, so it has no GUI and is administered via command prompt over RDP, or via remote management utilities. Once RDP’ing in to the server, I noticed the “Safe Mode” branding on each corner of the display, this was very odd. I restarted the server again, this time manually trying to start Active Directory Services manually via services.msc.

This presented:

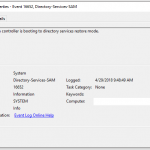
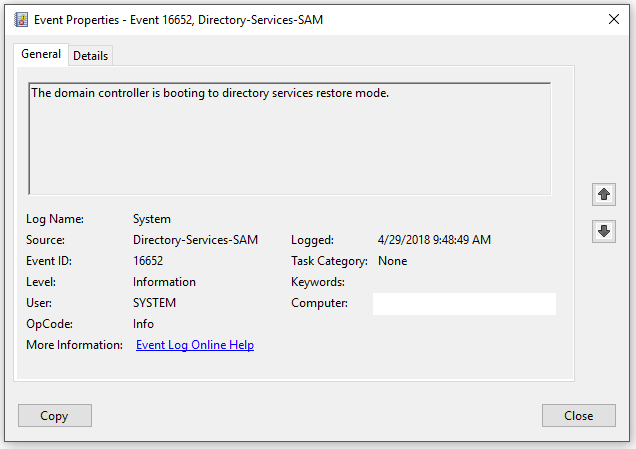
Event ID: 16652
Source: Directory-Services-SAM
General Description: The domain controller is booting to directory services restore mode.

Screenshot:

Directory Services Restore Mode

The domain controller is booting to directory services restore mode.


This surprised me (and scared me for that matter). I immediately started searching the internet to find out what would have caused this…

To my relief, I read numerous sites that advise that when an active backup is running on a guest VM which is a domain controller, Veeam activates directory services restore mode temporarily, so in the event of a restore, it will boot to this mode automatically. In my case, the switch was not changed back during the backup failure.

Running the following command in a command prompt, verifies that the safeboot switch is set to dsrepair enabled:

bcdedit /v

To disable directory services restore mode, type the following in a command prompt:

bcdedit /deletevalue safeboot

Restart the server and the issue should be resolved!

Jan 212018
 
Azure AD

This weekend I configured Azure AD Connect for pass through authentication for my on-premise Active Directory domain. This was a first for me and extremely easy to do, however there was a few issues with my firewall and SSL content filtering and scanning rules which was blocking the connection. I figured I’d create a post providing some information you’ll need to get this setup and running quickly.

In my environment, I have a Sophos UTM firewall which provides firewall services (port blocking), as well as HTTP and HTTPs scanning and filtering (web filtering).

The Problem

After running the Azure AD Connect wizard, all went good however there was an error at the end of the wizard notifying that synchronization was configured but is not occurring due to firewall. It provided a link for more information (that actually didn’t really contain the information needed).

While this issue is occurring, you’ll notice:

-Azure AD Connect in the Azure portal is reporting that pass-through authentication is Enabled, however after expanding the item, the Authentication Agent reports a status of Inactive on your internal domain controllers.

-In the Event log, under “Applications and Services Logs”, then “Microsoft”, then “AzureADConnect”, then “AuthenticationAgent”, and finally “Admin”, you’ll see the following error event:

Event ID: 12019

Source: Microsoft Azure AD Connect Authentication Agent (Microsoft-AzureADConnect-AuthenticationAgent)

Event:
The Connector stopped working because the client certificate is not valid. Uninstall the Connector and install it again. Request ID: '{WAJAJAJA-OHYA-YAAA-YAAAA-WAKAKAKAKAKAKAK}'

This event log above is due to the SSL and HTTPs content filtering.

-Azure Pass-Through authentication won’t work

The Fix

After doing some research, I came up with the following list of ports and hosts you’ll need to allow unfiltered to a specific list of hosts.

Ports

The following ports are used by Azure AD Connect:

Port 443 – SSL

Port 5671 – TCP (From the host running the Azure AD Connect to Internet)

Hosts (DNS Hosts)

Here’s the host list:

*blob.core.windows.net
*servicebus.windows.net
*adhybridhealth.azure.com
*management.azure.com
*policykeyservice.dc.ad.msft.net
*login.windows.net
*login.microsoftonline.com
*secure.aadcdn.microsoftonline-p.com
*microsoftonline.com
*windows.net
*msappproxy.net
*mscrl.microsoft.com
*crl.microsoft.com
*ocsp.msocsp.com
*www.microsoft.com

If you’re running a Sophos UTM like I am, you’ll need to create an HTTP(s) scanning exception and then import this list in to a rule “Matching these URLs”:

^https?://([A-Za-z0-9.-]*\.)?blob.core.windows.net/
^https?://([A-Za-z0-9.-]*\.)?servicebus.windows.net/
^https?://([A-Za-z0-9.-]*\.)?adhybridhealth.azure.com/
^https?://([A-Za-z0-9.-]*\.)?management.azure.com/
^https?://([A-Za-z0-9.-]*\.)?policykeyservice.dc.ad.msft.net/
^https?://([A-Za-z0-9.-]*\.)?login.windows.net/
^https?://([A-Za-z0-9.-]*\.)?login.microsoftonline.com/
^https?://([A-Za-z0-9.-]*\.)?secure.aadcdn.microsoftonline-p.com/
^https?://([A-Za-z0-9.-]*\.)?microsoftonline.com/
^https?://([A-Za-z0-9.-]*\.)?windows.net/
^https?://([A-Za-z0-9.-]*\.)?msappproxy.net/
^https?://([A-Za-z0-9.-]*\.)?mscrl.microsoft.com/
^https?://([A-Za-z0-9.-]*\.)?crl.microsoft.com/
^https?://([A-Za-z0-9.-]*\.)?ocsp.msocsp.com/
^https?://([A-Za-z0-9.-]*\.)?www.microsoft.com/

The exception I created skips:

  • Authentication
  • Caching
  • Antivirus
  • Extension Blocking
  • MIME type blocking
  • URL Filter
  • Content Removal
  • SSL Scanning
  • Certificate trust check
  • Certificate date check

After creating the exceptions, I restarted the “Microsoft Azure AD Connect Authentication Agent”. The errors stopped and Azure AD Pass-through started to function correctly! Also the status of the Authentication Agent now reports a status of active.