Oct 162018
 

In this post, I’ll be going over how to add additional and/or alternative UPN suffixes to your Active Directory. I’ll also be going over why you may require this inside of your environment.

This is also a follow up post to the article here: https://www.stephenwagner.com/2016/09/23/outlook-2016-exchange-2013-password-prompts-upn-and-samaccountname-troubles/ as Microsoft has deleted the KB 243629 article which contained the original instructions.

Why

There is a number of reasons why you may want to do this:

  1. You’re migrating to a newer version of Microsoft Outlook 2016, and require the users UPN to match the users e-mail address for auto-configure to function.
  2. Your internal domain is is a “domain.local” domain, however you want users to log in with a “domain.com” domain.
  3. You are implementing a line of business application or other piece of software that requires user’s UPNs to match their e-mail addresses.
  4. You’re performing a migration.

How

Let’s get to it! Here’s how to add an alternative UPN suffix to an Active Directory domain:

  1. Log on to your domain controller.
  2. Open “Active Directory Domains and Trusts”
  3. On the left hand side of the new window, right click on “Active Directory Domains and Trusts”, and select “Properties” (as shown below).
    Active Directory Domains and Trusts Window

    Active Directory Domains and Trusts Window


  4. Type in your new domain suffix in to the “Alternative UPN suffixes” box, and then click “Add”. As shown below.
    Add Alternative UPN suffix

    Add Alternative UPN suffix


  5. Click “Apply” and then close out of the windows.

The new UPN suffix should be available via “Active Directory Users and Computers” and you should be able to set it to users.

You can also configure the user accounts via the Exchange Administration Center (EAC). See below for an example:

Exchange Administration Center UPN Suffix

Exchange Administration Center UPN Suffix


Oct 082018
 
Microsoft Windows Logo

If you are running Microsoft Windows in a domain environment with WSUS configured, you may notice that you’re not able to install some FODs (Features on Demand), or use the “Turn Windows features on or off”. This will stop you from installing things like the RSAT tools, .NET Framework, Language Speech packs, etc…

You may see “failure to download files”, “cannot download”, or errors like “0x800F0954” when running DISM to install packages.

To resolve this, you need to modify your domain’s group policy settings to allow your workstations to query Windows Update servers for additional content. The workstations will still use your WSUS server for approvals, downloads, and updates, however in the event content is not found, it will query Windows Update.

Enable download of “Optional features” directly from Windows Update

  1. Open the group policy editor on your domain
  2. Create a new GPO, or modify an existing one. Make sure it applies to the computers you’d like
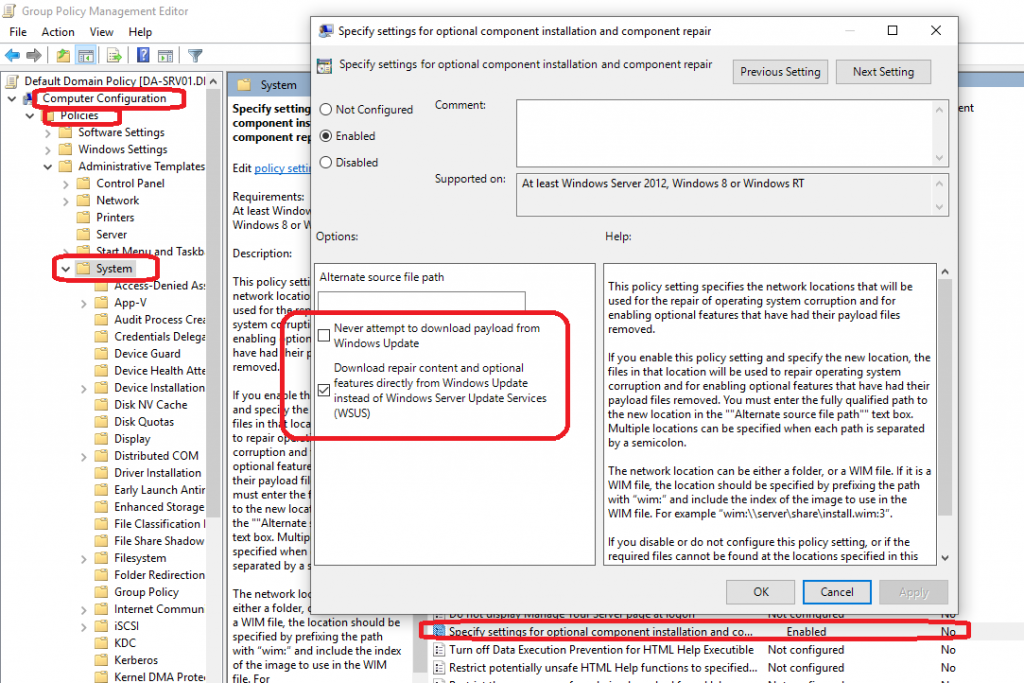
  3. Navigate to “Computer Configuration”, “Policies”, “Administrative Templates”, and then “System”.
  4. Double click or open “Specify settings for optional component installation and component repair”
  5. Make sure “Never attempt to download payload from Windows Update” is NOT checked
  6. Make sure “Download repair content and optional features directly from Windows Update instead of Windows Server Update Services (WSUS)” IS checked.
  7. Wait for your GPO to update, or run “gpupdate /force” on the workstations.

Please see an example of the configuration below:

Download repair content and optional features directly from Windows Update instead of Windows Server Update Services (WSUS)

You should now be able to download/install RSAT, .NET, Speech language packs, and more!

Oct 072018
 
Microsoft Windows Logo

Just a few words of warning when upgrading your VMware vSphere Windows 10 virtual machines to Windows 10 Version 1809 (October Update). When upgrading, after the first restart, you may notice multiple BSOD (Blue Screen of Death) with the error “Driver PNP Watchdog”. This will fail the upgrade. This issue may also occur on the Windows 10 Version 1903 (May Update).

Update – November 14 2018: This issue is still occurring on upgrades using the re-released November version of the October update.

Update and Fix – November 26th 2018: A very big thank you goes out to my reader Werner, who advised that the issue only occurs if the VM is in a snapshotted state. After his comment on this post, I decided to try upgraded without the VM in a snapshot state and it worked! Thanks Werner!

When the upgrade fails, the system will re-attempt until utlimately failing and reverting to the previous version of Windows 10.

In my case, I had a successful upgrade on numerous physical workstations, and a snapshot, so I decided to uninstall both the VMware tools agent, and VMware Horizon View agent. This had no affect and the VM still wouldn’t perform an upgrade.

I’m not sure if it’s the fact that it’s a VM, the VMware tools install, or the VMware Horizon View agent install, however I highly recommend waiting to upgrade until all the bugs get sorted out.

Leave a comment if you have anything to add! 🙂

Oct 052018
 
Microsoft Windows Logo

In this blog post I’ll explain how to install RSAT (Remote Server Administration Tools) on Windows 10. Previously, this was handled via an MSI installer, however with Microsoft Windows 10 version 1809 (October Update) and later, you must install RSAT using Features on Demand (or DISM) as the installer no long works. This will apply to all future Windows 10 releases.

Some of you may not be familiar with using the “Features on Demand” or “DISM” tool on Windows, so I decided to write up this little post to assist you in installing RSAT on the latest version of Windows 10.

Install RSAT on Windows 10 (1809 and higher)

To install RSAT on Windows 10 (version 1809 or later), open an elevated command and run the following command (as a single line):

DISM.exe /Online /add-capability /CapabilityName:Rsat.ActiveDirectory.DS-LDS.Tools~~~~0.0.1.0 /CapabilityName:Rsat.BitLocker.Recovery.Tools~~~~0.0.1.0 /CapabilityName:Rsat.CertificateServices.Tools~~~~0.0.1.0 /CapabilityName:Rsat.DHCP.Tools~~~~0.0.1.0 /CapabilityName:Rsat.Dns.Tools~~~~0.0.1.0 /CapabilityName:Rsat.FailoverCluster.Management.Tools~~~~0.0.1.0 /CapabilityName:Rsat.FileServices.Tools~~~~0.0.1.0 /CapabilityName:Rsat.GroupPolicy.Management.Tools~~~~0.0.1.0 /CapabilityName:Rsat.IPAM.Client.Tools~~~~0.0.1.0 /CapabilityName:Rsat.LLDP.Tools~~~~0.0.1.0 /CapabilityName:Rsat.NetworkController.Tools~~~~0.0.1.0 /CapabilityName:Rsat.NetworkLoadBalancing.Tools~~~~0.0.1.0 /CapabilityName:Rsat.RemoteAccess.Management.Tools~~~~0.0.1.0 /CapabilityName:Rsat.RemoteDesktop.Services.Tools~~~~0.0.1.0 /CapabilityName:Rsat.ServerManager.Tools~~~~0.0.1.0 /CapabilityName:Rsat.Shielded.VM.Tools~~~~0.0.1.0 /CapabilityName:Rsat.StorageReplica.Tools~~~~0.0.1.0 /CapabilityName:Rsat.VolumeActivation.Tools~~~~0.0.1.0 /CapabilityName:Rsat.WSUS.Tools~~~~0.0.1.0 /CapabilityName:Rsat.StorageMigrationService.Management.Tools~~~~0.0.1.0 /CapabilityName:Rsat.SystemInsights.Management.Tools~~~~0.0.1.0

*Please Note: If you are using WSUS, you may not be configured to download “optional features” from Windows Update (resulting in “cannot download”, or error “0x800F0954”). To resolve this, please follow the instructions at: https://www.stephenwagner.com/2018/10/08/enable-windows-update-features-on-demand-and-turn-windows-features-on-or-off-in-wsus-environments/

Additional Notes

You’ll notice that by using the command above, we are installing multiple “capabilities”. Below is a list of the capabilities that we install to include the full RSAT feature set:

  • Rsat.ActiveDirectory.DS-LDS.Tools~~~~0.0.1.0
  • Rsat.BitLocker.Recovery.Tools~~~~0.0.1.0
  • Rsat.CertificateServices.Tools~~~~0.0.1.0
  • Rsat.DHCP.Tools~~~~0.0.1.0
  • Rsat.Dns.Tools~~~~0.0.1.0
  • Rsat.FailoverCluster.Management.Tools~~~~0.0.1.0
  • Rsat.FileServices.Tools~~~~0.0.1.0
  • Rsat.GroupPolicy.Management.Tools~~~~0.0.1.0
  • Rsat.IPAM.Client.Tools~~~~0.0.1.0
  • Rsat.LLDP.Tools~~~~0.0.1.0
  • Rsat.NetworkController.Tools~~~~0.0.1.0
  • Rsat.NetworkLoadBalancing.Tools~~~~0.0.1.0
  • Rsat.RemoteAccess.Management.Tools~~~~0.0.1.0
  • Rsat.RemoteDesktop.Services.Tools~~~~0.0.1.0
  • Rsat.ServerManager.Tools~~~~0.0.1.0
  • Rsat.Shielded.VM.Tools~~~~0.0.1.0
  • Rsat.StorageReplica.Tools~~~~0.0.1.0
  • Rsat.VolumeActivation.Tools~~~~0.0.1.0
  • Rsat.WSUS.Tools~~~~0.0.1.0
  • Rsat.StorageMigrationService.Management.Tools~~~~0.0.1.0
  • Rsat.SystemInsights.Management.Tools~~~~0.0.1.0

For more information on this change, you can visit the following URLS:

https://www.microsoft.com/en-ca/download/details.aspx?id=45520

https://docs.microsoft.com/en-us/windows-hardware/manufacture/desktop/features-on-demand-non-language-fod#remote-server-administration-tools-rsat

https://docs.microsoft.com/en-us/windows-hardware/manufacture/desktop/features-on-demand-v2–capabilities

Sep 162018
 
Microsoft Windows Logo

I’ve noticed an issue with Microsoft Windows Server 2016, where a default install, when joined to an Active Directory Domain, will not get it’s time from the domain itself, but rather from “time.windows.com”.

I first noticed this a couple months ago when I had some time issues with one of my Server 2016 member servers. I ran “net time” which reported time from the domain controller, so I simply restarted the VM and it resolved the issue (or so I thought). I did not know there was a larger underlying issue.

While performing maintenance today, I noticed that all Windows Server 2016 VMs were getting their time from “time.windows.com”. When running “w32tm /monitor”, the hosts actually reported the PDC time sources, yet it still used the internet ntp server. I checked all my Windows Server 2012 R2 member servers and they didn’t have the issue. All workstations running Windows 10 didn’t have the issue either.

When this issue occurs, you’ll notice in the event log that the Windows Time Service actually finds your domain controllers as time sources, but then overrides it with the internet server time.windows.com for some reason. The only reference you’ll find pertaining to “time.windows.com”, will be when you run the “w32tm /query /configuration” command.

We need to change the time source from that host to the domain “NT5DS” time source. We’ll do so by resetting the configuration to default settings on the member server.

How to reset the Windows Time Service (w32tm) to default settings

PLEASE NOTE: Only run this on member servers that are experiencing this issue. Do not run this on your domain controller.

  1. Open an elevated (administrative) command prompt
  2. Run the following commands:
    net stop w32time
    w32tm /unregister
    w32tm /register
    net start w32time
  3. Restart the server (may not be needed, but is a good idea)

After doing this, when running “w32tm /query /configuration” you’ll notice the time source will now reflect “NT5DS”, and the servers should now being using your domain hierarchy time sources (domain controllers).