
So you’ve started to use or test Duo Security’s MFA/2FA technology on your network. You’ve been happy so far and you now want to begin testing or rolling out DUO MFA on your VMware Horizon View server.
VMware Horizon is great at providing an end user computing solution for your business, a byproduct of which is an amazing remote access system. With any type of access, especially remote, comes numerous security challenges. DUO Security’s MFA solution is great at provided multi-factor authentication for your environment, and fully supports VMware Horizon View.
In this guide, I’ll be providing a quick how to guide on how to get setup and configured with DUO MFA on your Horizon Server to authenticate View clients.
If you are looking to only implement DUO 2FA on the VMware Unified Access Gateway (and not the connection server), head over to my colleague’s post here: https://securedpackets.com/?p=424
Here’s a video of DUO on VMware Horizon View in action! Scroll down for instructions on how to set it up!
Enabling DUO MFA on VMWare View will require further authentication from your users via one of the following means:
- DUO Push (Push auth request to mobile app)
- Phone call (On user’s pre-configured phone number)
- SMS Passcode (Texted to users pre-configured phone number)
- PIN code from a Hardware Token
For more information on the DUO technology and authentication methods, please visit
https://www.digitallyaccurate.com/blog/2018/06/12/secure-business-enterprise-it-systems-multi-factor-authentication-duo-mfa/
Prerequisites
- VMware Horizon View Connection Server (Configured and working)
- VMware View Client (for testing)
- DUO Authentication Proxy installed, configured, and running (integrated with Active Directory)
- Completed DUO Auth Proxy config along with “[ad_client]” as primary authentication.
Please Note: For this guide, we’re going to assume that you already have a Duo Authentication Proxy installed and fully configured on your network. The authentication proxy server acts as a RADIUS server that your VMware Horizon View Connection Server will use to authenticate users against.
Instructions
The instructions will be performed in multiple steps. This includes adding the application to your DUO account, configuring the DUO Authentication Proxy, and finally configuring the VMware View Connection Server.
Add the application to your DUO account
- Log on to your DUO account, on the left pane, select “Applications”.
- Click on the Blue button “Protect an Application”.
- Using the search, look for “VMware View”, and then select “Protect this Application”.
- Record the 3 fields labelled “Integration key”, “Security key”, and “API hostname”. You’ll need these later on your authentication proxy.
- Feel free to modify the Global Policy to the settings you require. You can always change and modify these later.
- Under Settings, we’ll give it a friendly name, choose “Simple” for “Username normalization”, and optionally configure the “Permitted Groups”. Select “Save”.
Configure the DUO Authentication Proxy
- Log on to the server that is running your DUO Authentication Proxy.
- Open the file explorer and navigate to the following directory.
C:\Program Files (x86)\Duo Security Authentication Proxy\conf
- Before any changes I always make a backup of the existing config file. Copy and paste the “authproxy.cfg” file and rename the copy to “authproxy.cfg.bak”.
- Open the “authproxy.cfg” file with notepad.
- Add the following to the very end of the file:
;vmware-view
[radius_server_challenge]
ikey=YOUR_INTEGRATION_KEY
skey=YOUR_SECRET_KEY
api_host=YOUR-API-ADDRESS.duosecurity.com
failmode=safe
client=ad_client
radius_ip_1=IP-ADDY-OF-VIEW-SERVER
radius_secret_1=SECRETPASSFORDUOVIEW
port=1813
Using the values from the “Protect an Application”, replace the “ikey” with your “integration key”, “skey” with your “secret key”, and “api_host” with the API hostname that was provided. Additionally “radius_ip_1” should be set to your View Connection Server IP, and “radius_secret_1” is a secret passphrase shared only by DUO and the View connection server. - Save the file.
- Restart the DUO Authentication Proxy either using Services (services.msc), or run the following from a command prompt:
net stop DuoAuthProxy & net start DuoAuthProxy
Configure the VMware View Connection Server
- Log on to your server that runs your VMware View Connection Server.
- Open the VMware Horizon 7 Administrator web interface and log on.
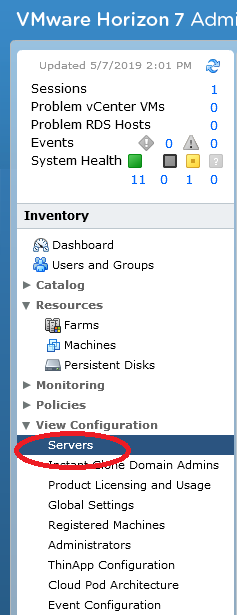
- On the left hand side, under “Inventory”, expand “View Configuration” and select “Servers”.
- On the right hand side in the “Servers” pane, click on the “Connection Servers” tab, then select your server, and click “Edit”.

- On the “Edit Connection Server Settings” window, click on the “Authentication” tab.
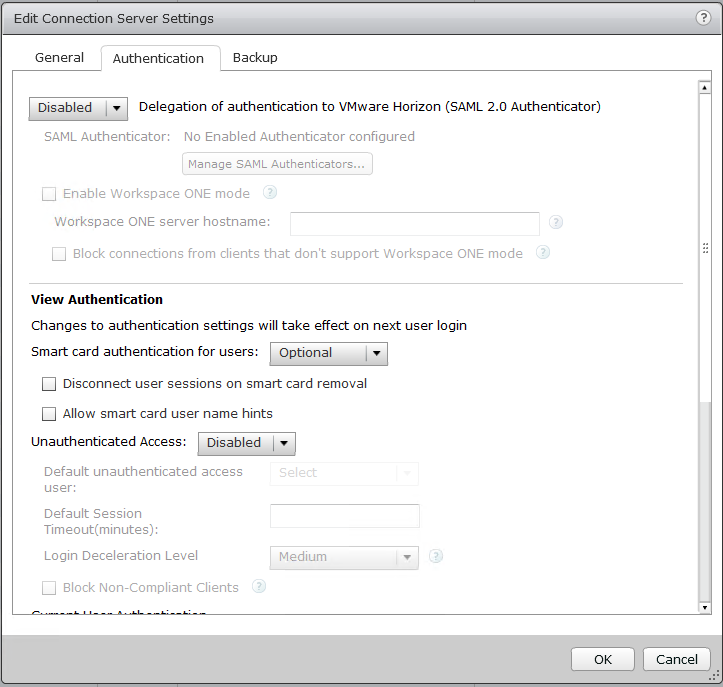
- Scroll down to the “Advanced Authentication” section, and change the “2-factor authentication” drop down, to “RADIUS”. Check both check boxes for “Enforce 2-factor and Windows user name matching”, and “Use the same user name and password for RADIUS and Windows Authentication”.

- Below the check boxes you will see “Authenticator”. Open the drop down, and select “Create New Authenticator”.
- In the “Add RADIUS Authenticator” window, give it a friendly name, friendly description, and populate the fields as specified in the screenshot below. You’ll be using the shared RADIUS/DUO secret we created above in the config file for the proxy auth.
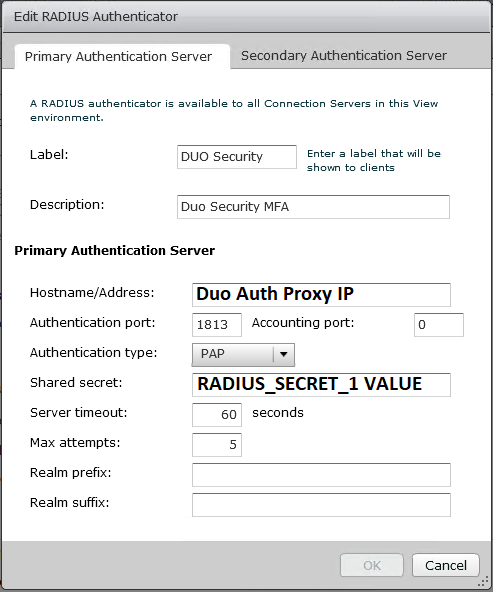
Please Note that I changed the default RADIUS port in my config to 1813. - Click “Ok”, then make sure the newly created authenticator is select in the drop down. Proceed to click “Ok” on the remaining windows, and close out of the web interface.
That’s it!
You have now completely implemented DUO MFA on your Horizon deployment. Now when users attempt to log on to your VMware View Connection server, after entering their credentials they will be prompted for a second factor of authentication as pictured below.
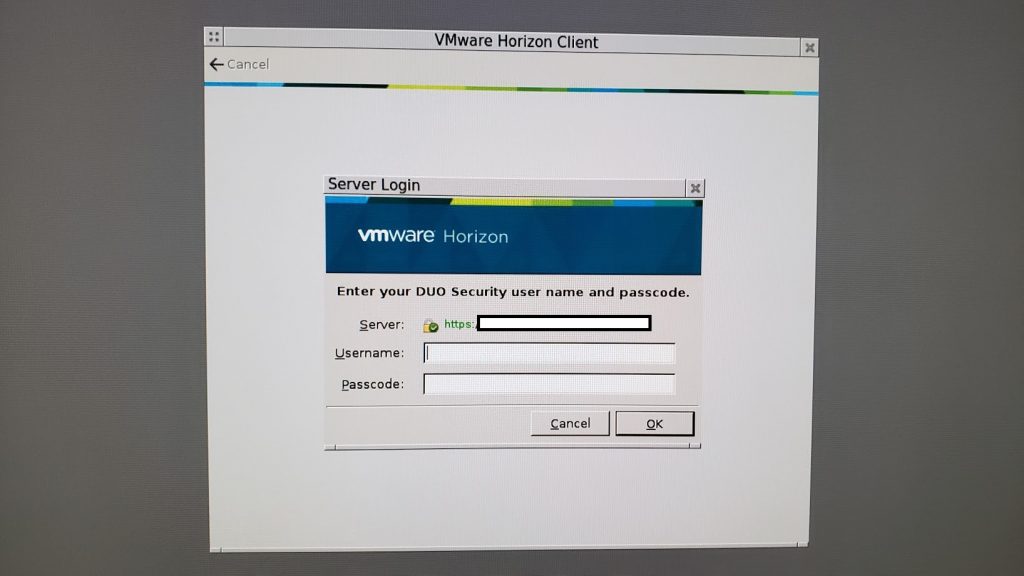
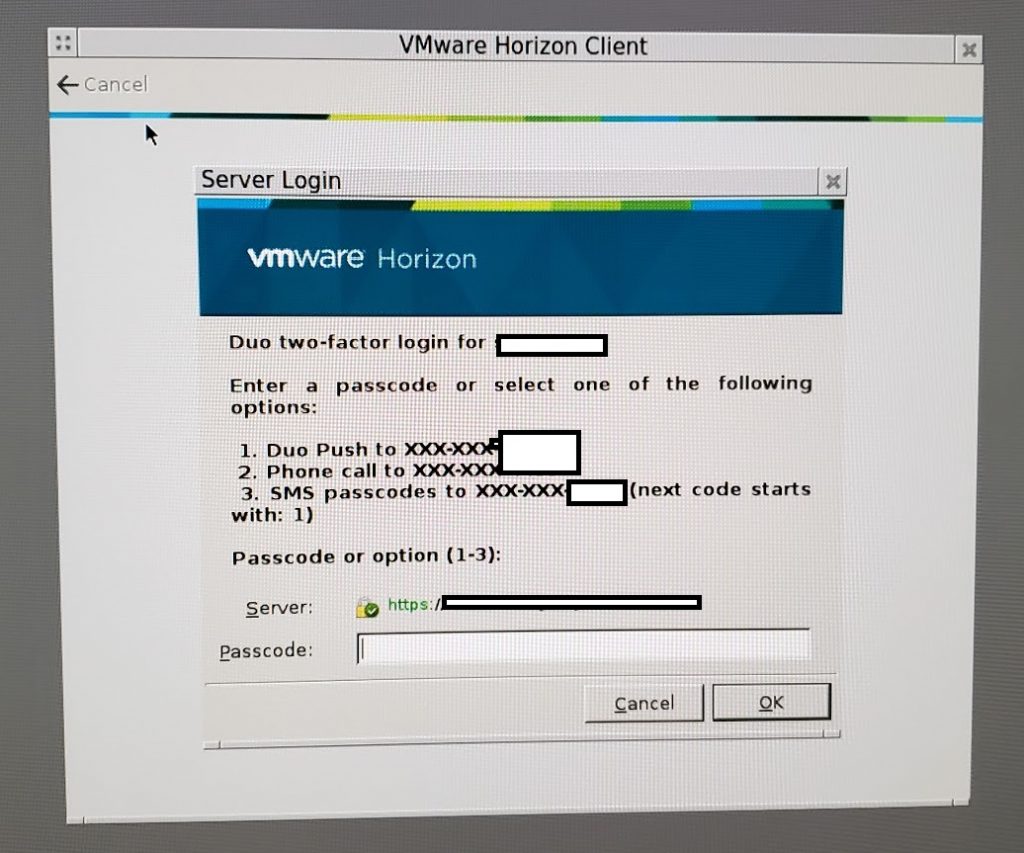
VMware Horizon View is now fully using MFA/2FA.
Leave a comment!
Hi, good explanation, but it is possible to activate the MFA for access only for specific Machines POOL and not for all?
Thanks in advance.
Luca.
Hi Luca,
Unfortunately I don’t think this is possible unless you implement it on the VM side.